
1. Introducere
This manual provides detailed instructions for the safe and efficient operation of your InFocus P120 INL412 Multimedia Projector (Model INL4128). Please read this manual thoroughly before using the projector and keep it for future reference. This projector is designed for high-quality image projection, suitable for various applications including presentations, home entertainment, and gaming.
2. Informații de siguranță
Respectați următoarele măsuri de siguranță pentru a preveni deteriorarea proiectorului și a asigura siguranța utilizatorului:
- Ventilare: Ensure adequate ventilation around the projector. Do not block ventilation openings. Maintain a minimum distance of 30 cm (12 inches) from walls or other objects.
- Sursa de alimentare: Folosiți doar sursa de alimentare și volumul specificatetage. Conectați în siguranță cablul de alimentare.
- Căldură: The projector generates heat during operation. Do not touch the projector's vents or exhaust areas directly after use.
- Ieșire luminoasă: Nu priviți direct în lentila proiectorului atunci cândamp este pornit, deoarece lumina intensă poate provoca leziuni oculare.
- Plasare: Place the projector on a stable, level surface. Avoid placing it in direct sunlight, near heat sources, or in areas with high humidity or dust.
- curatenie: Deconectați cablul de alimentare înainte de curățare. Folosiți o cârpă moale și uscată. Nu utilizați agenți de curățare lichizi sau cu aerosoli.
- Service: Nu încercați să reparați singur proiectorul. Apelați la personal de service calificat pentru toate lucrările de service.
3. Produs terminatview
3.1 Top Panel and Lens Area
The top panel features the control buttons for basic operation and the lens area with focus and zoom adjustments.

Figura 3.1: Sus view of the InFocus P120 INL412 projector, highlighting the control panel on the right and the lens adjustment area on the left. The InFocus logo is visible on the top surface.
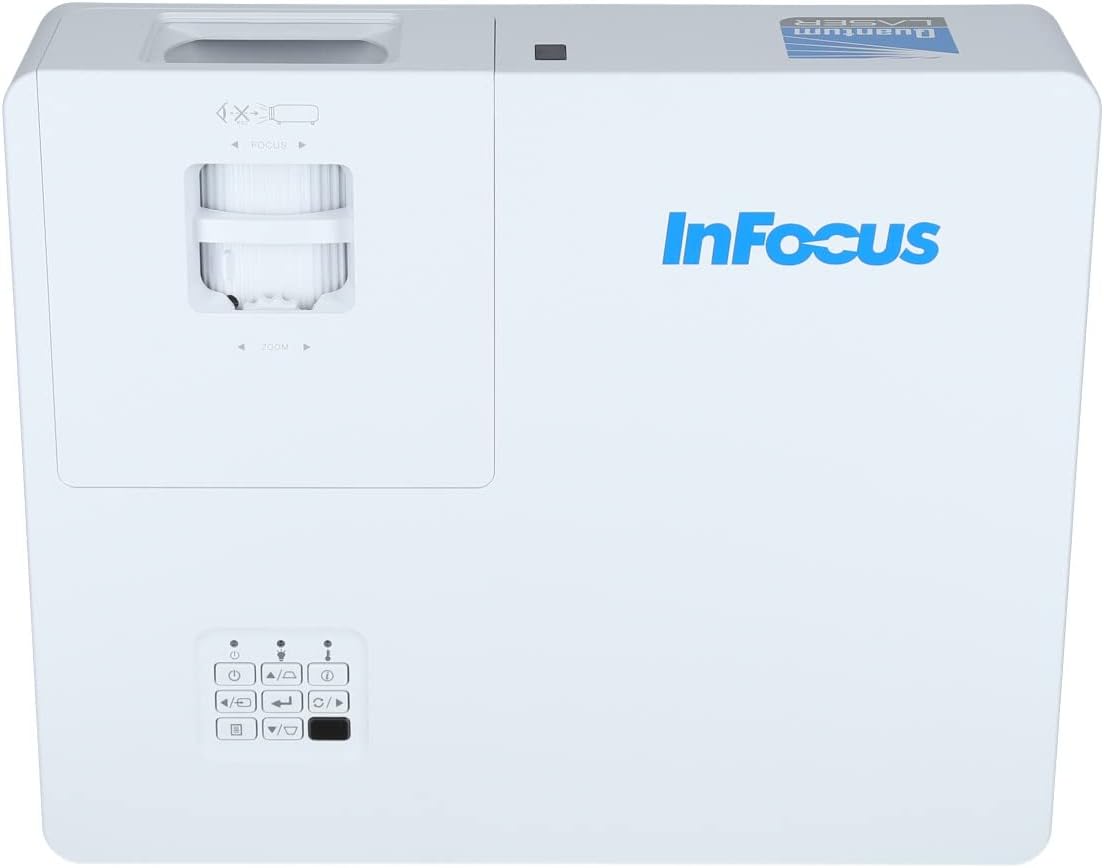
Figura 3.2: Un închidetor view of the projector's top panel, showing the focus and zoom rings near the lens opening and the array of control buttons for power, menu, source selection, and navigation.
3.2 Conexiuni la panoul din spate
The rear panel provides various input and output ports for connecting external devices.

Figure 3.3: Rear panel of the InFocus P120 INL412 projector, displaying a comprehensive array of connectivity options including HDMI (x2), USB, S-Video, Ethernet (LAN), VGA In (x2), VGA Out, RS232, and Audio In/Out ports. The power input is located on the bottom left.
Porturile cheie includ:
- HDMI 1 și 2: For connecting high-definition digital video and audio sources.
- USB: For connecting USB devices, potentially for media playback or firmware updates.
- S-Video: For connecting older video sources.
- VGA IN 1 & 2: For connecting computers or other devices with VGA output.
- IEȘIRE VGA: Pentru conectarea la un monitor extern.
- Ethernet (LAN): Pentru conectivitate și control la rețea.
- Audio IN 1 & 2 / Audio OUT: Pentru conexiuni audio analogice.
- RS232: Pentru control serial.
- Putere de intrare: Pentru conectarea cablului de alimentare CA.
3.3 Front and Side Panels
The front panel houses the projection lens and front ventilation, while the side panels feature additional ventilation grilles.

Figura 3.4: Față view of the InFocus P120 INL412 projector, displaying the main projection lens on the right and the extensive front ventilation grille on the left, crucial for heat dissipation.
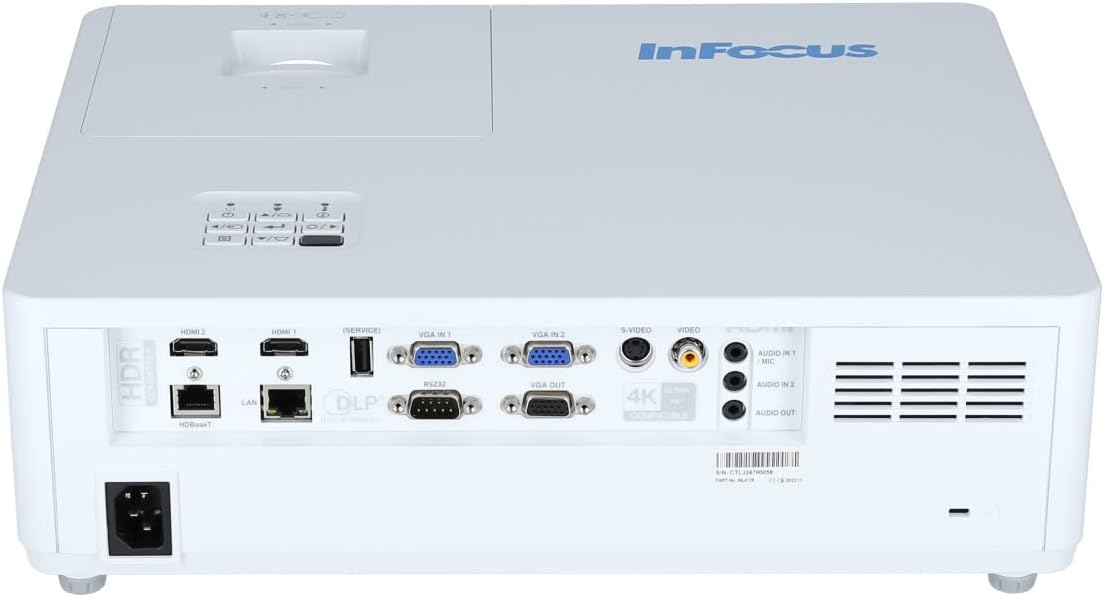
Figura 3.5: lateral view of the InFocus P120 INL412 projector, illustrating the side ventilation grilles that contribute to maintaining optimal operating temperature.
4. Configurare
4.1 Amplasarea proiectorului
Position the projector on a stable, flat surface or mount it securely. Ensure the projector is within the optimal projection distance for your screen size. Maintain clear space around the projector for proper ventilation.
4.2 Conectarea dispozitivelor
Before connecting any cables, ensure the projector and all source devices are powered off.
- Conexiune HDMI: Connect an HDMI cable from your source device (e.g., laptop, Blu-ray player, gaming console) to either the HDMI 1 or HDMI 2 port on the projector.
- Conexiune VGA: Connect a VGA cable from your computer to either VGA IN 1 or VGA IN 2. For audio, connect a separate audio cable from your computer's audio output to the corresponding Audio IN port on the projector.
- Conexiune USB: Insert a USB drive into the USB port for media playback (if supported by firmware) or service functions.
- Conexiune Ethernet (LAN): Connect an Ethernet cable to the LAN port for network control or updates.
- Ieșire audio: If using external speakers, connect an audio cable from the Audio OUT port on the projector to your audio system.
4.3 Conexiune la alimentare
Connect the power cord to the projector's power input and then plug the other end into a grounded electrical outlet.
5. Instrucțiuni de utilizare
5.1 Pornire/Oprire
- Pornire: Apăsați tasta Putere button on the projector's control panel or the remote control. The power indicator light will change.
- Oprire: Apăsați tasta Putere button again. A confirmation message may appear. Press the button a second time to confirm shutdown. Allow the projector to cool down before unplugging it.
5.2 Adjusting Focus and Zoom
Rotate the focus ring around the lens until the image appears sharp and clear. Use the zoom ring to adjust the image size to fit your screen.
5.3 Selectarea sursei de intrare
Apăsați tasta Sursă button on the control panel or remote control to cycle through available input sources (HDMI 1, HDMI 2, VGA 1, VGA 2, S-Video, USB). Select the input corresponding to your connected device.
5.4 Navigare prin meniu
Utilizați Meniu button to access the on-screen display (OSD) menu. Use the arrow buttons to navigate through menu options and the Intră Apăsați butonul pentru a selecta. Meniu din nou pentru a ieși.
6. Întreținere
6.1 Curățarea lentilei
Gently wipe the lens with a soft, lint-free cloth specifically designed for optical surfaces. Do not use abrasive cleaners or excessive force, as this can scratch the lens.
6.2 Cleaning the Projector Exterior
Folosiți o cârpă moale și uscată pentru a curăța partea proiectorului.asing. For stubborn dirt, dampen the cloth slightly with water, then wipe dry immediately. Avoid getting liquids into the projector's openings.
6.3 Ventilation Care
Regularly check the projector's ventilation grilles for dust accumulation. Use a soft brush or a vacuum cleaner with a brush attachment to gently remove dust from the vents to ensure proper airflow and prevent overheating.
7. Depanare
7.1 Nu este afișată nicio imagine
- Asigurați-vă că proiectorul este pornit și că indicatorul luminos de alimentare este aprins continuu.
- Verify that the video cable (HDMI, VGA, etc.) is securely connected to both the projector and the source device.
- Verificați dacă este selectată sursa de intrare corectă pe proiector.
- Confirm that the source device (laptop, player) is powered on and outputting a signal.
7.2 Imaginea este neclară sau nefocalizată
- Reglați inelul de focalizare de pe lentila proiectorului până când imaginea este clară.
- Ensure the projector is at the correct distance from the screen.
- Curățați lentila proiectorului dacă pare murdară.
7.3 Fără sunet
- If using HDMI, ensure the source device's audio output is set to HDMI.
- If using VGA, ensure a separate audio cable is connected from the source to the projector's Audio IN port.
- Verificați setările de volum atât pe proiector, cât și pe dispozitivul sursă.
- If using external speakers, ensure they are properly connected to the Audio OUT port and powered on.
8. Specificații
| Caracteristică | Detaliu |
|---|---|
| Marca | InFocus |
| Producător | În Focus |
| Numele modelului | P120 INL412 |
| Numărul de model | INL4128 |
| An | 2023 |
| Interfață hardware | Ethernet, HDMI, S-Video, USB |
| Număr de articole | 1 |
| Raportul de aspect | 16:9 |
| Wattage | 341 wați |
| Baterii incluse | Nu |
| Bateriile necesare | Nu |
| Factor de formă | Desktop |
| Tip de montare | Suport de masă |
| Telecomanda inclusa | Da |
| Dimensiunile produsului | 56.13 x 46.48 x 25.15 cm |
| Greutatea articolului | 5.5 kg |
| Dimensiunea maximă a imaginii | 308.28 inci |
| Dimensiunea minimă a imaginii | 910.63 milimetri |
| Prima dată disponibilă | 5 ianuarie 2022 |
9. Garanție și asistență
For warranty information and technical support, please refer to the documentation included with your purchase or visit the official InFocus webPăstrați dovada achiziției pentru reclamații în garanție.