
1. Introducere
This manual provides detailed instructions for assembling, operating, and maintaining your Gikfun Mini Amplifier Electronic Stereo Speaker Box DIY Kit. This kit is designed for enthusiasts to build a functional stereo speaker system, offering both an educational experience in electronics and a practical audio device. Please read all instructions carefully before beginning assembly.
2. Informații de siguranță
Please observe the following safety precautions during assembly and operation:
- Supravegherea adulților: This kit contains small parts and requires soldering. Adult supervision is recommended for younger users.
- Siguranța la lipire: Use appropriate ventilation when soldering. Wear safety glasses to protect your eyes from solder splatter. Avoid touching hot soldering iron tips or recently soldered components.
- Siguranta electrica: Ensure all connections are correct before applying power. Incorrect wiring can damage components or pose a fire hazard.
- Manipularea componentelor: Handle electronic components carefully to avoid damage from static electricity or physical stress.
- Sursa de alimentare: Use only the specified USB power source. Do not exceed the recommended voltage sau curent.
- Plasare: Place the assembled speakers on a stable, dry surface, away from water or excessive heat.
3. Conținutul pachetului
Verify that all components listed below are present in your kit before starting assembly. Refer to the image below for a visual representation of the kit contents.

Imagine: Pesteview of all components included in the DIY kit. This includes circuit boards, speakers, acrylic panels, resistors, capacitors, LEDs, wires, screws, and a USB cable.
- 2x PCB (Printed Circuit Boards)
- 2x 4Ohm 3W 40mm Diameter Full Range Audio Speakers
- Acrylic panels for speaker enclosures
- Various resistors, capacitors, and diodes
- LEDs for music spectrum display
- Circuite integrate (CI)
- Cablu de alimentare USB
- 3.5mm audio input cable
- Fire de conectare
- Nuts, screws, and standoffs for assembly
- Other small electronic components
4. Instrucțiuni de instalare și asamblare
Follow these steps carefully to assemble your stereo speaker kit. Basic soldering skills are required.
4.1. Component Identification and Preparation
Before soldering, identify all components. Resistors are color-coded, and capacitors have values printed on them. Ensure you have a clean workspace and your soldering iron is heated to the appropriate temperature.

Image: Technical drawing showing the dimensions of one of the 40mm speakers.

Image: Two 4Ohm 3W 40mm diameter full-range audio speakers.
4.2. Soldering Components to PCBs
Carefully solder all resistors, capacitors, diodes, ICs, and other small components onto the two provided PCBs according to the circuit diagram. Pay attention to component polarity where applicable (e.g., electrolytic capacitors, diodes, LEDs, ICs).
- Insert each component into its designated holes on the PCB.
- Bend the leads slightly to hold the component in place.
- Solder each lead, ensuring a good, shiny solder joint.
- Trim excess leads with flush cutters.
4.3. Conexiuni de cablare
Connect the speakers, USB power cable, and 3.5mm audio input cable to the PCBs as shown in the wiring diagram. Ensure secure and correct connections to avoid malfunction.
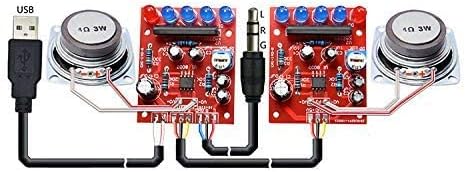
Image: Detailed wiring diagram illustrating how to connect the USB power, 3.5mm audio input, circuit boards, and speakers.
- Connect the speaker wires to the designated speaker output terminals on each PCB.
- Connect the USB power cable to the power input on one of the PCBs.
- Connect the 3.5mm audio input cable to the audio input on the appropriate PCB.
- Connect the two PCBs together using the provided interconnecting wires, ensuring correct left (L) and right (R) channel connections.
4.4. Ansamblul carcasei
Assemble the transparent acrylic enclosures for each speaker. The PCBs and speakers will fit into these enclosures.
- Peel off any protective film from the acrylic panels.
- Mount the speakers into the front panel of each enclosure using the provided screws and nuts.
- Mount the assembled PCBs into the enclosure, aligning them with the designated standoffs.
- Secure all acrylic panels together using the remaining screws and nuts to form the complete speaker boxes.

Image: Fully assembled stereo speakers with transparent acrylic enclosures and illuminated LEDs.
5. Instrucțiuni de utilizare
Once assembled, your Gikfun Mini Amplifier speakers are ready for use.
- Conectare alimentare: Plug the USB cable into a standard USB power source (e.g., computer USB port, USB wall adapter). The LEDs on the circuit boards should illuminate.
- Conectați sursa audio: Plug the 3.5mm audio jack into the headphone output of your audio device (e.g., smartphone, tablet, laptop, MP3 player).
- Redare audio: Start playing music or audio on your connected device. The speakers will output sound, and the LEDs will react to the music spectrum.

Image: Assembled speakers connected to a smartphone, illustrating typical usage.
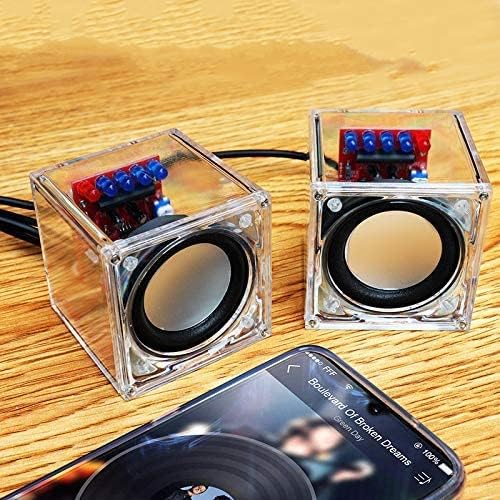
Image: The speakers in operation, connected to a mobile device.
6. Întreținere
To ensure the longevity and optimal performance of your Gikfun Mini Amplifier speakers, follow these simple maintenance guidelines:
- curatenie: Use a soft, dry cloth to wipe the acrylic enclosures. Avoid abrasive cleaners or solvents that could scratch or damage the plastic.
- Praf: Keep the speakers free from dust. A soft brush or compressed air can be used to clean crevices.
- Depozitare: When not in use for extended periods, store the speakers in a cool, dry place.
- Evitați umezeala: Do not expose the speakers to water or high humidity, as this can damage the electronic components.
7. Depanare
If you encounter issues with your Gikfun Mini Amplifier speakers, refer to the following troubleshooting tips:
| Problemă | Cauza posibila | Soluţie |
|---|---|---|
| Fără ieșire de sunet |
|
|
| Sunet distorsionat sau slab |
|
|
| LED-urile nu se aprind |
|
|
8. Specificații
Key technical specifications for the Gikfun Mini Amplifier Electronic Stereo Speaker Box DIY Kit:
- Marca: Gikfun
- Nume model: Mini Ampmai în viață
- Putere maximă de ieșire difuzor: 3 wați per difuzor
- Tip difuzor: Woofer (Full Range Audio Speaker)
- Dimensiune difuzor: 40 Millimeters Diameter
- Număr de canale audio: 2.0 (Stereo)
- Mod de ieșire audio: Stereo
- Tehnologie de conectivitate: USB (for power), 3.5mm Audio Jack (for input)
- Protocol de conectivitate: USB
- Sursa de alimentare: Electric cu fir (prin USB)
- Metoda de control: Touch (refers to the nature of the DIY kit, not a physical touch control on the device)
- Dispozitive compatibile: Desktop, Laptop, Player MP3, Smartphone, Tabletă, Televizor
- Tip de montare: Plug Mount (refers to component mounting on PCB)
- Este rezistent la apă: FALS
9. Informații despre garanție
This Gikfun product comes with a limited warranty. The warranty typically covers individual components prior to assembly for a specified period from the date of purchase. Damage resulting from improper assembly, misuse, or modification is not covered. For specific warranty terms and conditions, please refer to the product packaging or contact Gikfun customer support.
10. Asistență pentru clienți
For further assistance, technical support, or inquiries regarding your Gikfun Mini Amplifier Electronic Stereo Speaker Box DIY Kit, please contact Gikfun customer service. You can typically find contact information on the Gikfun official website-ul sau prin intermediul comerciantului de unde a fost achiziționat produsul.
Resurse online: Vizitați Gikfun Store on Amazon pentru informații despre produse și actualizări.