
D-Link DSL-224
D-Link N300 VDSL2 Router DSL-224 User Manual
Model: DSL-224
1. Introducere
This manual provides detailed instructions for the installation, configuration, and operation of your D-Link N300 VDSL2 Router, model DSL-224. This device combines a VDSL2/ADSL2+ modem and a high-speed wireless router, offering a complete solution for internet connectivity in your home or small office.
Please read this manual thoroughly before attempting to install or use the device to ensure proper setup and optimal performance.
2. Conținutul pachetului
Verificați dacă pachetul dvs. conține următoarele articole:
- D-Link N300 VDSL2 Router (DSL-224)
- Adaptor de alimentare
- Cablu Ethernet (RJ-45)
- Cablu telefonic (RJ-11)
- Ghid de instalare rapidă
If any items are missing or damaged, please contact your local D-Link reseller for assistance.
3. Suprasolicitare fizicăview
3.1 Panoul frontal
The front panel of the DSL-224 router features LED indicators that provide real-time status information about the device's operation.

Imaginea 3.1: Faţă view of the D-Link DSL-224 Router, showing the status indicator lights. From left to right, these typically include Power, DSL, Internet, Wi-Fi, and LAN activity indicators.
- LED de alimentare: Indicates if the router is powered on.
- LED-uri DSL: Indicates the status of the VDSL/ADSL connection. A solid light means a stable connection.
- LED Internet: Indicates internet connectivity. A solid light means the router has an active internet connection.
- LED WLAN: Indicates wireless network activity. Blinks when data is being transmitted wirelessly.
- LED-uri LAN (1-4): Indicate activity on the corresponding Ethernet ports.
3.2 Panoul din spate
The rear panel contains all the physical connection ports for power, DSL line, and Ethernet devices.
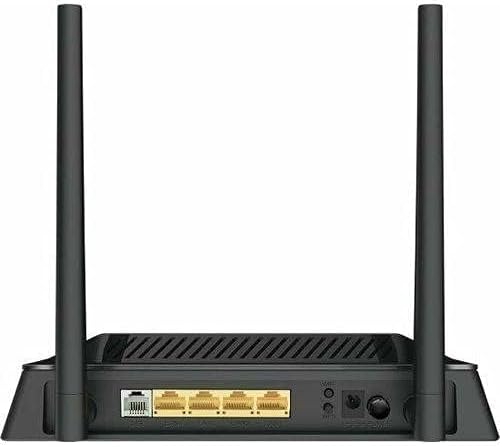
Imaginea 3.2: Spate view of the D-Link DSL-224 Router, displaying the various ports. These include the DSL port, four LAN Ethernet ports, the power input, and a reset button.
- DSL Port (RJ-11): Connects to your VDSL/ADSL line from the wall jack.
- LAN Ports (1-4, RJ-45): Se conectează la dispozitive cu fir, cum ar fi computere, console de jocuri sau imprimante de rețea.
- Port de alimentare: Se conectează la adaptorul de alimentare inclus.
- Buton de resetare: Used to restore the router to factory default settings. Press and hold for 5-10 seconds while the device is powered on.
- Butonul WPS: For easy and secure wireless connection setup.
- Buton de pornire / oprire: Pentru a porni sau opri dispozitivul.
4. Configurare
4.1 Instalare hardware
- Poziționați routerul: Place the router in a central location to maximize wireless coverage. Avoid placing it near obstructions or devices that emit radio frequency interference.
- Conectați linia DSL: Connect one end of the phone cable (RJ-11) to the DSL port on the router and the other end to your wall's VDSL/ADSL jack. If you have a splitter, connect it to the splitter's modem port.
- Conectare la un computer (opțional): For initial setup, you may connect a computer directly to one of the LAN ports on the router using an Ethernet cable (RJ-45).
- Conectare alimentare: Connect the power adapter to the router's power port and then plug the adapter into a power outlet. Press the Power On/Off button if available.
- Verificați LED-urile: Wait for the Power, DSL, and Internet LEDs to become solid green. The DSL LED may blink for a few minutes before becoming solid.
4.2 Configurație inițială (Web Interfață)
- Accesați Web Interfata: Deschide a web browser on a connected computer (wired or wireless). In the address bar, type the router's default IP address (commonly http://192.168.1.1 or http://192.168.0.1) și apăsați Enter.
- Log in: Enter the default username and password. These are usually printed on a sticker on the bottom of the router (e.g., Username: admin, Parola: admin or blank).
- Executați expertul de configurare: Follow the on-screen setup wizard to configure your internet connection (VDSL/ADSL settings provided by your Internet Service Provider) and wireless network (SSID and password).
- Schimbați parola implicită: For security, it is highly recommended to change the default administrator password for the router's web interfata.
5. Operarea routerului
5.1 Connecting Devices Wirelessly
- Găsiți rețeaua: Pe dispozitivul wireless (laptop, smartphone, tabletă), căutați rețelele Wi-Fi disponibile.
- Selectați SSID-ul: Selectați numele rețelei Wi-Fi (SSID) pe care l-ați configurat în timpul configurării.
- Introduceți parola: Enter the Wi-Fi password (WPA/WPA2 key) you set.
- Connect using WPS: Alternatively, press the WPS button on the router and then activate WPS on your wireless device within two minutes to establish a connection without entering a password.
5.2 Conectarea dispozitivelor prin Ethernet
Connect an Ethernet cable from the LAN port of your computer or other wired device to any of the available LAN ports (1-4) on the rear of the DSL-224 router.
6. Întreținere
6.1 de actualizări de firmware
Verificați periodic suportul D-Link website for firmware updates for your DSL-224 router. Firmware updates can improve performance, add new features, and fix security vulnerabilities. Follow the instructions provided with the firmware update carefully.
6.2 Resetare din fabrică
Dacă întâmpinați probleme persistente sau uitați datele de conectare, puteți efectua o resetare la setările din fabrică:
- With the router powered on, use a paperclip or a thin object to press and hold the Reset button on the rear panel for 5-10 seconds.
- Release the button when the Power LED blinks or all LEDs briefly turn off and then on.
- The router will restart with factory default settings. You will need to reconfigure your internet and wireless settings.
7. Depanare
This section addresses common issues you might encounter with your D-Link DSL-224 router.
7.1 Fără conexiune la internet
- Verificați cablurile: Asigurați-vă că toate cablurile (DSL, Ethernet) sunt conectate în siguranță.
- Verificați LED-urile: Verify that the Power, DSL, and Internet LEDs are solid green. If the DSL LED is blinking, there might be an issue with your phone line or ISP connection. If the Internet LED is off, check your ISP settings in the router's web interfata.
- Reporniți routerul: Opriți routerul, așteptați 30 secunde, apoi porniți-l din nou.
- Setări ISP: Confirm that your VDSL/ADSL settings (VPI/VCI, connection type, username, password) are correctly entered in the router's configuration. Contact your ISP if unsure.
7.2 Nu mă pot conecta la Wi-Fi
- Check WLAN LED: Ensure the WLAN LED on the front panel is lit or blinking.
- Parolă corectă: Double-check that you are entering the correct Wi-Fi password (WPA/WPA2 key).
- Puterea semnalului: Mută-te mai aproape de router pentru a îmbunătăți puterea semnalului.
- Reporniți dispozitivul: Restart your wireless device and try connecting again.
- Repornirea routerului: Restart the router as described above.
7.3 Viteză redusă a internetului
- Cu fir vs. fără fir: Test speed with a wired connection to determine if the issue is with the wireless network or the internet connection itself.
- Interferență: Reduce interference by moving the router away from other electronic devices (cordless phones, microwaves).
- Optimizarea canalului: În router web interface, try changing the wireless channel to a less congested one.
- Lățime de bandă a furnizorului de servicii de internet: Contact your ISP to verify your subscribed speed and check for any network issues on their end.
8. Specificații
Below are the technical specifications for the D-Link N300 VDSL2 Router DSL-224:
| Caracteristică | Descriere |
|---|---|
| Marca | D-Link |
| Numele modelului | DSL-224 |
| Tehnologia de conectivitate | Fără fir |
| Tip fără fir | 802.11n |
| Comunicare wireless standard | 802.11n |
| Clasa de bandă de frecvență | Dual-Band |
| Numărul de porturi | 4 (LAN) |
| Tip antenă | Fix |
| Componente incluse | Router |
| Dispozitive compatibile | Computer personal |
| Greutatea articolului | 510 g |
| Dimensiuni pachet | 22.2 x 17.4 x 7.8 cm |
9. Garanție și asistență
For warranty information and technical support, please refer to the warranty card included with your product or visit the official D-Link support website. You can typically find drivers, firmware updates, and additional support resources there.
Asistență D-Link Website: www.dlink.com/support (Please note: This is a generic example URL. Refer to your product's specific documentation for the correct regional support link.)
Ask a question about this manual
Ask about setup, troubleshooting, compatibility, parts, safety, or missing instructions. Manuals+ will review the question and use this page’s manual context to help answer it.