
1. Introducere
Thank you for choosing the Vancer Gretxa Wireless Ultralight Gaming Mouse. This manual provides essential information for setting up, operating, and maintaining your new gaming mouse. Please read it thoroughly to ensure optimal performance and longevity of your device.
Conținutul pachetului
The Vancer Gretxa Wireless Ultralight Gaming Mouse package includes the following items:
- Vancer Gretxa Wireless Gaming Mouse
- USB-C to USB-A Charging Cable (Red)
- USB Extension Dongle
- Dongle receptor wireless
- Extra Set of PTFE Skates
- Ghid de pornire rapidă
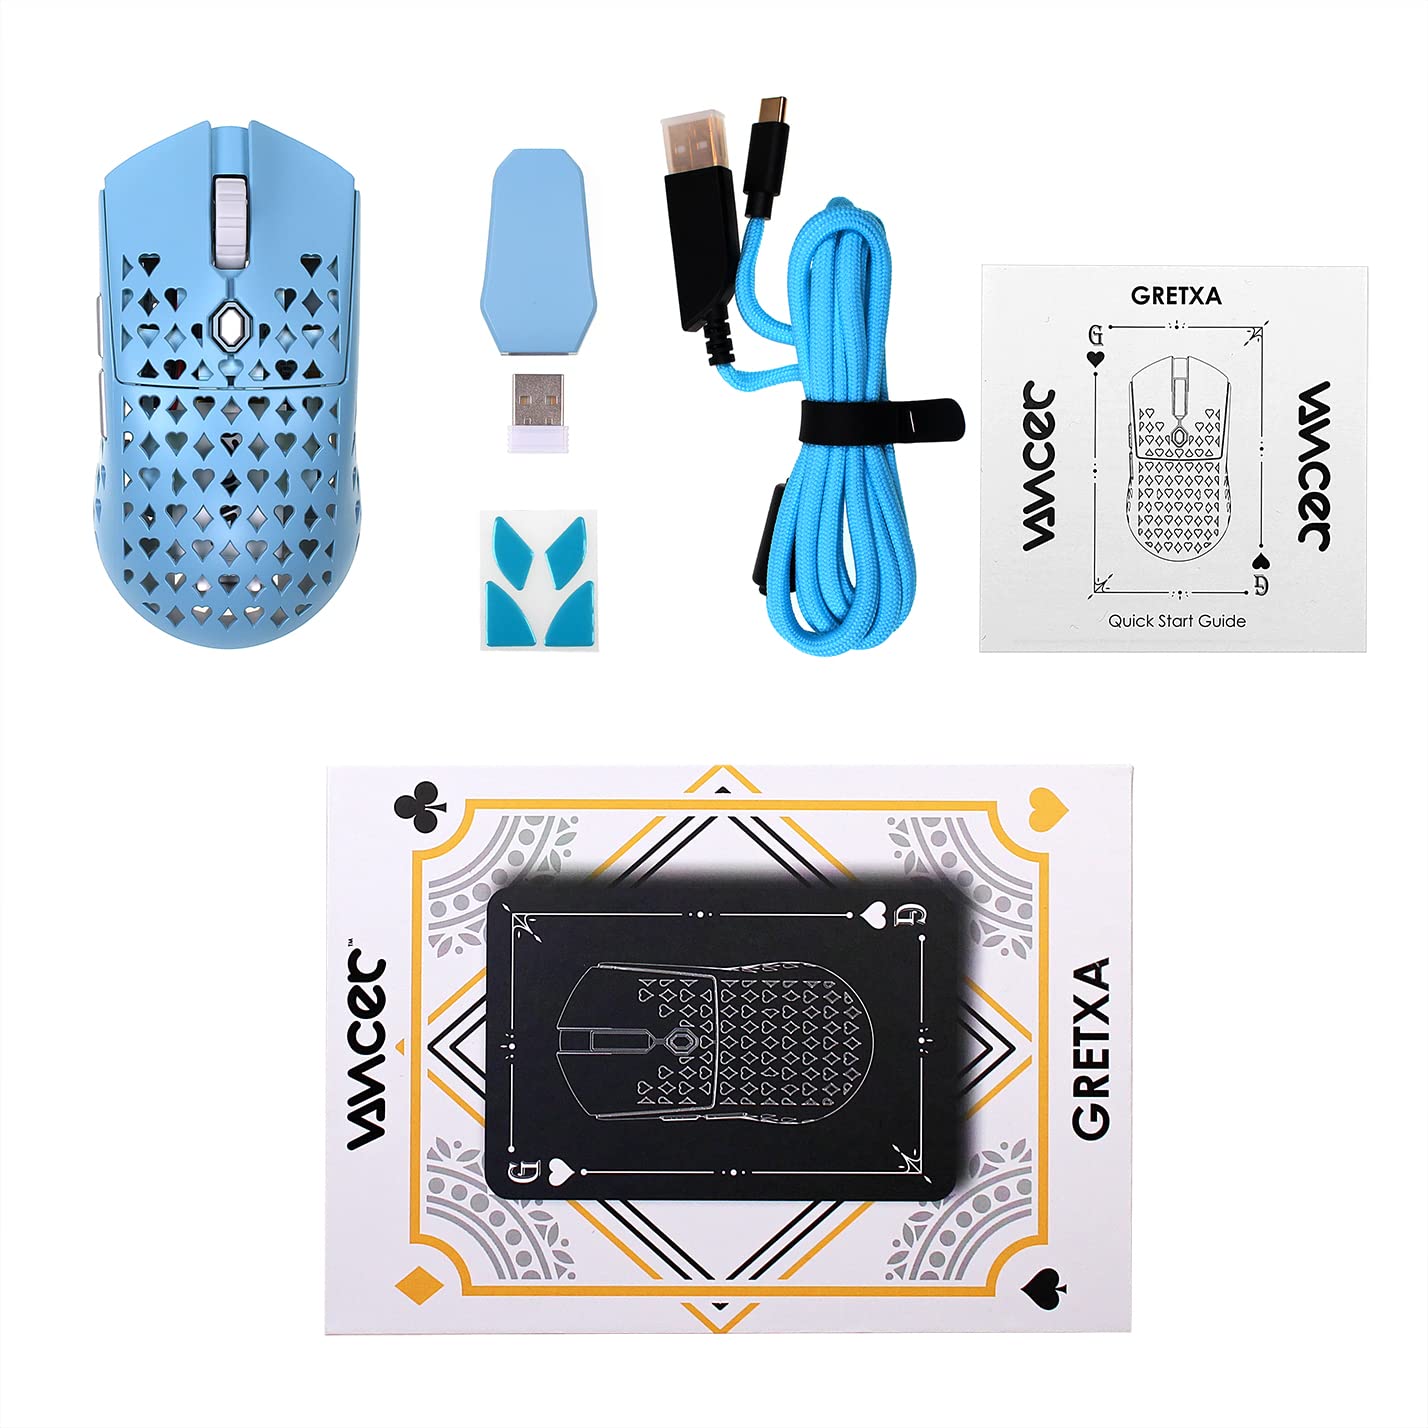
2. Configurare
2.1 Conectarea receptorului wireless
- Locate the wireless receiver dongle.
- Plug the receiver dongle into an available USB-A port on your computer. For optimal signal strength, use the provided USB extension dongle to place the receiver closer to the mouse.
- Porniți mouse-ul folosind comutatorul de alimentare situat pe partea inferioară a mouse-ului.
- Your computer should automatically detect the mouse. No additional drivers are typically required for basic functionality on Windows 10.
2.2 Încărcarea mouse-ului
The Vancer Gretxa mouse is equipped with a rechargeable Lithium Ion battery.
- Connect the USB-C end of the charging cable to the front port of the mouse.
- Connect the USB-A end of the charging cable to an available USB-A port on your computer or a USB wall adapter.
- Mouse-ul poate fi utilizat în modul cu fir în timpul încărcării.
- A full charge typically takes a few hours. The LED indicator on the mouse will change to indicate charging status (refer to the Quick Start Guide for specific LED behaviors).

2.3 Optional Software Installation
For advanced customization, such as remapping buttons, adjusting DPI steps, or configuring macros, Vancer may provide optional software. Please visit the official Vancer website for the latest software downloads and installation instructions. Note that some features like RGB lighting may be tied to DPI settings.
3. Instrucțiuni de utilizare
3.1 Funcții de bază ale mouse-ului
- Click stânga: Buton de acțiune principală.
- Click dreapta: Secondary action button, often for context menus.
- Rotiță de defilare: Derulează conținutul pe verticală. Poate fi apăsat și pentru o funcție de clic cu butonul din mijloc.
- Butoane laterale: De obicei, utilizat pentru navigarea înainte/înapoi în web browsers or customizable functions in games/software.
- Butonul DPI: Comută între nivelurile presetate de sensibilitate DPI.

3.2 Ajustare DPI
The Vancer Gretxa mouse features a dedicated DPI button, usually located behind the scroll wheel or on the underside, to cycle through different sensitivity settings. The default DPI steps are 400, 800, 1800, 3200, 4800, and 6400. Each step may correspond to a different LED color for visual indication. Press the DPI button to switch between these settings to find your preferred sensitivity.
3.3 Ajustarea ratei de interogare
The polling rate determines how often the mouse reports its position to the computer. The Gretxa mouse supports polling rates of 125Hz (8ms), 500Hz (2ms), and 1000Hz (1ms). Higher polling rates generally provide smoother tracking and lower latency. Adjustment of the polling rate is typically done via the optional Vancer software.
3.4 Mod cu fir
When the USB-C charging cable is connected to the mouse and your computer, the mouse will automatically switch to wired mode. This allows for continuous use even if the battery is depleted, and can be preferred for competitive gaming to eliminate any potential wireless interference.
4. Întreținere
4.1 Cleaning Your Mouse
Curățarea regulată ajută la menținerea performanței și a igienei.
- Exterior: Utilizați ușor o cârpă moale, fără scame dampClătiți cu apă sau o soluție de curățare blândă. Evitați substanțele chimice dure.
- Senzor: Gently clean the optical sensor on the underside of the mouse with a cotton swab or compressed air to remove dust and debris.
- Rotiță de defilare: Use compressed air to clear any dust or particles that may accumulate around the scroll wheel mechanism.
4.2 Înlocuirea patinelor din PTFE
The Vancer Gretxa mouse comes with high-quality PTFE skates for smooth gliding. Over time, these may wear down. An extra set of PTFE skates is included in your package for replacement.
- Îndepărtați cu grijă patinele vechi din PTFE folosind o unealtă subțire, neabrazivă.
- Ensure the surface where the skates were is clean and free of adhesive residue.
- Îndepărtați folia protectoare de pe noile patine din PTFE și aliniați-le cu grijă cu adânciturile de pe partea inferioară a mouse-ului.
- Apăsați ferm pentru a asigura o aderență adecvată.

4.3 Îngrijirea bateriei
- Evitați descărcarea completă frecventă a bateriei.
- Depozitați mouse-ul într-un loc răcoros și uscat atunci când nu îl utilizați pentru perioade lungi de timp.
- Use only the provided charging cable or a certified USB-C cable to prevent damage.
5. Depanare
If you encounter issues with your Vancer Gretxa mouse, please refer to the following common solutions:
| Problemă | Soluție posibilă |
|---|---|
| Șoarecele nu răspunde |
|
| Mișcarea cursorului este neregulată sau sacadată |
|
| Butoanele sau rotița de derulare nu funcționează |
|
| Durată slabă a bateriei |
|
6. Specificații
Below are the technical specifications for the Vancer Gretxa Wireless Ultralight Gaming Mouse:
| Caracteristică | Detaliu |
|---|---|
| Model | Gretxa |
| Conectivitate | 2.4GHz Wireless, USB-C (Wired) |
| Senzor | Senzor optic Pixart 3370 |
| Greutate | Aproximativ 69 g |
| Dimensiuni (L x l x H) | 123 x 62 x 37 mm |
| Setări DPI | 400 / 800 / 1800 / 3200 / 4800 / 6400 (Adjustable) |
| Rata de sondare | 125 Hz / 500 Hz / 1000 Hz |
| LOD (distanța de ridicare) | 2mm (default), 1mm (adjustable via software) |
| Comutatoare | TTC Gold Switches (V2 improvement) |
| Patinele | PTFE |
| Tip baterie | Litiu-ion (1 incluse) |
| Sistem de operare | Windows 10 (and compatible with other modern OS) |
| Dispozitive compatibile | Computer personal |
7. Garanție și asistență
7.1 Informații despre garanție
For the most current and detailed warranty information regarding your Vancer Gretxa Wireless Ultralight Gaming Mouse, please refer to the official Vancer website or the warranty card included with your product. Warranty terms and conditions, including duration and coverage, may vary by region and are subject to change by the manufacturer.
7.2 Asistență pentru clienți
If you require further assistance, have questions not covered in this manual, or need technical support, please visit the official Vancer website. You can typically find FAQs, driver downloads, and contact information for customer service there.