
1. Introducere
The HQST 20A PWM Flush Mount Solar Charge Controller is designed to efficiently manage power flow from your solar panels to your battery bank, ensuring optimal charging and protection. It is compatible with both 12V and 24V battery systems, supporting various battery types including Lithium, Sealed (AGM), Gel, and Flooded batteries. This manual provides essential information for proper installation, operation, and maintenance of your solar charge controller.
2. Produs terminatview
Familiarize yourself with the components of your HQST solar charge controller:
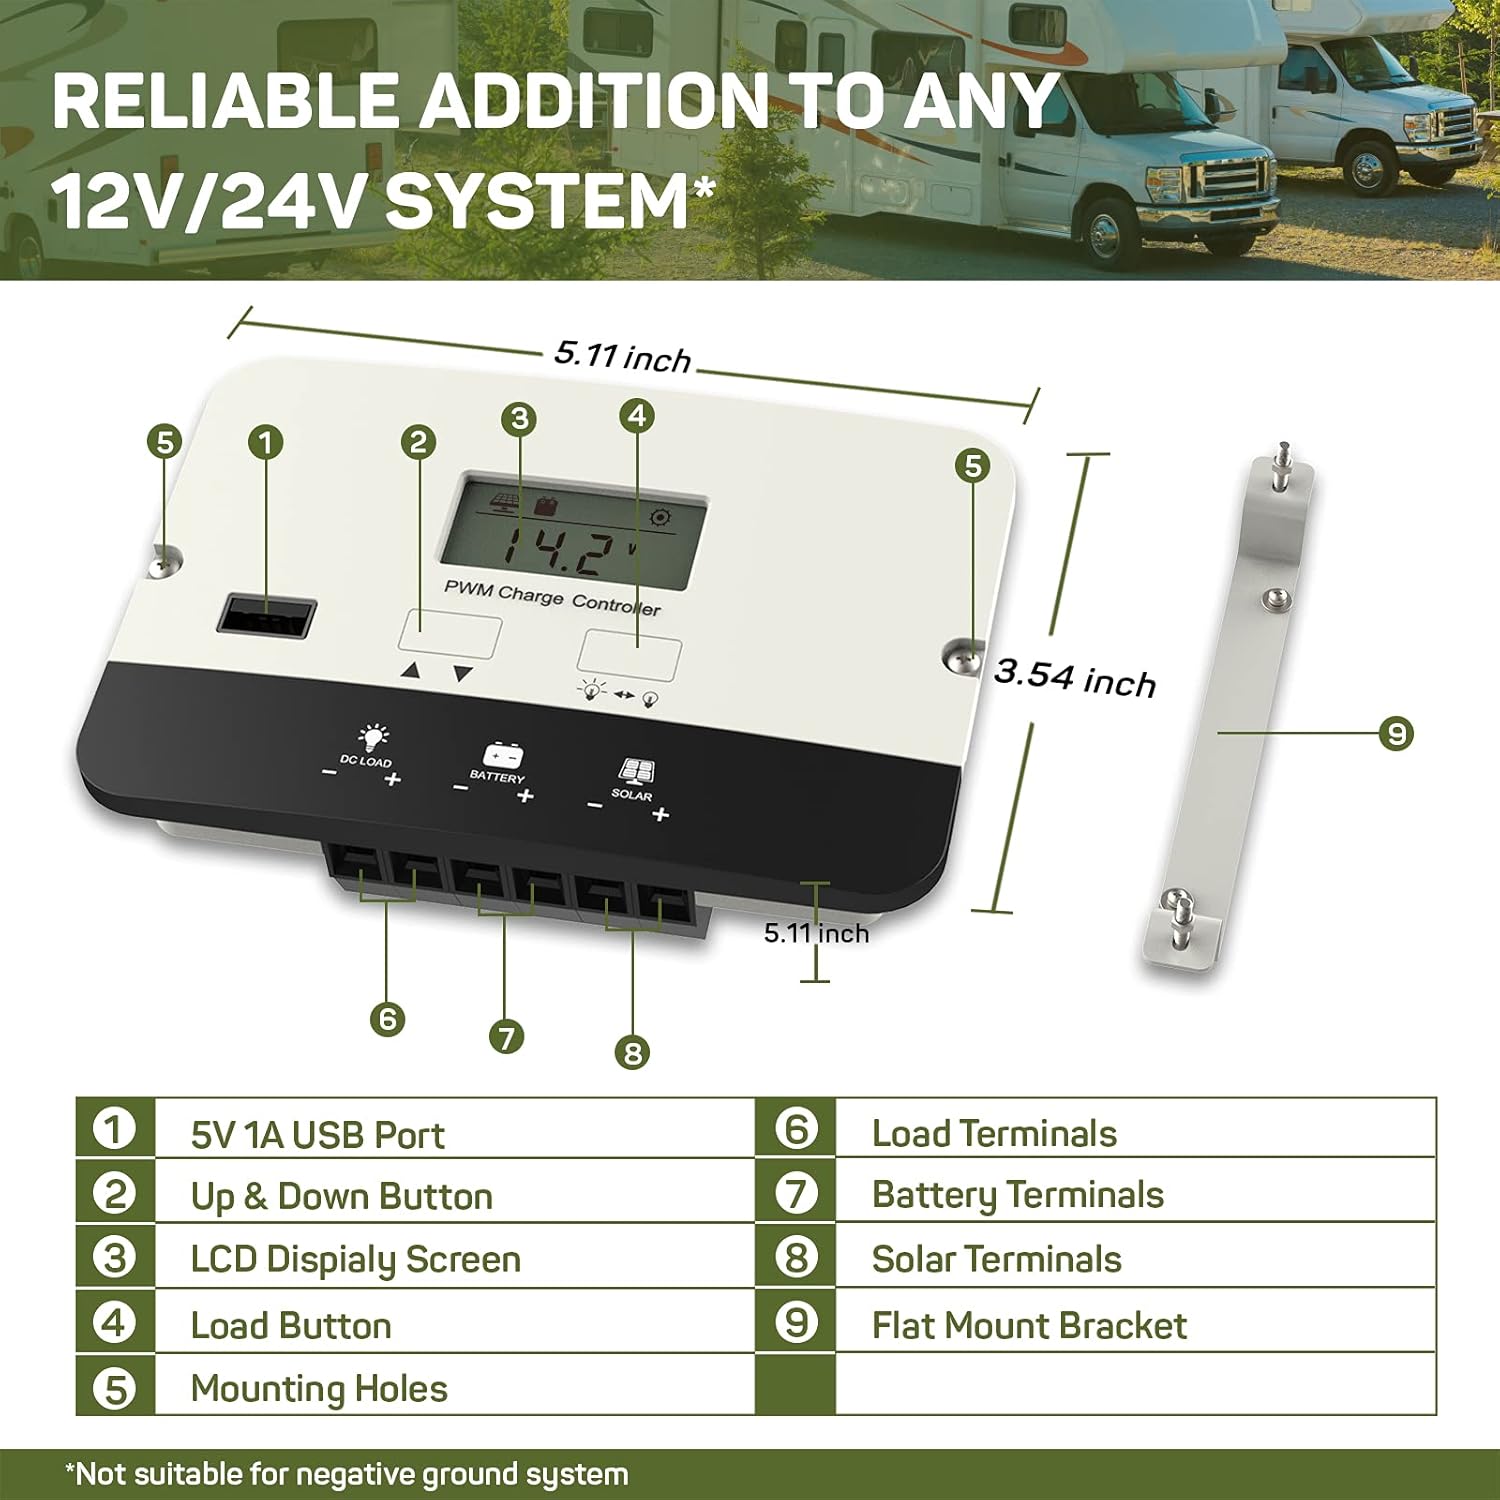
This diagram illustrates the key components and dimensions of the HQST 20A PWM Flush Mount Solar Charge Controller. It measures approximately 5.11 inches in length and 3.54 inches in width.
- 5V 1A USB Port: For charging USB-compatible devices.
- Buton sus și jos: Used for navigating display screens and adjusting settings.
- Ecran LCD: Shows real-time system data and settings.
- Load Button: Controls the DC load output.
- Găuri de montare: For securing the controller during installation.
- Terminale de sarcină: Connect to your DC loads.
- Terminale baterie: Conectați-vă la banca de baterii.
- Solar Terminals: Conectați-vă la sistemul de panouri solare.
- Flat Mount Bracket: Optional bracket for surface mounting.
3. Configurare
3.1 Montarea controlerului
The controller offers flexible mounting options:

The controller can be installed using either a flush mount for a seamless look or a flat mount with the provided bracket. Choose a location that is dry, well-ventilated, and away from direct sunlight or heat sources.
- Montare încasată: Integrate the controller directly into a panel or wall for a clean finish.
- Montare plată: Use the included bracket to mount the controller on a surface.
Ensure adequate space around the controller for air circulation to prevent overheating.
3.2 Conexiuni de cablare
Follow the correct wiring sequence to prevent damage to the controller or battery:
- Conectați bateria: First, connect the battery to the controller's battery terminals (7). Ensure correct polarity (positive to positive, negative to negative). The LCD will power on.
- Conectați panoul solar: Next, connect the solar panel to the controller's solar terminals (8). Ensure correct polarity.
- Conectați sarcina de curent continuu: Finally, connect your DC loads to the controller's load terminals (6). Ensure correct polarity.
Secvență de deconectare: To disconnect the system, reverse the order: disconnect the load, then the solar panel, and finally the battery.

This wiring diagram illustrates the proper connection order for the solar panel, battery, and DC load to the HQST solar charge controller.

When connecting wires, ensure they are inserted into the correct square socket for the cable, not the screw hole. Fully unscrew the terminal screws, insert the wire ends, then tighten the screws securely.
3.3 Setarea tipului de baterie
The controller automatically recognizes 12V/24V Sealed (AGM), Gel, and Flooded batteries. For Lithium batteries, manual parameter setting is required:

The LCD display allows for manual adjustment of battery parameters, especially crucial for Lithium-ion batteries.
- Press and hold the 'Up & Down' button to enter the setting mode.
- Use the 'Up & Down' buttons to navigate to the battery type setting (e.g., "b01" for Gel, "b02" for Sealed, "b03" for Flooded, "b04" for Lithium).
- For Lithium batteries, further adjust charging voltage, volum de descărcare excesivătage, and other parameters as per your battery manufacturer's specifications.
- Press and hold the 'Load' button to save the settings and exit.
4. Instrucțiuni de utilizare
4.1 Navigare pe ecranul LCD
The LCD screen provides real-time monitoring of your solar system:

The intuitive LCD screen cycles through various operational data, including battery voltage, PV voltage, charge current, load current, controller temperature, and battery state of charge (SOC).
- Press the 'Up & Down' button (2) to manually cycle through the displayed parameters.
- The display will automatically cycle through parameters if no button is pressed for a few seconds.
4.2 Controlul sarcinii
The controller features a DC load output with multiple control modes:
- Press the 'Load' button (4) to manually turn the DC load output on or off.
- The controller supports 17 different load control modes, allowing for customized operation (e.g., dusk-to-dawn, timed operation). Refer to the full manual for detailed instructions on setting load modes.
4.3 port de încărcare USB
The integrated 5V 1A USB port (1) can charge small electronic devices. This port is active when the DC load output is enabled.
4.4 4-Stage Încărcare inteligentă
The controller employs an advanced 4-stage charging algorithm to optimize battery health and lifespan:

This graph illustrates the voltage si curent profiles during the 4-stage charging process, including Bulk, Boost/Absorption, Float, and Equalization stages.
- Încărcare în vrac: Oferă curent maxim pentru încărcarea rapidă a bateriei.
- Boost/Absorption Charge: Menține un volum constanttage to ensure the battery is fully charged without overcharging.
- Taxă plutitoare: Reduce volumultage la un nivel mai scăzut pentru a menține bateria la încărcare completă, compensând autodescărcarea.
- Taxa de egalizare: (For lead-acid batteries only) Periodically overcharges the battery to balance cell voltagși previn sulfatarea.
5. Întreținere
To ensure the longevity and optimal performance of your HQST solar charge controller, perform the following maintenance checks:
- Inspecție regulată: Periodically check all wiring connections for tightness and signs of corrosion. Loose connections can cause voltagpicături de e și supraîncălzire.
- Curăţenie: Keep the controller's exterior clean and free from dust, dirt, and debris. Use a dry cloth for cleaning. Do not use harsh chemicals or abrasive materials.
- Ventilare: Ensure that the installation area remains well-ventilated to allow for proper heat dissipation. Blocked vents can lead to overheating and reduced efficiency.
- Sănătatea bateriei: Monitor your battery's health and performance regularly. Follow the battery manufacturer's maintenance guidelines.
6. Depanare
Dacă întâmpinați probleme cu regulatorul de încărcare solară, consultați următoarele probleme și soluții comune:
| Problemă | Cauza posibila | Soluţie |
|---|---|---|
| Controller Display is Off | No power from battery or incorrect battery connection. | Check battery connections and ensure correct polarity. Verify battery voltage este peste volumul minim de funcționaretage. |
| Bateria nu se încarcă | No solar input, incorrect solar panel connection, or faulty solar panel. | Ensure solar panels are receiving adequate sunlight. Check solar panel wiring for correct polarity and secure connections. Test solar panel voltage. |
| DC Load Not Working | Load output disabled, incorrect load connection, or over-discharge protection active. | Press the Load button to enable output. Check load wiring for correct polarity and secure connections. Verify battery voltage is above the over-discharge protection threshold. |
| Error Code Displayed (e.g., E02) | Specific system fault (e.g., E02 typically indicates over-discharge). | Consult the full product manual for a complete list of error codes and their corresponding solutions. Address the underlying issue (e.g., charge battery for E02). |
If the problem persists after attempting these solutions, please contact HQST customer support.
7. Specificații
| Caracteristică | Caietul de sarcini |
|---|---|
| Model | 20A PWM Flush Mount |
| Sistem Voltage | 12V / 24V Auto-recognition (Lithium batteries require manual setting) |
| Curent de încărcare maxim | 20A |
| Compatibilitatea bateriei | Lithium, Sealed (AGM), Gel, Flooded |
| Încărcarea Stages | 4-Stage (Bulk, Boost/Absorption, Float, Equalization) |
| Ieșire USB | 5V 1A |
| Tip de afișare | LCD |
| Dimensiuni produs (L x l x H) | 5.11 x 3.54 x 1.36 inci |
| Greutatea articolului | 9.1 uncii |
| Temperatura maximă de funcționare | 45°C (113°F) |
| Caracteristici de protecție | Reverse polarity, over-voltage, over-current, over-discharge, short-circuit, reverse current. |
8. Garanție și asistență
This HQST product is backed by a 10 an garanție, reflecting our commitment to quality and durability. For any technical assistance, troubleshooting, or warranty claims, please contact HQST customer support.
You can find contact information and additional resources on the official HQST website: www.hqst.com
Please have your product model number (20A PWM Flush Mount) and purchase details ready when contacting support.