
1. Introducere
Mulțumesc pentru achizițieasing the Soundsation MIOMIX 404FXM 6-Channel Mixer. This versatile mixer is designed for a wide range of audio applications, including home recording, live performances, and podcasting. It combines professional audio quality with portability, featuring low-noise preamplifiers, digital effects, a USB media player/recorder, and Bluetooth connectivity. This manual provides essential information for safe operation, setup, and optimal use of your MIOMIX 404FXM mixer.
2. Instrucțiuni de siguranță
AVERTISMENT: Pentru a reduce riscul de incendiu sau electrocutare, nu expuneți acest echipament la ploaie sau umezeală.
- Citiți cu atenție aceste instrucțiuni înainte de a utiliza unitatea.
- Păstrați acest manual pentru referințe viitoare.
- Respectați toate avertismentele și urmați toate instrucțiunile.
- Nu utilizați acest aparat lângă apă.
- Curățați numai cu o cârpă uscată.
- Nu blocați niciun orificiu de ventilație. Instalați conform instrucțiunilor producătorului.
- Nu instalați lângă nicio sursă de căldură, cum ar fi calorifere, registre de căldură, sobe sau alte aparate (inclusiv ampliificatori) care produc căldură.
- Nu înfrângeți scopul de siguranță al ștecherului polarizat sau cu împământare. Un ștecher polarizat are două lame, una mai lată decât cealaltă. Un ștecher de tip împământare are două lame și un al treilea ștecher de împământare. Lama lată sau al treilea vârf sunt prevăzute pentru siguranța dumneavoastră. Dacă ștecherul furnizat nu se potrivește în priză, consultați un electrician pentru înlocuirea prizei învechite.
- Protejați cablul de alimentare să nu fie călcat sau ciupit, în special la prize, prize convenabile și la punctul de ieșire din aparat.
- Utilizați numai atașamente/accesorii specificate de producător.
- Deconectați acest aparat din priză în timpul furtunilor cu fulgere sau când nu este utilizat pentru perioade lungi de timp.
- Toate lucrările de întreținere se adresează personalului de service calificat. Întreținerea este necesară atunci când aparatul a fost deteriorat în vreun fel, cum ar fi cablul de alimentare sau ștecherul este deteriorat, s-a vărsat lichid sau au căzut obiecte în aparat, aparatul a fost expus la ploaie sau umezeală, nu funcționează normal , sau a fost abandonat.
3. Conținutul pachetului
Vă rugăm să verificați dacă toate articolele enumerate mai jos sunt incluse în pachet:
- Soundsation MIOMIX 404FXM Mixer
- Adaptor de alimentare
- Manual de utilizare
4. Caracteristicile produsului
- 6-channel mixer with digital multi-effect processor.
- Integrated USB player/recorder supporting WAV, MP3, WMA, and FLAC formats.
- Wireless Bluetooth audio streaming.
- 4 Mic/Line channels with low-noise preamps and Combo connectors.
- Selectable Hi-Z inputs for guitars and other high-impedance instruments.
- +48V Phantom Power for condenser microphones.
- Peak indicators on input channels.
- 1 stereo line channel with 6.3mm jacks and +4/-10 dB pad adapter.
- 2-band EQ on channels 1-4.
- 24-bit/48 kHz digital effects processor with 16 presets (Reverb, Delay, Echo, Chorus, etc.) and TAP-Tempo function.
- USB player level control.
- Ieșire pentru căști cu control de nivel.
- XLR main outputs with volume control.
- Stereo VU Meter with 2 x 6 LED bars.
5. Comenzi și funcții
5.1 Panoul frontal pesteview

Image: Front panel of the Soundsation MIOMIX 404FXM mixer, showing all input channels, EQ controls, effect section, USB/Bluetooth media player, and main output controls.
Input Channels (MIC/INST 1-4)
- MIC/INST Input (Combo Jack): Connect XLR microphones or 1/4" instrument/line cables.
- Alimentare fantomă +48V: Activates phantom power for condenser microphones. Use with caution.
- Comutator Hi-Z: Engages high impedance input for direct connection of guitars or basses.
- Butonul GAIN: Ajustează sensibilitatea de intrare pentru microfonul sau instrumentul conectat.
- HIGH Knob: Adjusts the high-frequency equalization (treble).
- Buton LOW: Adjusts the low-frequency equalization (bass).
- Buton FX: Controls the amount of signal sent to the internal digital effects processor.
- Butonul PAN: Ajustează poziția stereo (stânga/dreapta) a canalului.
- Butonul VOL: Ajustează volumul de ieșire al canalului individual.
- PK (Peak) LED: Se aprinde când semnalul de intrare este prea puternic, indicând o posibilă saturare.
Stereo Line Input (CH 5-6)
- L/Mono, R Inputs (1/4" Jacks): Connect stereo line-level devices (keyboards, CD players, DJ consoles, etc.). The L/Mono input can be used alone for a mono signal.
- +4/-10dB Switch: Adjusts input sensitivity for different line-level devices.
- Butonul PAN: Ajustează poziția stereo a canalului.
- Butonul VOL: Adjusts the output volume of the stereo channel.
- PK (Peak) LED: Se aprinde când semnalul de intrare este prea puternic.
USB & Bluetooth Media Player
- Port USB: Connect a USB drive for playing audio files or recording.
- Ecran de afișare: Afișează modul curent, informațiile despre piesă și setările.
- Up/Rewind Button: Navigates up in menus or rewinds current track.
- Down/Forward Button: Navigates down in menus or fast-forwards current track.
- Play/Pause/Enter Button: Plays/pauses audio or confirms menu selections.
- Butonul MENU: Accesses media player menu options (BT streaming, music player, audio recorder, selection).
- MP3 PLAYER LVL Knob: Controls the output level of the USB/Bluetooth media player.
Digital Effects Processor (24-bit/48 kHz)
- Afișare efect: Shows the selected effect number and parameter values.
- Buton PROGRAM: Rotates to select one of the 16 built-in digital effects. Press to confirm selection.
- Butonul TAP TEMPO: Tap multiple times to set the tempo for time-based effects (e.g., Delay).
- Butonul LEVEL: Adjusts the overall wet/dry mix of the effects.
Output & Monitoring Section
- PHONES Jack (1/4"): Conectați căștile pentru monitorizare.
- PHONES LVL Knob: Reglează volumul ieșirii pentru căști.
- MAIN OUT L/R (XLR): Balanced XLR outputs for connecting to powered speakers, ampdispozitive de filtrare sau de înregistrare.
- MAIN OUT Knob: Controlează volumul general de ieșire al mixajului principal.
- VU Meter (LED): Displays the stereo output level of the main mix.
5.2 Panoul din spate pesteview
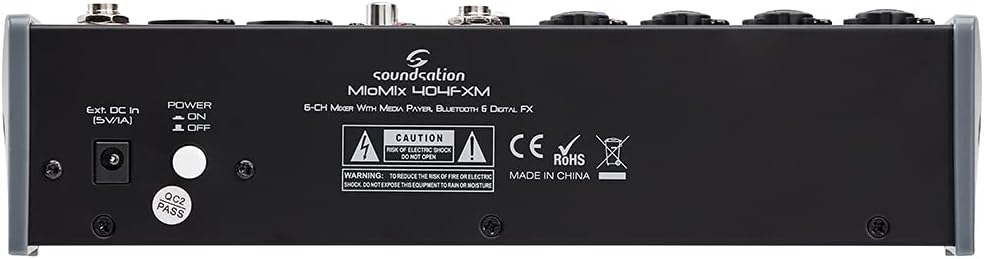
Image: Rear panel of the Soundsation MIOMIX 404FXM mixer, showing the power input, power switch, and main output connections.
- Ext. DC In (5V/1A): Power input for connecting the provided external power adapter.
- Comutator PORNIRE/OPRIRE: Turns the mixer's power on or off.
- REC OUT L/R (RCA): Unbalanced RCA outputs for connecting to recording devices.
6. Configurare
- Despachetați mixerul: Carefully remove the MIOMIX 404FXM from its packaging.
- Plasare: Așezați mixerul pe o suprafață stabilă și plană, asigurând o ventilație adecvată în jurul unității.
- Conexiune de alimentare: Ensure the mixer's POWER switch is in the OFF position. Connect the provided power adapter to the "Ext. DC In (5V/1A)" port on the rear panel, then plug the adapter into a suitable power outlet.
- Pornire inițială: Flip the POWER switch to the ON position. The mixer's indicators should light up, and the display should activate.
- Conectați ieșirile: Connect the MAIN OUT XLR outputs to your powered speakers, amplifier, or audio interface. Connect headphones to the PHONES jack for monitoring.
- Conectarea intrărilor: Connect your microphones, instruments, and line-level devices to the appropriate input channels.
7. Instrucțiuni de utilizare
7.1 Conectarea surselor audio
- Microfoane: Connect dynamic microphones via XLR cables to the MIC/INST Combo jacks. For condenser microphones, connect via XLR and activate the +48V Phantom Power switch for the respective channel.
- Instruments (Guitars/Basses): Connect directly using a 1/4" TS cable to the MIC/INST Combo jack and engage the Hi-Z switch for that channel.
- Line-Level Devices (Keyboards, CD Players): Connect using 1/4" TS cables to the MIC/INST Combo jacks (for mono) or to the CH 5-6 L/Mono and R inputs (for stereo). Adjust the +4/-10dB switch on CH 5-6 as needed.
7.2 Adjusting Channel Levels and EQ
- Set all GAIN, VOL, and MAIN OUT knobs to their minimum positions before starting.
- Speak into the microphone or play your instrument. Slowly increase the GAIN knob for the respective channel until the PK LED flashes only occasionally during the loudest parts.
- Adjust the HIGH and LOW EQ knobs to shape the tone of your sound.
- Use the PAN knob to position the sound in the stereo field.
- Slowly increase the channel's VOL knob to blend it into the overall mix.
7.3 Using the USB Media Player/Recorder
- Redare: Insert a USB drive containing WAV, MP3, WMA, or FLAC files into the USB port. The display will show the file list. Use the Up/Down buttons to navigate and Play/Pause/Enter to select and play. Adjust the MP3 PLAYER LVL knob to control its volume in the mix.
- Înregistrare: In the media player menu (accessed via MENU button), select the 'Audio Recorder' function. Ensure your USB drive has enough free space. Press Play/Pause/Enter to start and stop recording. The mixer records the main stereo mix.
7.4 Conectivitate Bluetooth
- Press the MENU button on the media player and select 'BT Streaming'. The display will show 'Bluetooth' and indicate it's searching.
- On your smartphone or Bluetooth device, search for available devices and select 'MIOMIX 404FXM'.
- Once paired, you can stream audio from your device to the mixer. Control the volume using your device and the MP3 PLAYER LVL knob on the mixer.
7.5 Aplicarea efectelor digitale
- Turn the FX knob on the desired input channel to send signal to the effects processor.
- Rotate the PROGRAM knob to browse through the 16 available effects. Press the PROGRAM knob to select an effect.
- Adjust the LEVEL knob in the FX section to control the overall amount of effect applied to the mix.
- For time-based effects, use the TAP TEMPO button to synchronize the effect to your music.
7.6 Monitoring and Main Output
- Căști: Connect headphones to the PHONES jack and adjust the PHONES LVL knob for comfortable monitoring.
- Ieșire principală: Slowly increase the MAIN OUT knob to send the mixed audio to your connected speakers or amplifier. Monitor the VU Meter to ensure levels are not clipping (avoiding red LEDs).
8. Întreținere
- curatenie: Folosiți o lavetă moale și uscată pentru a curăța suprafața mixerului. Nu folosiți detergenți lichizi sau solvenți.
- Depozitare: Când nu este utilizat pentru perioade lungi de timp, depozitați mixerul într-un loc răcoros și uscat, ferit de lumina directă a soarelui și de temperaturi extreme.
- Ventilare: Asigurați-vă că orificiile de ventilație nu sunt blocate pentru a preveni supraîncălzirea.
9. Depanare
- Fără ieșire de sunet:
- Check all power connections and ensure the mixer is turned ON.
- Verify that all channel VOL knobs, MAIN OUT knob, and PHONES LVL knob are turned up.
- Ensure your speakers/amplifier are powered on and connected correctly.
- Check input source connections and ensure GAIN knobs are set appropriately.
- Sunet distorsionat:
- Reduceți butonul GAIN pentru canalul de intrare.
- Check if the PK LED is constantly lit; if so, reduce the input level.
- Lower the MAIN OUT volume if the VU Meter is consistently in the red.
- Alimentarea fantomă nu funcționează:
- Ensure the +48V switch is engaged for the specific channel.
- Verify that you are using an XLR cable, as phantom power is only supplied via XLR.
- Bluetooth nu se conectează:
- Ensure the mixer's media player is in 'BT Streaming' mode.
- Make sure your device's Bluetooth is enabled and it's searching for devices.
- Încercați să anulați asocierea și să reasociați dispozitivul.
- Probleme de redare/înregistrare prin USB:
- Asigurați-vă că unitatea USB este formatată corect (în general, se recomandă FAT32).
- Verificați dacă sunetul files are in a supported format (WAV, MP3, WMA, FLAC).
- For recording, ensure the USB drive has sufficient free space.
10. Specificații
| Caracteristică | Caietul de sarcini |
|---|---|
| Producător | Soundsation |
| Numărul de model | E923E |
| Numărul de canale | 6 |
| Greutatea articolului | 1900 grame |
| Tehnologia de conectivitate | USB, Bluetooth |
| Sursa de alimentare | Cablu electric |
| Tip conector de ieșire | XLR |
| Intrare audio | XLR, mufă jack de 1/4" |
| Voltage | 48 de volți (alimentare fantomă) |
| Efecte digitale | 16 Presets, 24-bit/48 kHz |
| Formate audio USB acceptate | WAV, MP3, WMA, FLAC |
11. Garanție și asistență
Soundsation products are designed and manufactured to the highest quality standards. For information regarding warranty coverage, service, or technical support, please refer to the warranty card included with your product or visit the official Soundsation webPăstrați bonul fiscal ca dovadă a achiziției pentru orice reclamații în garanție.