
MOUNTUP MU0034
MOUNTUP MU0034 Manual de instrucțiuni pentru montarea pe birou pentru un singur monitor
Marca: MOUNTUP | Model: MU0034
1. Introducere
This manual provides detailed instructions for the installation, operation, and maintenance of your MOUNTUP MU0034 Single Monitor Desk Mount. Please read this manual thoroughly before installation to ensure correct setup and safe operation. This monitor mount is designed to enhance your workspace ergonomics by providing adjustable positioning for a single monitor.
2. Informații de siguranță
- Asigurați-vă că toate componentele sunt prezente și nedeteriorate înainte de instalare. Nu utilizați produsul dacă lipsesc sau sunt defecte piesele.
- This product is intended for monitors weighing up to 17.6 lbs (8 kg) and screen sizes from 17 to 32 inches. Do not exceed the maximum weight capacity.
- Compatible VESA patterns are 75x75mm and 100x100mm. Verify your monitor's VESA pattern before proceeding.
- Ensure the desk surface is stable and strong enough to support the combined weight of the mount and monitor.
- Tighten all screws firmly, but do not overtighten to avoid stripping threads or damaging components.
- Țineți copiii și animalele de companie departe în timpul instalării.
- Dacă aveți îndoieli cu privire la procesul de instalare, consultați un profesionist calificat.
3. Conținutul pachetului
Vă rugăm să verificați dacă toate piesele sunt incluse în pachet:
- Ansamblu braț monitor
- Birou Clamp Baza
- Grommet Base Components
- Placă VESA
- Set de accesorii (șuruburi, șaibe, chei Allen)
- Manual de instructiuni
4. Specificații
| Caracteristică | Caietul de sarcini |
|---|---|
| Numărul de model | MU0034 |
| Material | Aluminiu lustruit |
| Compatibilitate cu dimensiunea ecranului | 17" to 32" (flat or curved) |
| Capacitate de greutate | Până la 17.6 lbs (8 kg) |
| Compatibilitate VESA | 75x75mm, 100x100mm |
| Reglarea înălțimii | Up to 11" (16.3" total height adjustment range) |
| Interval de înclinare | +45° până la -45° |
| Gama rotativă | 360° (arm), 180° (monitor plate) |
| Rotaţie | 360° (landscape to portrait) |
| Max Desk Thickness (C-clamp) | 3.35" |
| Diametrul orificiului inelului de etanșare | 0.39" - 3.1" |
5. Configurare și instalare
The MOUNTUP MU0034 offers two installation options: C-clamp mounting and Grommet mounting. Choose the method suitable for your desk.
5.1. C-Clamp Montare
This method is for desks without existing grommet holes, or if you prefer clamping to the edge of your desk. Ensure your desk thickness is no more than 3.35 inches.
- Atașați C-clamp: Assemble the C-clamp components to the base of the monitor arm. Position the base on the edge of your desk and tighten the clamp screw until it is secure.
- Atașați placa VESA la monitor: Secure the VESA plate to the back of your monitor using the appropriate screws from the hardware kit. Ensure the screws are tightened securely.
- Slide Monitor onto Arm: Carefully slide the monitor (with the attached VESA plate) onto the monitor arm's VESA head. Ensure it clicks into place or is secured with the provided locking mechanism.
- Reglați tensiunea: Refer to Section 6.1 for adjusting the gas spring tension to match your monitor's weight.

Figura 1: Ilustrație a C-clamp and Grommet mounting options. The C-clamp is shown securing the mount to the desk edge, while the grommet mount uses a desk hole.
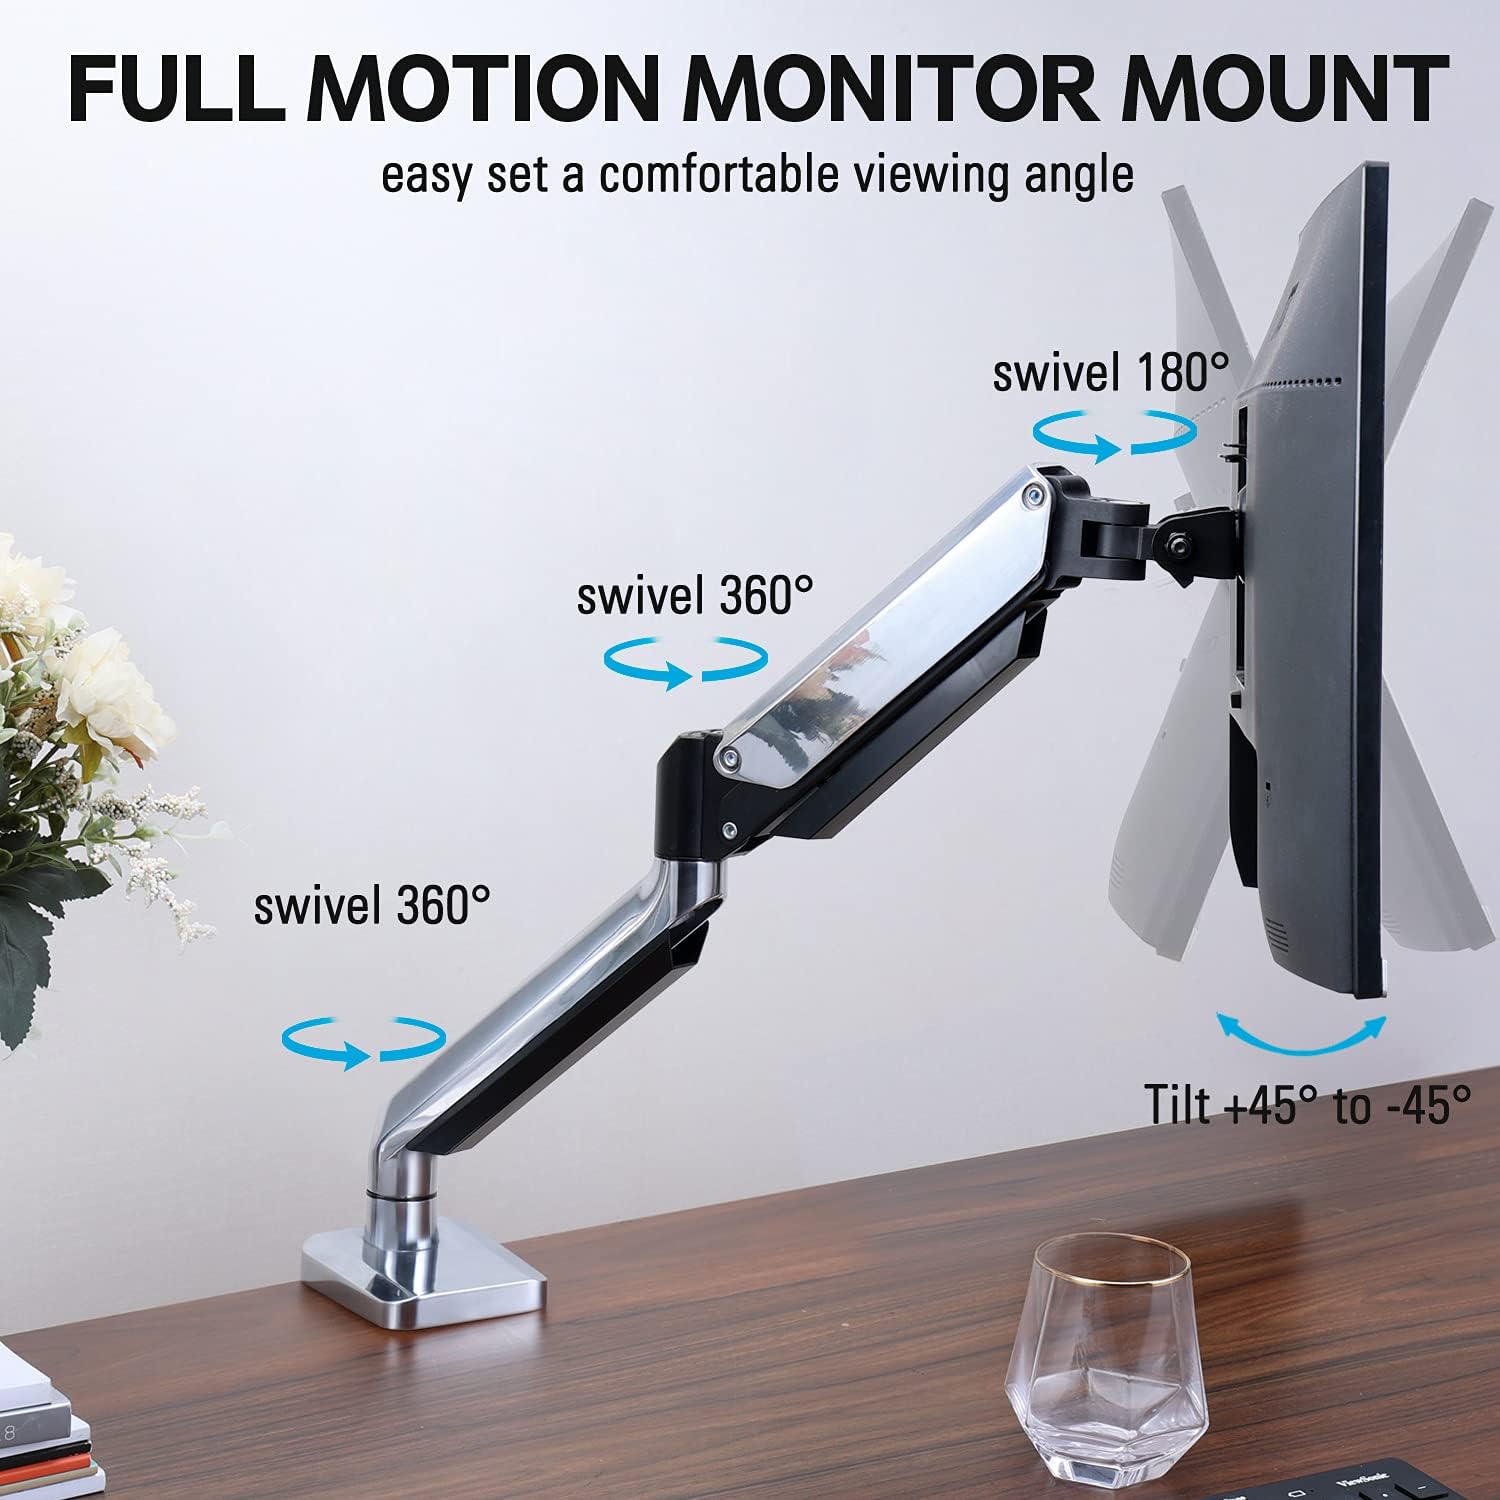
Figure 2: The removable VESA plate being attached to the back of a monitor, then sliding onto the monitor arm for easier installation.
5.2. Montare cu ochiuri
This method utilizes an existing hole in your desk. Ensure your desk thickness is no more than 3.35 inches and the grommet hole diameter is between 0.39 and 3.1 inches.
- Assemble Grommet Base: Insert the grommet base components through the desk hole and secure them from underneath the desk using the provided plate and nut.
- Atașați placa VESA la monitor: Secure the VESA plate to the back of your monitor using the appropriate screws from the hardware kit. Ensure the screws are tightened securely.
- Slide Monitor onto Arm: Carefully slide the monitor (with the attached VESA plate) onto the monitor arm's VESA head. Ensure it clicks into place or is secured with the provided locking mechanism.
- Reglați tensiunea: Refer to Section 6.1 for adjusting the gas spring tension to match your monitor's weight.
6. Operare și reglaje
The MOUNTUP MU0034 monitor arm offers various adjustments for optimal viewconfort.
6.1. Reglarea tensiunii arcului cu gaz
The gas spring tension needs to be adjusted to match the weight of your monitor. This ensures the monitor stays in position once adjusted.
- If the monitor drifts down, turn the adjustment screw (usually located on the arm joint) clockwise ("+") to increase tension.
- If the monitor floats up, turn the adjustment screw counter-clockwise ("-") to decrease tension.
- Adjust gradually until the monitor remains stable at any height.
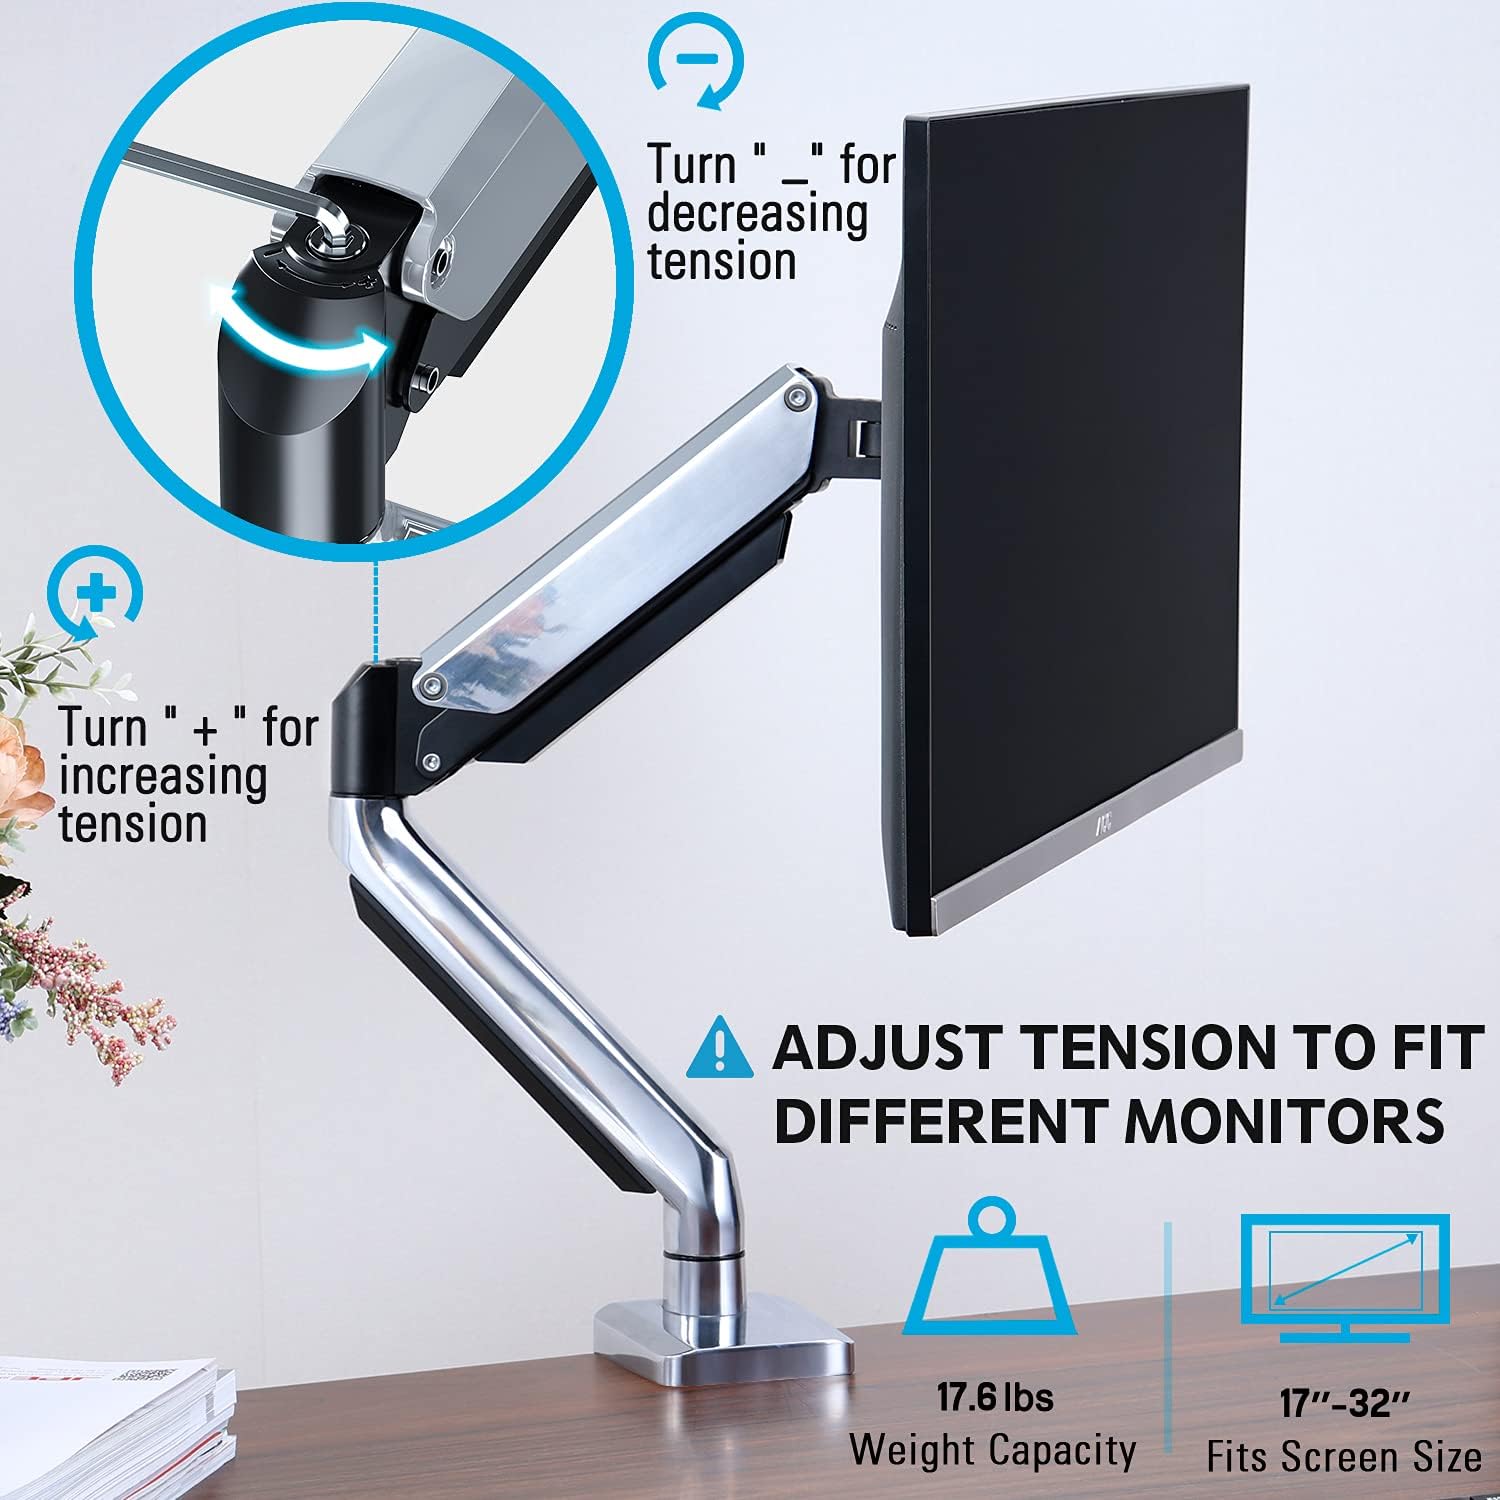
Figure 3: Instructions for adjusting the gas spring tension using an Allen key. Turning clockwise increases tension, counter-clockwise decreases it.
6.2. Reglarea înălțimii
Once the gas spring tension is correctly set, you can easily raise or lower your monitor to your desired ergonomic height. The arm allows for up to 11 inches of vertical adjustment.

Figure 4: Diagram illustrating the maximum height adjustment of 11 inches and maximum extension of 17.5 inches.
6.3. Înclinare, pivotare și rotație
The monitor arm provides full motion capabilities:
- Înclinare: Adjust the monitor screen +45° to -45° to reduce glare or find a comfortable viewunghiul de ing.
- pivotare: The arm can swivel 360° at the base and 360° at the middle joint. The monitor plate itself can swivel 180°. This allows for easy screen sharing or repositioning.
- Rotaţie: Rotiți monitorul la 360° pentru a comuta între orientarea peisaj și portret.

Figure 5: Visual representation of the monitor arm's full motion capabilities, including 360° swivel, 180° swivel at the monitor plate, and +45° to -45° tilt.

Figure 6: An image demonstrating the monitor's ability to rotate 360 degrees, allowing for both landscape and portrait viewmoduri de ing.
7. Gestionarea cablurilor
The MOUNTUP MU0034 features integrated cable management to keep your workspace tidy.
- Traseați cablurile monitorului (de alimentare, video etc.) de-a lungul părții inferioare a brațului.
- Use the provided cable clips or covers to secure the cables within the arm channels.
- Ensure cables have enough slack to allow for full range of motion without tension.

Figure 7: Illustration of how cables are routed and organized through the integrated channels on the monitor arm, keeping the desk clear.
8. Întreținere
- Verificați periodic toate șuruburile și conexiunile pentru a vă asigura că rămân strânse.
- Curățați suportul cu o lavetă moale,amp Evitați utilizarea de produse de curățare abrazive sau solvenți.
- Do not lubricate the gas spring mechanism.
9. Depanare
| Problemă | Cauza posibila | Soluţie |
|---|---|---|
| Monitorul scade sau nu rămâne activ | Tensiunea arcului cu gaz este prea mică pentru greutatea monitorului. | Increase gas spring tension by turning the adjustment screw clockwise ("+"). |
| Monitor floats up or is hard to push down | Tensiunea arcului cu gaz este prea mare pentru greutatea monitorului. | Decrease gas spring tension by turning the adjustment screw counter-clockwise ("-"). |
| Monitor is wobbly | Mount not securely fastened to desk or VESA plate not tight. | Verificați și strângeți toate clemeleamp/grommet screws and VESA plate screws. |
| Difficulty rotating/tilting monitor | Îmbinările sunt prea strânse. | Loosen the corresponding joint screws slightly (do not remove). |
10. Garanție și asistență
The MOUNTUP MU0034 Single Monitor Desk Mount is backed by a 3-year support period. For technical assistance, missing parts, or warranty claims, please contact MOUNTUP customer support through their official channels or the retailer where the product was purchased.
Vă rugăm să păstrați dovada achiziției în scopul garanției.
Ask a question about this manual
Ask about setup, troubleshooting, compatibility, parts, safety, or missing instructions. Manuals+ will review the question and use this page’s manual context to help answer it.