
1. Introducere
Thank you for choosing the BSIDE ACM92 Mini Clamp Meter. This device is a compact, auto-ranging digital multimeter designed for accurate measurement of AC/DC current, AC/DC voltage, resistance, and frequency. It also features non-contact voltage detection and continuity testing. Please read this manual thoroughly before operation to ensure safe and correct usage.
Informații de siguranță: Always adhere to safety precautions when working with electrical circuits. Incorrect use can lead to electric shock or damage to the meter. This device conforms to IEC-61010-1, IEC-61010-2-030, IEC-61010-2-032, IEC-61010-2-033 standards and has over-voltage protection class CAT III 300V, CAT II 600V, pollution degree II.
2. Produs terminatview
2.1 Componente
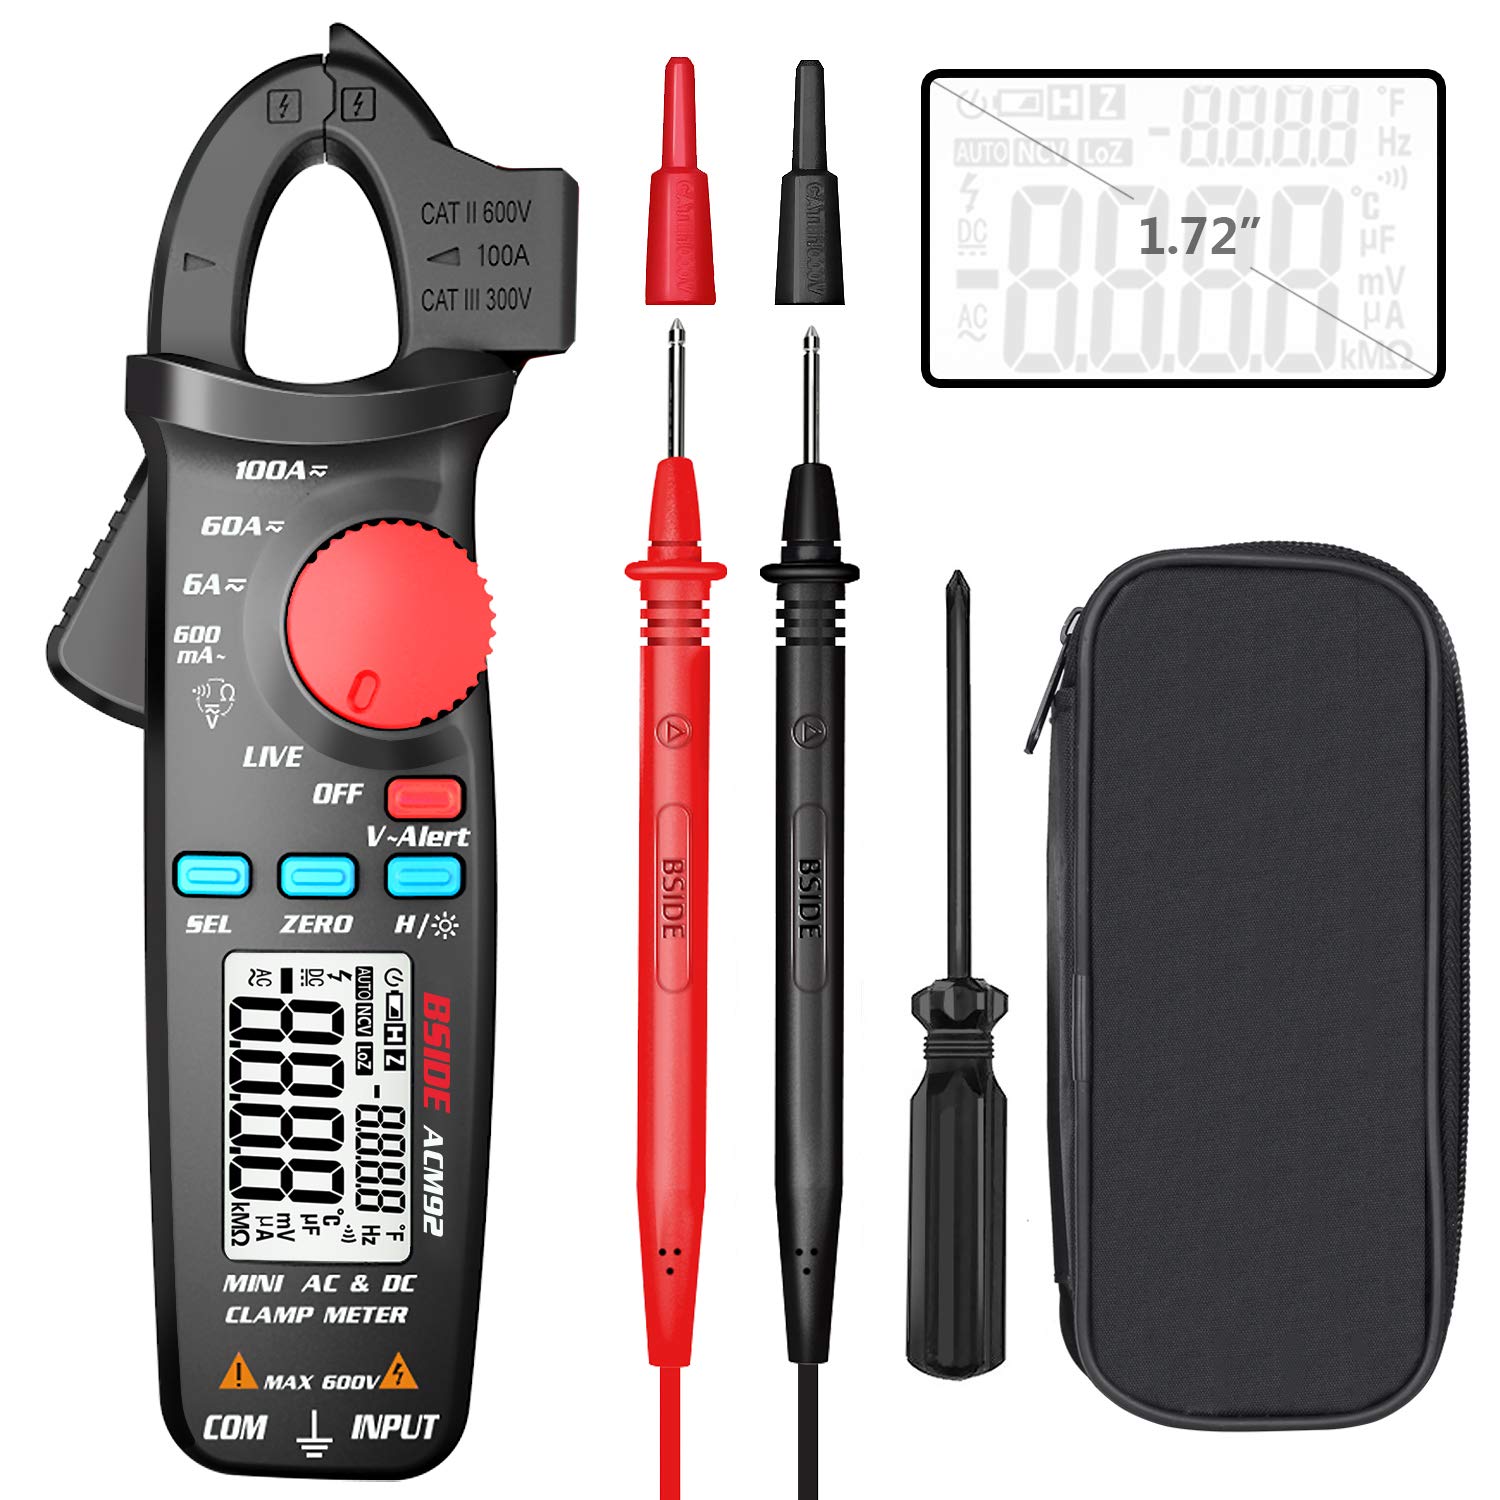
This image displays the BSIDE ACM92 Mini Clamp Meter along with its standard accessories. Included are the clamp meter unit, a pair of test probes (red and black), a carrying bag for protection and portability, and a small screwdriver for battery compartment access.
2.2 Caracteristici cheie
- Measures AC Current (minimum 0.1mA by jaws)
- Measures DC Current (minimum 1mA by jaws)
- Măsuri AC/DC Voltage
- V-Alert (Non-Contact Voltage Detection) and Live-Wire Check
- Measures Frequency, Resistance, and Continuity
- Clamp-on Frequency Function
- Auto Power Off for battery conservation
- Funcția Hold Data
- Indicație baterie descărcată
- Backlight for improved visibility in dark environments
- 20mm jaw capacity with side probe holder
3. Configurare
3.1 Instalarea bateriei
- Asigurați-vă că aparatul de măsură este oprit.
- Localizați capacul compartimentului bateriilor pe spatele contorului.
- Folosiți șurubelnița furnizată pentru a slăbi șurubul care fixează capacul bateriei.
- Scoateți capacul.
- Introduceți două baterii AAA de 1.5 V, respectând polaritatea corectă (+/-).
- Puneți la loc capacul bateriei și strângeți șurubul.
4. Instrucțiuni de utilizare
4.1 Pornire/Oprire
Rotate the rotary switch from 'OFF' to any desired measurement function to power on the meter. To power off, rotate the switch back to 'OFF'. The meter will automatically power off after 20 minutes of inactivity.
4.2 Măsurarea curentului continuu

This image illustrates the BSIDE ACM92 Mini Clamp Meter being used to measure DC current. The clamp jaws are placed around a single conductor connected to a car battery, and the display shows a current reading.
- Rotate the rotary switch to the '6A/60A/100A' DC current range.
- Press the 'ZERO' button to zero out any residual magnetic field before measurement.
- Deschide clamp jaws and enclose only one conductor (not a bundle of wires).
- Citiți valoarea curentului continuu pe afișaj.
4.3 Măsurarea curentului alternativ
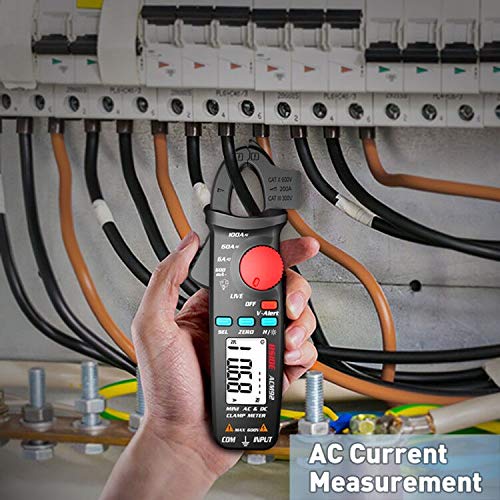
This image shows the BSIDE ACM92 Mini Clamp Meter measuring AC current. The clamp jaws are positioned around a single live wire within an electrical distribution panel, with the measurement displayed on the screen.
- Rotate the rotary switch to the '600mA' or '6A/60A/100A' AC current range.
- Deschide clamp jaws and enclose only one conductor.
- Citiți valoarea curentului alternativ de pe afișaj.
4.4 Măsurarea AC/DC Voltage
- Insert the red test probe into the 'INPUT' jack and the black test probe into the 'COM' jack.
- Rotate the rotary switch to the 'V' (Voltage) function. The meter will automatically detect AC or DC voltage.
- Conectați sondele de testare în paralel cu circuitul sau componenta care urmează să fie măsurată.
- Citiți voltage valoarea pe display.
4.5 V-Alert (Volum fără contact)tage Detectie)

This image demonstrates the V-Alert function of the BSIDE ACM92 Mini Clamp Meter. The meter is held near an electrical circuit breaker, and its display shows 'V-Alert' with a flashing indicator, signifying the detection of AC voltage fără contact direct.
- Rotate the rotary switch to the 'V-Alert' position.
- Bring the top end of the meter near the conductor or outlet.
- Dacă AC voltage is detected, the LCD display will flash, and an alarm buzzer will sound.
4.6 Măsurarea rezistenței
- Insert the red test probe into the 'INPUT' jack and the black test probe into the 'COM' jack.
- Rotate the rotary switch to the 'Ω' (Resistance) function.
- Ensure the circuit or component is de-energized before connecting the probes.
- Connect the test probes across the component to measure its resistance.
- Citiți valoarea rezistenței pe afișaj.
4.7 Test de continuitate
- Insert the red test probe into the 'INPUT' jack and the black test probe into the 'COM' jack.
- Rotate the rotary switch to the 'Ω' (Resistance) function and press 'SEL' to cycle to continuity mode (indicated by a buzzer symbol).
- Conectați sondele de testare la circuit sau la componentă.
- If the resistance is less than 30Ω, the continuity beeper will sound, indicating a continuous path.
4.8 Măsurarea frecvenței
- Utilizarea sondelor de testare: Insert probes, rotate switch to 'Hz' function, connect probes to the circuit.
- Folosind Clamp Fălcile: Rotate switch to 'Hz' function, open jaws and enclose a single conductor carrying AC current.
- Citiți valoarea frecvenței pe afișaj.
4.9 Reținerea datelor
Press the 'H/☀' button briefly to hold the current reading on the display. Press it again to release the hold function.
4.10 Lumina de fundal
Press and hold the 'H/☀' button for approximately 2 seconds to turn the backlight on or off.
5. Întreținere
5.1 Curățare
Ștergeți suprafața contoruluiasing cu anunțamp o lavetă și un detergent blând. Nu utilizați abrazive sau solvenți. Asigurați-vă că aparatul de măsură este complet uscat înainte de utilizare.
5.2 Înlocuirea bateriei
When the low battery indicator appears on the display, replace the batteries as described in Section 3.1. Remove batteries if the meter will not be used for an extended period.
6. Depanare
6.1 Probleme comune
| Problemă | Cauza posibila | Soluţie |
|---|---|---|
| Contorul nu pornește | Baterii uzate sau instalate incorect | Înlocuiți bateriile, asigurându-vă de polaritatea corectă. |
| Citire curentă inexactă | Multiple conductors in jaws; residual magnetism (DC) | Ensure only one conductor is in jaws. Press 'ZERO' for DC current. |
| Fără bip de continuitate | Resistance too high; meter not in continuity mode | Check circuit for breaks. Press 'SEL' to select continuity mode. |
| Afișajul arată „OL” | Suprasarcină sau în afara intervalului | Select a higher range if available, or the measured value exceeds meter's maximum. |
7. Specificații
7.1 Specificații tehnice
| Măsurare | Gamă | Precizie |
|---|---|---|
| Afişa | 6000 conturi | |
| Curent DC | 6A/60A/100A | ±(2.5%+10 counts) |
| Curent alternativ | 600mA/6A/60A/100A | ±(3.0%+10 counts) for 600mA; ±(2.5%+10 counts) for others |
| DC Voltage | 600V | ±(1.0%+5 counts) |
| AC Voltage | 600V | ±(1.0%+3 counts) |
| Rezistenţă | 6000Ω | ±(1.0%+3 counts) |
| Frequency (Probes) | 60Hz/1000Hz | ±(1.5%+5 counts) |
| Frequency (Jaws) | 60Hz/1000Hz | ±(1.0%+5 counts) |
| Jaw Capacity | 20mm | |
| Putere | 1.5 V (AAA) x 2 | |
| Dimensiune | 179 x 67 x 36 mm | |
| Greutate | 137 g | |
8. Măsuri importante de siguranță
- Nu depășiți valorile maxime de intrare specificate pentru fiecare funcție.
- Never use the meter if it or the test leads appear damaged.
- Nu utilizați contorul în medii cu gaze explozive, vapori sau praf.
- Aveți grijă când lucrați cu voltagpeste 30V AC RMS, 42V peak sau 60V DC. Aceste voltajetagreprezintă un pericol de șoc.
- Deconectați întotdeauna alimentarea circuitului și descărcați toate curentul de mare tensiune.tagcondensatoare înainte de a măsura rezistența sau continuitatea.
- Ensure the rotary switch is set to the correct function before making a measurement.
- Țineți degetele în spatele apărătorilor de degete de pe sondele de testare în timpul utilizării.
- Înlocuiți bateriile imediat ce apare indicatorul de baterie descărcată pentru a asigura citiri precise.
9. Conținutul pachetului
- 1 x BSIDE ACM92 Clamp Metru
- 1 x Pair of Test Probes
- 1 x Geantă de transport
- 1 x șurubelniță
- 1 x Manual de utilizare (acest document)
10. Garanție și asistență pentru clienți
Pentru informații despre garanție sau asistență tehnică, vă rugăm să consultați ambalajul produsului sau să contactați distribuitorul. Păstrați bonul fiscal ca dovadă a achiziției.

