1. Introducere
Thank you for choosing the TIC-D2500 2-Input, 2-Zone, 2X300W Bridged Power Amplifier. Acest grad profesional amplifier is designed for reliable performance in various audio applications, featuring 8 Ohm, 4 Ohm, and 70V output capabilities, along with Crown ultra-efficient DriveCore technology. This manual provides essential information for the safe and efficient operation of your ampmai în viață.
2. Informații de siguranță
AVERTIZARE: To reduce the risk of fire or electric shock, do not expose this equipment to rain or moisture. Do not open the casing. Apelați la personal de service calificat pentru toate lucrările de service.
- Citiți toate instrucțiunile înainte de a utiliza ampmai în viață.
- Păstrați aceste instrucțiuni pentru referințe viitoare.
- Respectați toate avertismentele de pe produs și din instrucțiunile de utilizare.
- Urmați toate instrucțiunile.
- Nu utilizați acest aparat lângă apă.
- Curățați numai cu o cârpă uscată.
- Nu blocați niciun orificiu de ventilație. Instalați conform instrucțiunilor producătorului.
- Nu instalați lângă nicio sursă de căldură, cum ar fi calorifere, registre de căldură, sobe sau alte aparate (inclusiv ampliificatori) care produc căldură.
- Nu înfrângeți scopul de siguranță al ștecherului polarizat sau cu împământare. Un ștecher polarizat are două lame, una mai lată decât cealaltă. Un ștecher de tip împământare are două lame și un al treilea ștecher de împământare. Lama lată sau al treilea vârf sunt prevăzute pentru siguranța dumneavoastră. Dacă ștecherul furnizat nu se potrivește în priză, consultați un electrician pentru înlocuirea prizei învechite.
- Protejați cablul de alimentare să nu fie călcat sau ciupit, în special la prize, prize convenabile și la punctul de ieșire din aparat.
- Utilizați numai atașamente/accesorii specificate de producător.
- Deconectați acest aparat din priză în timpul furtunilor cu fulgere sau când nu este utilizat pentru perioade lungi de timp.
- Toate lucrările de întreținere se adresează personalului de service calificat. Întreținerea este necesară atunci când aparatul a fost deteriorat în vreun fel, cum ar fi cablul de alimentare sau ștecherul este deteriorat, s-a vărsat lichid sau au căzut obiecte în aparat, aparatul a fost expus la ploaie sau umezeală, nu funcționează normal , sau a fost abandonat.
3. Produs terminatview
3.1 Panoul frontal

Figure 3.1: Front Panel of the TIC-D2500 Amplifier. Shows the power switch, LCD display, control knobs for channels A and B, and navigation buttons.
- Întrerupător: Întoarce ampmai viață pornită sau oprită.
- CHA / CHB Level Controls: Rotary knobs to adjust the output level for Channel A and Channel B independently.
- Display LCD: Shows volume in dB per channel, operating temperature, and other system information.
- Navigation Buttons (Home, Level, Type, Function, Mute): Used to navigate menus and adjust settings on the LCD display.
- TIC-D2500 Model Indicator: Displays the product model number.
3.2 Panoul din spate

Figure 3.2: Rear Panel of the TIC-D2500 Amplifier. Displays input/output connectors, mode switches, AC inlet, and breaker.
- Breaker: Circuit breaker for protection.
- Intrare AC: Power input connector for the AC power cord.
- Speaker Outputs (CH1, CH2, BRG): Connectors for speaker cables. Supports 4Ω, 8Ω, and 70V outputs. Includes both binding posts and Speakon-style connectors.
- CH1 Input / CH2 Input (XLR): Balanced XLR input connectors for audio signals.
- CH1 Link / CH2 Link (XLR): XLR link outputs for passing the input signal to another amplifizer sau dispozitiv.
- Mode Switches (BRG, PARALLEL, STEREO): Switches to select the amplifier's operating mode (Bridged, Parallel, or Stereo).
- HI-PASS Switches (OFF, 30Hz, 50Hz): Switches to activate high-pass filters at 30Hz or 50Hz, or disable them.
3.3 Detailed Rear Panel Connectors
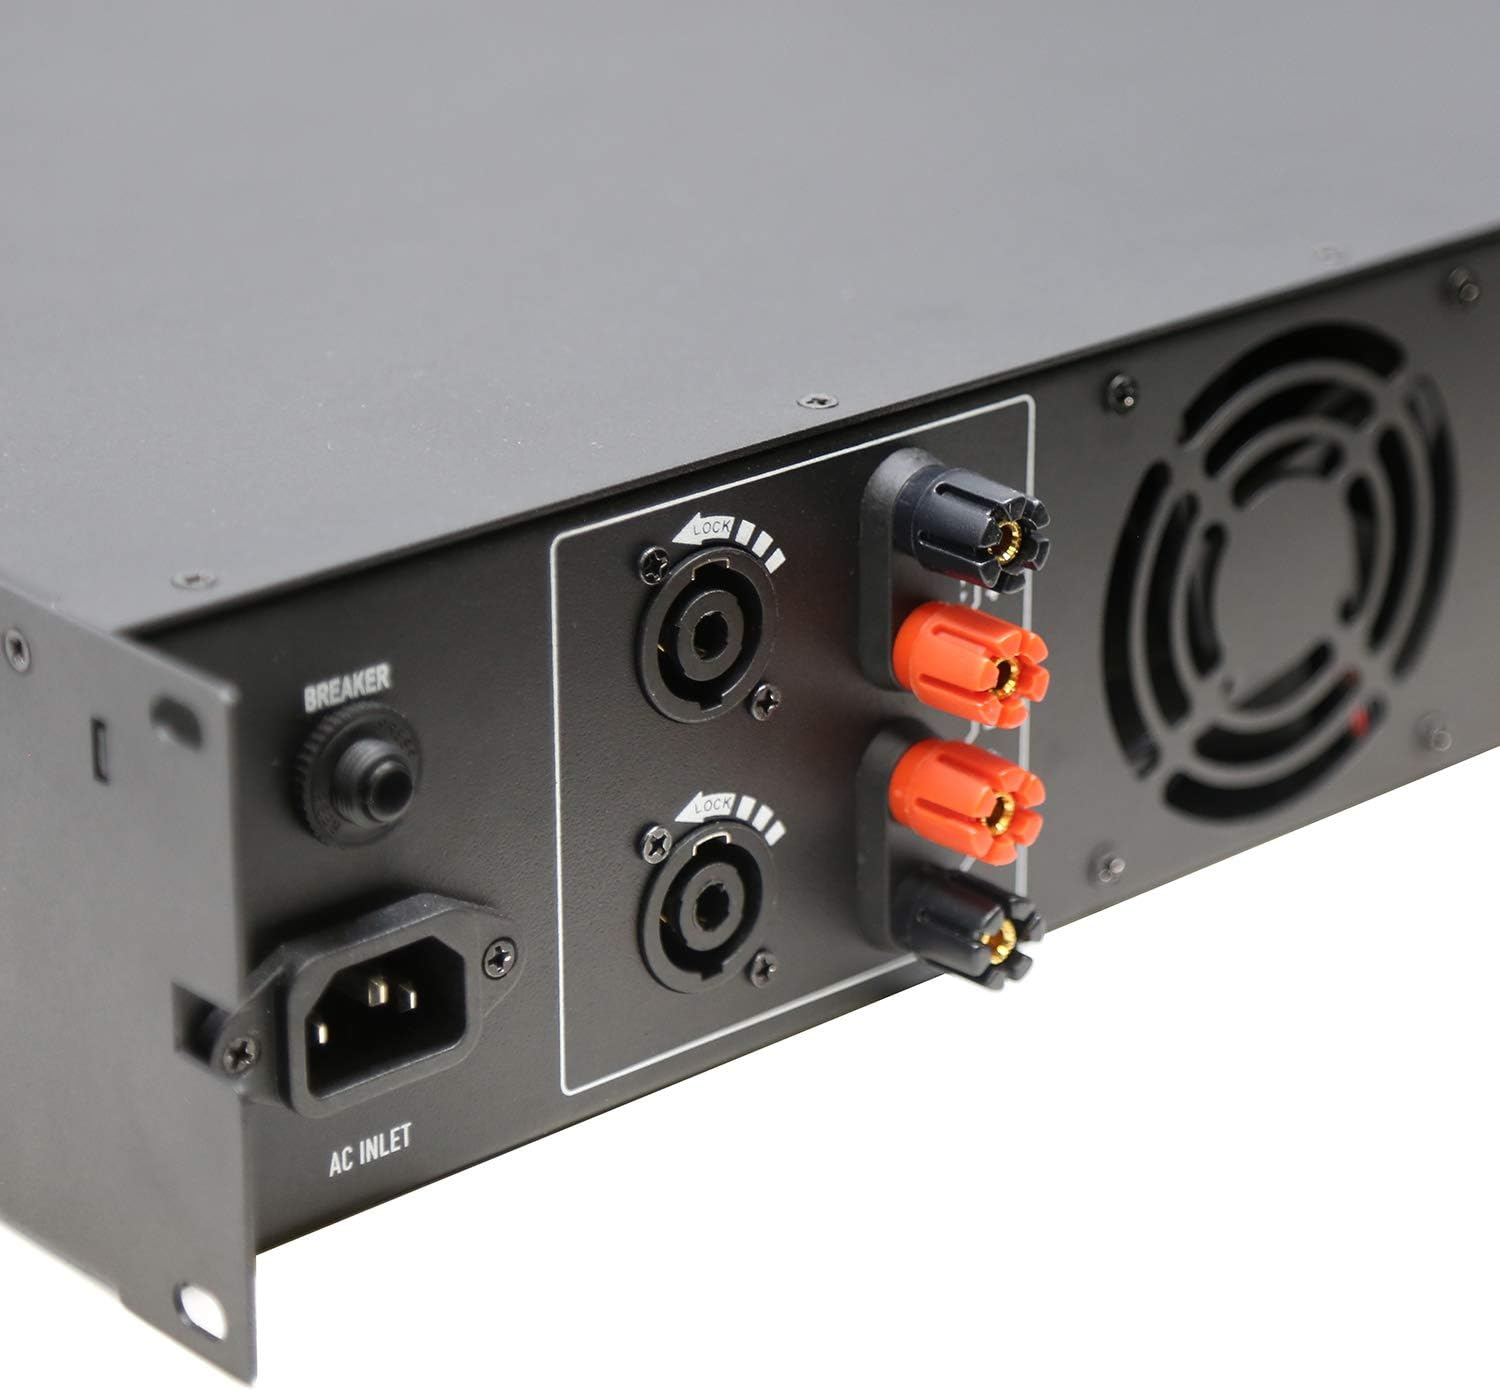
Figure 3.3: Rear Left Panel Detail. Shows the AC inlet, breaker, and speaker output terminals (binding posts and Speakon).

Figure 3.4: Rear Right Panel Detail. Shows the XLR input and link output connectors, along with the BRG/PARALLEL/STEREO and HI-PASS switches.
4. Configurare
- Plasare: Asigurați amplifier is placed in a well-ventilated area, preferably in a standard 2U rack space. Maintain adequate clearance around the unit for airflow.
- Conexiune de alimentare:
- Asigurați ampÎntrerupătorul de alimentare al aparatului este în poziția OPRIT.
- Connect the supplied AC power cord to the AC Inlet on the rear panel and then to a suitable grounded power outlet.
- Conexiuni de intrare:
- Conectați sursa audio (mixer, preamplificator)amplifier, etc.) to the CH1 INPUT and CH2 INPUT XLR connectors on the rear panel using balanced XLR cables.
- If linking to another amplifier, use the CH1 LINK and CH2 LINK XLR outputs.
- Output Connections (Speakers):
- Connect your speakers to the appropriate speaker output terminals (binding posts or Speakon) on the rear panel. Ensure correct polarity (+ to + and - to -).
- For 70V systems, ensure your speakers are compatible with 70V constant voltage systems and connect them accordingly.
- For 4Ω or 8Ω operation, ensure your speakers' impedance matches the amplifier's output capabilities for the selected mode (Stereo or Parallel).
- For Bridged mode (BRG), connect a single speaker to the designated BRG output terminals. Refer to the rear panel markings for correct connections.
- Selectarea modului:
- Set the BRG/PARALLEL/STEREO switch to your desired operating mode.
- Set the HI-PASS switches according to your system requirements. "OFF" for full range, "30Hz" or "50Hz" to filter out low frequencies.
5. Instrucțiuni de utilizare
- Pornire:
- Before powering on, ensure all level controls (CHA, CHB) are set to their minimum position.
- Turn on your audio source equipment first.
- Flip the Power Switch on the front panel to the ON position. The LCD display will illuminate.
- Reglarea volumului:
- Slowly increase the CHA and CHB level controls to achieve the desired output volume.
- Monitor the LCD display for volume levels (in dB) and operating temperature.
- Using the LCD Display and Navigation:
- Use the "Home", "Level", "Type", "Function", and "Mute" buttons to navigate through the amplifier's settings and monitoring options displayed on the LCD.
- Consult the on-screen menus for specific adjustments related to input sensitivity, output modes, and other advanced features.
- Oprire:
- Before powering off, reduce all level controls to their minimum position.
- Opriți ampLiifier folosind comutatorul de alimentare.
- Turn off your audio source equipment.
6. Întreținere
- curatenie: Deconectați amplifier from power before cleaning. Use a soft, dry cloth to wipe down the exterior. Do not use liquid cleaners or aerosols.
- Ventilare: Regularly check that ventilation openings are clear of dust and debris to ensure proper cooling.
- Conexiuni prin cablu: Periodically inspect all cable connections for secure fit and signs of wear.
- Depozitare: Dacă stocați amplifier for an extended period, ensure it is in a cool, dry place, protected from dust and extreme temperatures.
7. Depanare
| Problemă | Cauza posibila | Soluţie |
|---|---|---|
| Fără putere | Power cord disconnected; Power switch off; Circuit breaker tripped; Power outlet issue. | Check power cord connection; Ensure power switch is ON; Reset circuit breaker; Test power outlet with another device. |
| Fără ieșire de sunet | Input cables disconnected; Speaker cables disconnected or incorrect polarity; Amplifier level controls at minimum; Incorrect mode selection; Audio source issue. | Check all input and output cable connections; Verify speaker polarity; Increase CHA/CHB level controls; Ensure correct BRG/PARALLEL/STEREO mode is selected; Check audio source. |
| Sunet distorsionat | Input signal too high (clipping); Amplifier overloaded; Speaker impedance mismatch; Faulty cables. | Reduce input signal level from source; Ensure speakers match amplifier impedance; Check speaker connections and cables; Reduce ampnivel de ieșire mai ridicat. |
| Supraîncălzire | Blocked ventilation; Excessive load; Prolonged high-level operation. | Asigurați o ventilație adecvată în jurul amplifier; Reduce load or operating level; Allow amplifier să se răcească. |
If the problem persists after attempting these solutions, please contact qualified service personnel or TIC Audio support.
8. Specificații
| Caracteristică | Detaliu |
|---|---|
| Model | D2500 |
| Putere de ieșire (8Ω) | 300 L x 2 |
| Impedanta de iesire | 4Ω / 8Ω / 70V Stable |
| Amptip mai în viață | Class D with Crown DriveCore technology |
| Raspuns in frecventa | 20Hz - 20KHz (+/-3dB) |
| Conectori de intrare | 2 x 3-pin XLR (balanced signal input) |
| Conectori de ieșire | Speaker (x2) - Binding Posts & Speakon-style |
| Spațiu de rack | 2U |
| Dimensiuni (L x A x H) | 483 x 257 x 88.8mm (19 x 10.1 x 3.5 inches approx.) |
| Greutatea articolului | 17.27 lire (7.83 kg) |
| Sursa de alimentare | AC |
9. Garanție și asistență
For warranty information, technical support, or service inquiries, please contact TIC Audio directly. Refer to the official TIC Audio webConsultați site-ul sau documentația de achiziție pentru cele mai recente date de contact și termeni de garanție.
This product may be eligible for extended protection plans. Please refer to your retailer for details on available protection plans.
Producător: TIC Audio