
1. Introducere
The Autopilot APCET2 is a versatile temperature controller designed for both cooling and heating applications. It features automatic day and night set points, detected by a built-in photocell, allowing for precise temperature management. Easy-to-use knobs facilitate setting adjustments, and a Memory-lock feature ensures consistent performance by preventing accidental changes to set points.
Caracteristici cheie:
- Controls heating or cooling equipment with both day/night set points.
- Includes a 20-foot remote precision temperature sensor.
- Temperature control differential of +/- 3°F.
- Built-in photocell for automatic day/night detection.
- Temperature control range: 50°F–100°F (10°C–38°C).
- Electric power source.
2. Informații de siguranță
Vă rugăm să citiți și să înțelegeți toate instrucțiunile de siguranță înainte de a utiliza acest dispozitiv. Nerespectarea acestor instrucțiuni poate duce la electrocutare, incendiu sau vătămări corporale grave.
- Numai pentru utilizare în interior: This device is intended for indoor use in dry locations. Do not expose to water or high humidity.
- Evaluare electrică: Ensure the connected device's electrical rating does not exceed the thermostat's maximum load (1800 watts, 15 amps at 120V AC).
- Împământare adecvată: Always plug the thermostat into a properly grounded 3-prong outlet.
- Evitați supraîncărcarea: Do not plug multiple high-power devices into the thermostat using a power strip or adapter.
- Plasarea senzorului: Position the temperature sensor away from direct heat sources, cold drafts, or direct sunlight to ensure accurate readings.
- curatenie: Disconnect power before cleaning. Use a dry cloth; do not use liquid cleaners.
- Copii și animale de companie: Nu lăsați dispozitivul la îndemâna copiilor și a animalelor de companie.
3. Produs terminatview
The Autopilot APCET2 thermostat features a user-friendly design with clearly labeled controls and indicators.
Faţă View:
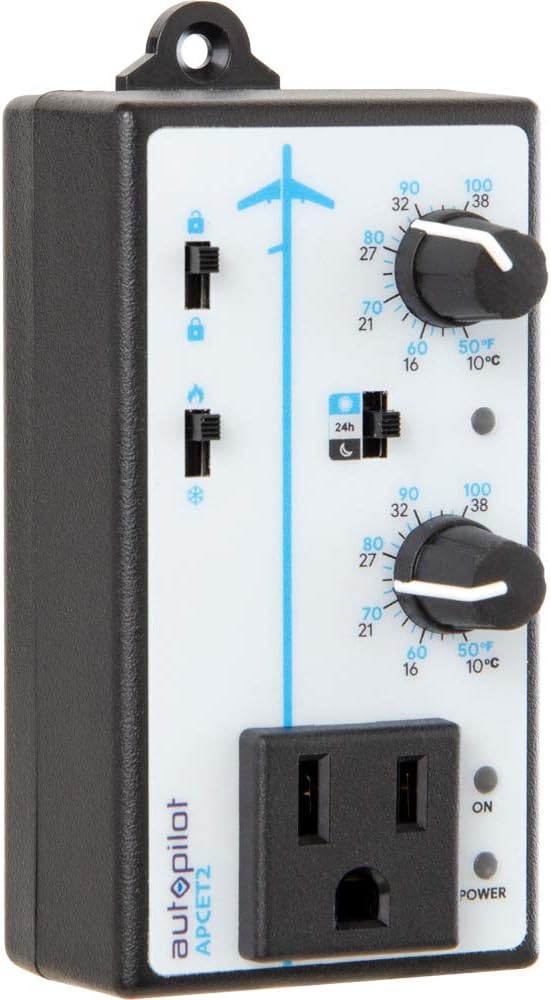
Figura 3.1: Faţă view of the Autopilot APCET2 thermostat. This image displays the main control panel, including the two temperature setting knobs, the day/night mode switch, the heating/cooling mode switch, and the integrated power outlet for connecting your device. The "ON" and "POWER" indicator lights are also visible.
- Day/Night Temperature Knobs: Two separate knobs for setting desired temperatures for day and night cycles.
- Day/Night Mode Switch: Toggles between 24-hour operation or automatic day/night detection via photocell.
- Heating/Cooling Mode Switch: Selects whether the thermostat controls a heating or cooling device.
- Priză integrată: Where the controlled device is plugged in.
- Indicator luminos de alimentare: Se aprinde când unitatea este alimentată cu energie electrică.
- Indicator luminos de ieșire: Illuminates when power is being supplied to the connected device.
Spate View:

Figura 3.2: Spate view of the Autopilot APCET2 thermostat. This image shows the standard 3-prong power plug for connecting the thermostat to a wall outlet, along with the screws for potential wall mounting.
- Priza de alimentare: Standard 3-prong plug for connecting to a 120V AC wall outlet.
- Găuri de montare: For optional wall mounting.
Dimensiuni:
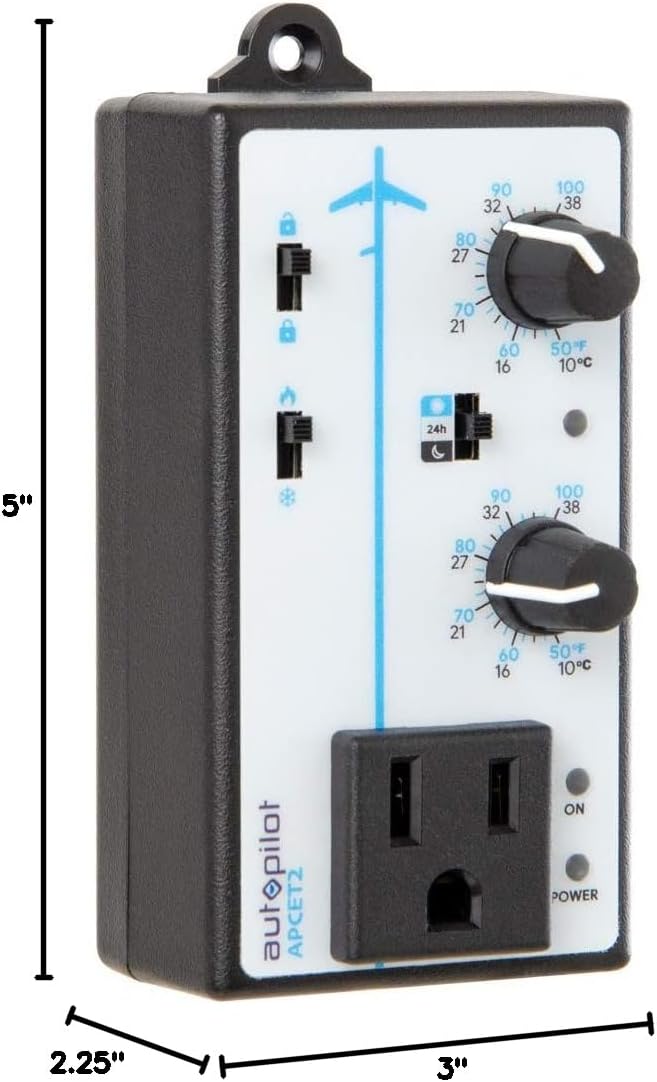
Figura 3.3: Dimensions of the Autopilot APCET2 thermostat. The image indicates the device measures approximately 3 inches deep, 2.25 inches wide, and 5 inches high.
4. Instrucțiuni de configurare
- Despachetați dispozitivul: Carefully remove the Autopilot APCET2 thermostat and its components from the packaging.
- Connect the Temperature Sensor: Plug the 20-foot remote precision temperature sensor into the designated port on the side of the thermostat. Ensure a secure connection.
- Poziționarea senzorului: Place the temperature sensor in the area where you want to monitor and control the temperature. Avoid placing it in direct sunlight, near heat sources, or in drafts, as this can affect accuracy.
- Plug in the Thermostat: Insert the 3-prong plug of the Autopilot APCET2 thermostat into a standard 120V AC grounded wall outlet. The Power indicator light should illuminate.
- Conectați-vă dispozitivul: Plug the heating or cooling device you wish to control into the integrated power outlet on the front of the thermostat.
- Verificare inițială: Ensure all connections are secure before proceeding to operation.
5. Instrucțiuni de utilizare
The Autopilot APCET2 offers flexible temperature control with day and night settings and heating/cooling modes.
5.1 Selecting Operating Mode (Heating or Cooling)
- Localizați Heating/Cooling Mode Switch on the front panel (typically marked with flame and snowflake icons).
- Glisați comutatorul spre icoana flacara pentru Modul de încălzire. In this mode, the connected device will turn ON when the temperature drops below the set point and turn OFF when it rises above the set point (considering the +/- 3°F differential).
- Glisați comutatorul spre pictograma fulg de nea pentru Modul de răcire. In this mode, the connected device will turn ON when the temperature rises above the set point and turn OFF when it drops below the set point (considering the +/- 3°F differential).
5.2 Setting Day and Night Temperatures
The thermostat allows for distinct day and night temperature settings.
- Day Temperature Setting: Utilizați upper knob (associated with the sun icon) to set your desired daytime temperature. Rotate the knob clockwise to increase the temperature and counter-clockwise to decrease it. The range is 50°F–100°F (10°C–38°C).
- Night Temperature Setting: Utilizați lower knob (associated with the moon icon) to set your desired nighttime temperature. Rotate the knob clockwise to increase the temperature and counter-clockwise to decrease it. The range is 50°F–100°F (10°C–38°C).
5.3 Day/Night Detection Mode
The thermostat can automatically switch between day and night settings using its built-in photocell.
- Localizați Day/Night Mode Switch (typically marked with a 24h icon and sun/moon icons).
- Glisați comutatorul spre sun/moon icon pentru Detectare automată zi/noapte. The built-in photocell will detect ambient light levels and automatically switch between your set day and night temperatures.
- Glisați comutatorul spre 24h icon pentru 24-Hour Operation. In this mode, the thermostat will continuously use the Day Temperature Setting, regardless of light conditions.
5.4 Memory-Lock Feature
The Memory-lock feature prevents accidental changes to your set points.
- La blocare the settings, slide the small switch next to the padlock icon to the poziție blocată. This will prevent the temperature knobs from being accidentally adjusted.
- La debloca the settings, slide the switch to the poziție deblocată.
6. Întreținere
Regular maintenance ensures optimal performance and longevity of your Autopilot APCET2 thermostat.
- curatenie: Disconnect the thermostat from the power outlet before cleaning. Use a soft, dry cloth to wipe the exterior. Do not use abrasive cleaners, solvents, or immerse the unit in water.
- Îngrijirea senzorului: Keep the temperature sensor clean and free from dust or debris. Ensure the sensor cable is not pinched or damaged.
- Depozitare: If storing the device for an extended period, disconnect it from power, clean it, and store it in a cool, dry place.
7. Depanare
If you encounter issues with your Autopilot APCET2 thermostat, refer to the following common problems and solutions:
| Problemă | Cauza posibila | Soluţie |
|---|---|---|
| Device not turning ON/OFF at set temperature. | Incorrect mode selected (Heating/Cooling). Temperature differential not met. Termostatul nu primește curent. Connected device is faulty or not powered. | Verify the Heating/Cooling switch is in the correct position. Allow for the +/- 3°F temperature differential. Check if the thermostat is securely plugged into a live outlet and the Power indicator is ON. Test the connected device by plugging it directly into a wall outlet. |
| Temperature settings cannot be adjusted. | Memory-lock feature is engaged. | Slide the Memory-lock switch to the unlocked position. |
| Day/Night mode not switching automatically. | Photocell mode not selected. Photocell is obstructed or in constant light/darkness. | Ensure the Day/Night Mode switch is set to the sun/moon icon. Check that the photocell (small sensor on the front) is not covered and is exposed to natural light changes. |
| Citiri inexacte ale temperaturii. | Temperature sensor improperly placed or damaged. | Relocate the sensor away from direct heat, cold drafts, or sunlight. Inspect the sensor and cable for damage. |
Dacă problema persistă după încercarea acestor soluții, vă rugăm să contactați serviciul de asistență pentru clienți.
8. Specificații
| Marca | Pilot automat |
| Numele modelului | Advanced Day & Night Cooling or Heating |
| Numărul de model | APCET2 |
| Dimensiunile produsului | 3" D x 2.25" L x 5" H |
| Tip controler | Knob & Push Button |
| Caracteristica specială | Lockable (Memory-lock) |
| Culoare | Negru |
| Utilizări specifice | Temperature Control in Grow Rooms, Controlling Heating and Cooling Equipment |
| Tip de control al temperaturii | Programabil |
| Componente incluse | 20' remote precision temperature sensor |
| Sursa de alimentare | Electric |
| Voltage | 120 volți |
| Wattage | 1800 wați |
| Greutatea articolului | 8.1 uncii |
| Interval de control al temperaturii | 50°F–100°F (10°C–38°C) |
| Diferențial de temperatură | +/- 3 ° F |
| Tip de afișare | LCD |
| Iluminare de fundal | Da |
| Tip de montare | Montare pe perete |
9. Garanție și asistență pentru clienți
For warranty information or technical assistance, please contact Autopilot customer support. Refer to the product packaging or the official Autopilot website pentru cele mai recente date de contact.
When contacting support, please have your product model number (APCET2) and purchase information readily available.