
HoldPeak HP-890CN
HoldPeak HP-890CN Digital Multimeter User Manual
Model: HP-890CN
1. Introducere
Thank you for choosing the HoldPeak HP-890CN Digital Multimeter. This device is designed for stable and reliable performance, featuring an anti-drop design and a clear 25mm high LCD display. It is capable of measuring various electrical parameters including DC/AC voltage, diode, resistance, capacitance, frequency, duty cycle, temperature, and hFE, along with a non-contact voltage (NCV) detection function. Please read this manual thoroughly before use to ensure safe and proper operation.
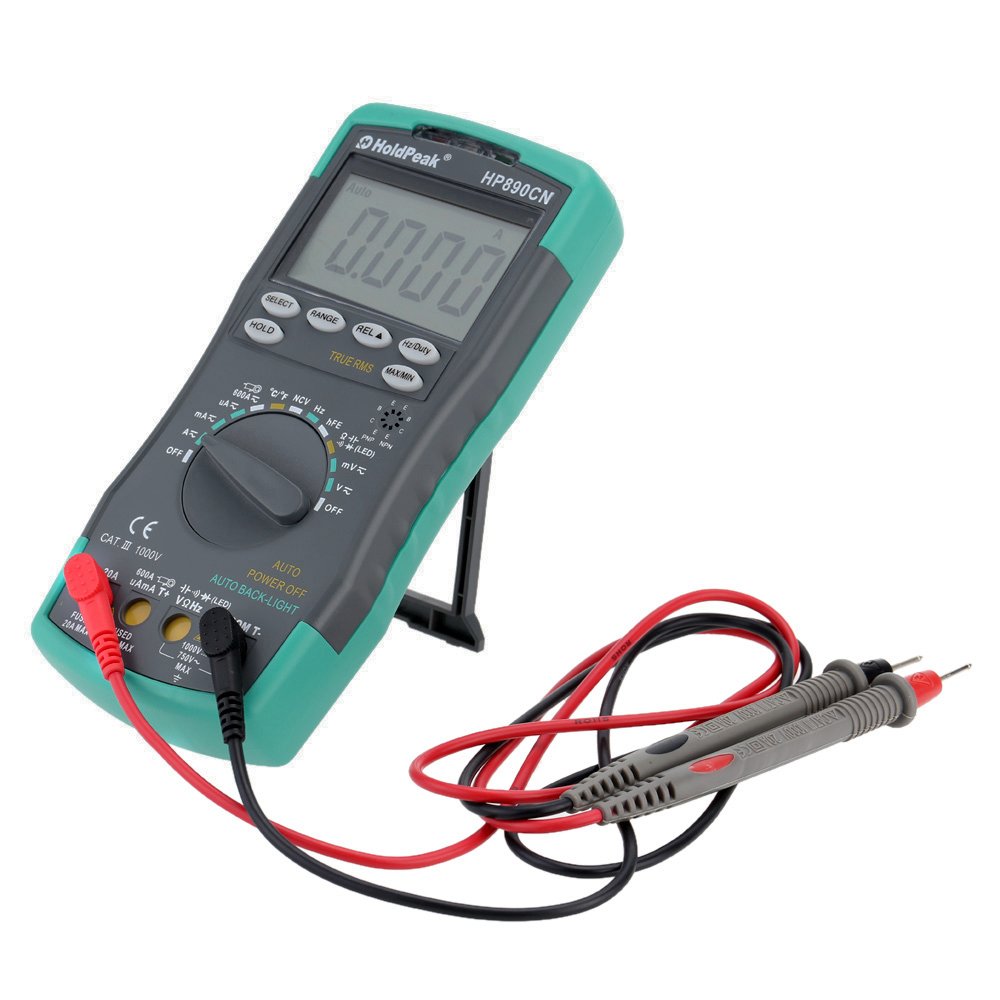
Figure 1: HoldPeak HP-890CN Digital Multimeter
2. Informații de siguranță
WARNING: To avoid electrical shock or damage to the meter, please observe the following safety precautions:
- Always remove test leads from the circuit before opening the case or battery cover.
- Do not operate the meter with the case or battery cover open.
- To prevent damage or injury, ensure quick-acting fuses with the specified amp and volt ratings are installed.
- This device complies with IEC 1010-1 1000V CAT III, Pollution Degree 2 standards.
- Folosiți întotdeauna funcția și intervalul corecte pentru măsurători.
- Nu aplica niciodată voltage sau curent care depășește limitele maxime specificate.
- Fiți precauți când lucrați cu volumtagpeste 30V AC RMS, 42V peak sau 60V DC. Aceste voltajetagreprezintă un pericol de șoc.
- Keep fingers behind the probe barriers during measurements.

Figura 2: Spate view of the multimeter showing safety warnings and battery compartment.
3. Produs terminatview
The HoldPeak HP-890CN Digital Multimeter features a large LCD display and intuitive controls for ease of use. Below is a diagram illustrating the main components and their functions.

Figure 3: Labeled diagram of the HP-890CN Multimeter.
Componente cheie:
- Display LCD: Shows measurement readings, units, and function indicators. Features smart backlight.
- Comutator de funcție: Comutator rotativ pentru selectarea funcțiilor de măsurare (Volumtage, Curent, Rezistență etc.).
- Mufe de intrare:
- COM: Common input jack for the black test lead.
- VΩHz: Intrare pentru voltage, resistance, frequency, capacitance, diode, and temperature measurements (red test lead).
- mAµA: Input for current measurements up to 600mA (red test lead).
- 20A: Input for current measurements up to 20A (red test lead).
- Butoane:
- SELECTA: Toggles between functions within a single rotary switch position (e.g., AC/DC, Diode/Continuity).
- GAMĂ: Selectează manual intervalul de măsurare (setarea automată a intervalului este implicită).
- REL (Valoare relativă): Measures relative changes.
- Hz/Funcție: Selects frequency or duty cycle measurement.
- ȚINEȚI: Îngheață citirea curentă a afișajului.
- TRUE RMS: Indicates True RMS measurement capability for AC.
- MAX / MIN: Records maximum and minimum readings.
- NCV Induction Area: Pentru non-contact voltage detectare.
- hFE Testing Interface: Soclu pentru testarea tranzistoarelor.
- Stativ: Suport integrat pentru confort viewing (rotates 180 degrees).
4. Configurare
4.1 Instalarea bateriei
The multimeter requires either two 1.5V AAA batteries or one 9V 6F22 battery (not included). The specific battery type included with your product may vary. To install or replace batteries:
- Asigurați-vă că multimetrul este oprit (OFF) și că toate sondele de testare sunt deconectate.
- Localizați compartimentul bateriilor pe spatele contorului.
- Folosiți o șurubelniță pentru a slăbi șurubul care fixează capacul bateriei.
- Scoateți capacul bateriei.
- Introduceți bateriile noi, respectând polaritatea corectă (+ și -).
- Puneți la loc capacul bateriei și strângeți bine șurubul.

Figura 4: Intern view of the multimeter, showing the battery compartment.
4.2 Conectarea cablurilor de testare
Always connect the black test lead to the COM jack. Connect the red test lead to the appropriate input jack based on the measurement you intend to perform:
- Pentru Voltage, Resistance, Capacitance, Frequency, Diode, and Temperature: Connect the red lead to the VΩHz jack.
- For Current up to 600mA: Connect the red lead to the mAµA jack.
- For Current up to 20A: Connect the red lead to the 20A jack.
5. Instrucțiuni de utilizare
Before taking any measurements, ensure the test leads are correctly connected and the function switch is set to the desired measurement type.
5.1 Pornire/Oprire
Rotate the function switch from the OFF position to any desired measurement function to turn the meter ON. Rotate it back to OFF to power it down. The meter features an auto power-off function to conserve battery life.
5.2 Măsurarea DC Voltage (V=)
- Set the function switch to the V= position.
- Conectați sonda neagră la mufa COM și sonda roșie la mufa VΩHz.
- Connect the test probes across the component or circuit to be measured, in parallel.
- Citiți voltagValoarea de pe ecranul LCD.
5.3 Măsurarea AC Voltage (V~)
- Setați comutatorul de funcție în poziția V~.
- Conectați sonda neagră la mufa COM și sonda roșie la mufa VΩHz.
- Connect the test probes across the component or circuit to be measured, in parallel.
- Citiți voltage value on the LCD display. This meter provides True RMS readings for AC voltage.

Figura 5: Măsurarea volumului de curent alternativtagde la o priză de curent.
5.4 Measuring DC/AC Current (A= / A~)
CAUTION: Always connect the meter in series with the circuit when measuring current. Ensure the circuit is de-energized before connecting the meter.
- Set the function switch to the A= or A~ position. Use the SELECT button to toggle between DC and AC if necessary.
- Conectați cablul de test negru la mufa COM.
- Pentru curenți de până la 600 mA, conectați sonda roșie de testare la mAµA Pentru curenți de până la 20 A, conectați sonda roșie de testare la mufa 20A jack.
- Break the circuit and connect the test probes in series with the circuit.
- Conectați circuitul la curent și citiți valoarea curentului pe afișajul LCD.
5.5 Măsurarea rezistenței (Ω)
- Setați comutatorul de funcție în poziția Ω.
- Conectați sonda neagră la mufa COM și sonda roșie la mufa VΩHz.
- Connect the test probes across the component to be measured. Ensure the component is de-energized.
- Citiți valoarea rezistenței pe afișajul LCD.
5.6 Measuring Capacitance (F)
- Set the function switch to the capacitance (F) position.
- Conectați sonda neagră la mufa COM și sonda roșie la mufa VΩHz.
- Connect the test probes across the capacitor. Ensure the capacitor is fully discharged before measurement.
- Citiți valoarea capacității pe afișajul LCD.
5.7 Measuring Frequency (Hz) / Duty Cycle (%)
- Set the function switch to the Hz/% position.
- Conectați sonda neagră la mufa COM și sonda roșie la mufa VΩHz.
- Conectați sondele de testare la sursa de semnal.
- Press the Hz/Duty button to toggle between frequency and duty cycle measurements.
- Citiți valoarea de pe ecranul LCD.
5.8 Testarea diodei
- Set the function switch to the Diode/Continuity position. Press SELECT to choose Diode Test.
- Conectați sonda neagră la mufa COM și sonda roșie la mufa VΩHz.
- Conectați sonda roșie la anod și sonda neagră la catodul diodei.
- Citiți voltage drop on the LCD display. Reverse the probes to check for open circuit (OL).
5.9 Test de continuitate
- Set the function switch to the Diode/Continuity position. Press SELECT to choose Continuity Test.
- Conectați sonda neagră la mufa COM și sonda roșie la mufa VΩHz.
- Conectați sondele de testare la circuit sau la componentă.
- Dacă rezistența este sub aproximativ 50 Ω, va suna un buzer, indicând continuitatea.
5.10 Temperature Measurement (°C/°F)
- Setați comutatorul de funcție în poziția °C/°F.
- Connect the K-type thermocouple probe to the VΩHz and COM jacks, observing polarity.
- Așezați vârful termocuplului pe sau lângă obiectul a cărui temperatură trebuie măsurată.
- Read the temperature on the LCD display. Use the SELECT button to switch between Celsius and Fahrenheit.
5.11 hFE Test (Transistor Test)
- Setați comutatorul de funcție în poziția hFE.
- Insert the transistor's Emitter, Base, and Collector leads into the corresponding holes in the hFE socket, ensuring correct NPN or PNP type.
- Citiți valoarea hFE (amplificarea curentului continuu) pe afișajul LCD.
5.12 fără contact voltage (NCV) Detectie
- Set the function switch to the NCV position.
- Move the NCV induction area of the meter close to the conductor being tested.
- Dacă AC voltage is detected (90V to 1000V AC RMS), the NCV red indicator will light up, and the buzzer will sound. The intensity of the sound and light indicates the strength of the detected voltage.
5.13 Funcții speciale
- ȚINEȚI: Apăsați pentru a îngheța valoarea curentă de pe afișaj. Apăsați din nou pentru a o elibera.
- REL (Valoare relativă): Press to store the current reading as a reference. Subsequent measurements will show the difference from this reference.
- MAX / MIN: Press to enter MAX/MIN mode. The meter will display the maximum or minimum reading recorded since entering this mode. Press again to cycle between MAX, MIN, and current reading.
6. Întreținere
6.1 Curățare
Ștergeți contorul cu reclamăamp cloth and mild detergent. Do not use abrasives or solvents. Keep the contacts of the input jacks clean.
6.2 Înlocuirea bateriei
When the battery symbol appears on the LCD, the batteries need to be replaced. Refer to section 4.1 for battery installation instructions.
6.3 Înlocuirea siguranței
WARNING: To avoid electrical shock, disconnect the test leads before opening the case. Replace fuses only with quick-acting fuses of the specified type and rating.
The meter is protected by two fuses:
- F1: 600mA/250V fast-blow fuse for the mAµA input.
- F2: 20A/250V fast-blow fuse for the 20A input.
Pentru a înlocui o siguranță:
- Turn the meter OFF and disconnect all test leads.
- Scoateți capacul bateriilor și bateriile.
- Unscrew the screws holding the back case and carefully open the meter.
- Carefully remove the old fuse by gently prying it from its clips.
- Install a new fuse of the correct type and rating.
- Reasamblați contorul, asigurându-vă că toate șuruburile sunt strânse.
7. Depanare
- Random values in mV mode: It is normal for the display to show random values in mV mode when the input terminals are open (not connected to a circuit). Simply short the input terminals to zero the reading. This will not affect measurement results.
- Niciun afișaj sau afișaj slab iluminat: Verificați nivelul bateriei. Înlocuiți bateriile dacă sunt descărcate.
- No reading in current mode: Check if the fuse is blown. Replace if necessary (refer to section 6.3). Ensure test leads are connected to the correct current input jack (mAµA or 20A) and in series with the circuit.
- Se afișează „OL”: Indicates an overload (measurement exceeds the selected range) or an open circuit.
8. Specificații
| Parametru | Caietul de sarcini |
|---|---|
| Marca | HoldPeak |
| Model | HP-890CN |
| Culoare | Gray + Blue-Green |
| Material | Plastic |
| Afișare maximă | 6000 conturi |
| Controlul autonomiei | Gama automată |
| Dimensiunea ecranului | 60 × 35 mm |
| DC Voltage | 60mV/600mV/6V/60V/600V/1000V |
| AC Voltage (RMS adevărat) | 60mV/600mV/6V/60V/600V/750V |
| Curent DC | 600µA/6000µA/60mA/600mA/6A/20A |
| Curent AC (True RMS) | 600µA/6000µA/60mA/600mA/6A/20A |
| Rezistenţă | 600Ω/6KΩ/60KΩ/600KΩ/6MΩ/60MΩ |
| Capacitate | 9.999nF/99.99nF/999.9nF/9.999µF/99.99µF/999.9µF/9.99mF/99.99mF |
| Frecvenţă | 9.999Hz/99.99Hz/999.9Hz/9.999KHz/99.99KHz/999.9KHz/9.999MHz |
| Ciclul de funcționare | 0.1% până la 99.9% |
| Temperatură | -20 ~ 1000 ° C / -4 ~ 2222 ° F |
| Testul diodei | Da |
| Continuitate Buzzer | Da |
| Testul tranzistorului hFE | 0-1000 |
| Detectare NCV | 90V ~ 1000V AC rms |
| Alimentare electrică | 2 * 1.5V AAA batteries / 1 * 9V 6F22 battery (not included) |
| Mediul de operare | 0-40°C (32-104°F) |
| Mediul de stocare | -20-60 ° C (-4-140 ° F) |
| Dimensiunea produsului (L×L×H) | Approx. 19 × 8.5 × 3.5 cm (7.67 × 3.35 × 1.37 inches) |
| Greutatea produsului | 300 grame (10.58 uncii) |
| Producător | MIS-E0833 |
| UPC | 783950206936, 791592905193 |
9. Conținutul pachetului
Pachetul include următoarele articole:
- 1 * HoldPeak HP-890CN Digital Multimeter
- 1 * Geanta de depozitare
- 1 * Pair of Test Leads (Red and Black)
- 1 * K-Type Thermocouple Probe
- 1 * Manual de utilizare în limba engleză

Figura 6: Multimetru și accesorii incluse.

Figure 7: Included storage bag for the multimeter.
10. Garanție și asistență
For warranty information or technical support, please refer to the documentation provided with your purchase or contact the seller/manufacturer directly. Keep your purchase receipt as proof of purchase.
Ask a question about this manual
Ask about setup, troubleshooting, compatibility, parts, safety, or missing instructions. Manuals+ will review the question and use this page’s manual context to help answer it.