
1. Introducere
This manual provides detailed instructions for the installation, operation, and maintenance of the Fafeicy TM626 DIN Rail Mount AC220V Power Timer Switch. This digital timer is designed for precise time control of electrical appliances and systems, offering programmable on/off cycles for various applications.
The TM626 is suitable for controlling street lights, factory equipment, advertising signs, production machinery, radio and television equipment, stage lighting, and other power equipment that requires regular automated switching.
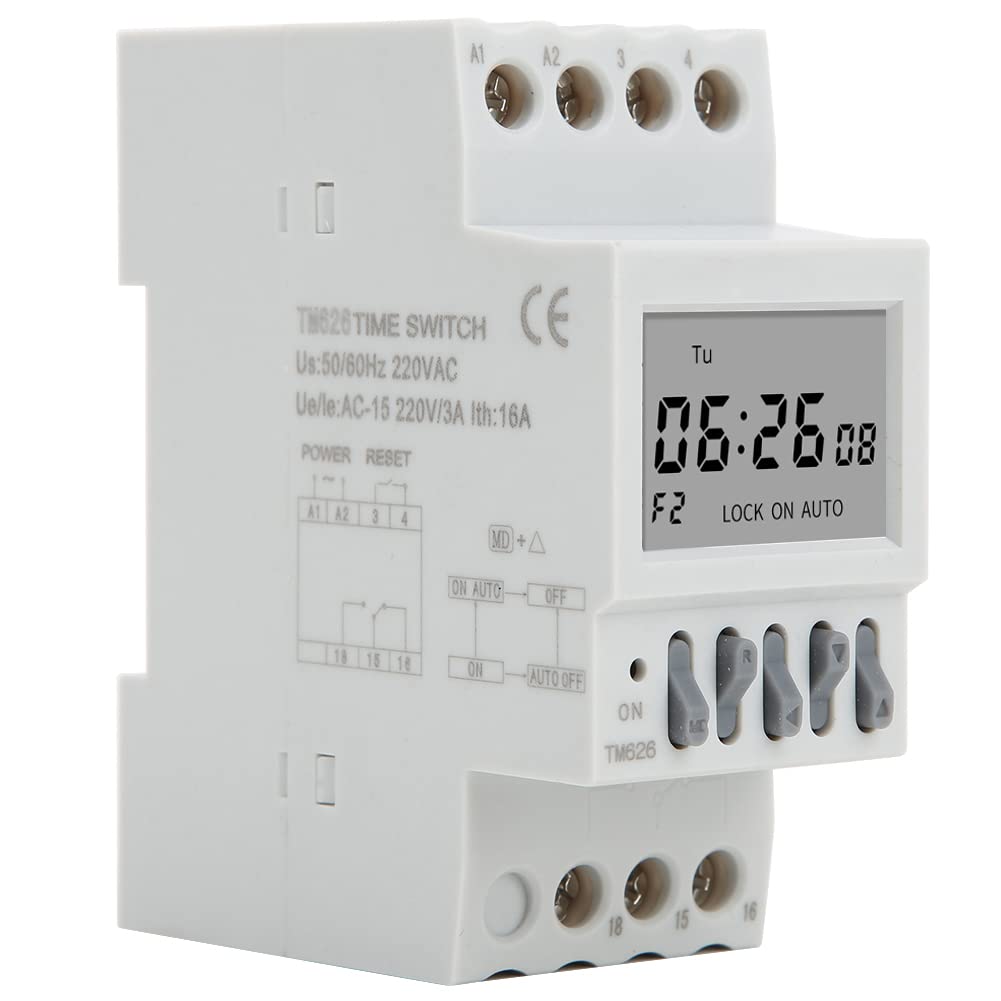
Imaginea 1.1: Înclinată view of the Fafeicy TM626 Power Timer Switch, showing the display and terminal connections.

Image 1.2: The TM626 timer switch is ideal for automating various applications, including street lighting, industrial equipment, and advertising displays.
2. Informații de siguranță
Vă rugăm să citiți și să înțelegeți toate instrucțiunile de siguranță înainte de a instala sau utiliza acest dispozitiv. Nerespectarea acestor instrucțiuni poate duce la electrocutare, incendiu sau vătămări corporale grave.
- Asigurați-vă că alimentarea cu energie electrică este deconectată înainte de orice lucrare de instalare sau întreținere.
- Instalarea trebuie efectuată numai de către un electrician calificat.
- Nu depășiți volumul specificattage (AC220V) and current (16A) ratings.
- Țineți dispozitivul departe de apă și de medii cu umiditate ridicată.
- Nu încercați să deschideți sau să reparați dispozitivul singur. Contactați personal calificat pentru service.
3. Produs terminatview
The Fafeicy TM626 is a compact digital timer switch designed for DIN rail mounting. It features a clear LCD display for time and program settings, along with intuitive control buttons.
3.1 Componente
- Display LCD: Shows current time, day, and programming status.
- Butoane de control: Used for setting time, programming, and manual override.
- Blocuri terminale: For connecting power input and load output.
- DIN Rail Clips: Pentru montare sigură pe o șină DIN standard.

Imaginea 3.1: Față view of the TM626 timer switch, highlighting the LCD display and control buttons.

Imaginea 3.2: Laterală view of the TM626, illustrating the integrated DIN rail mounting clips.
4. Specificații
| Caracteristică | Caietul de sarcini |
|---|---|
| Marca | Fafeicy |
| Numărul de model | TM626 (Fafeicy txusog0m3i) |
| Vol. De operaretage | CA 220V (50/60Hz) |
| Curent nominal | 16A |
| Dimensiunea ecranului | 1.6 inchi |
| Viața mecanică | ≥ 30,000 de ori |
| Viața electrică | ≥ 10,000 de ori |
| Dimensiuni (aprox.) | Width: 35mm (1.4in), Height: 82mm (3.2in), Depth: 68mm (2.7in) |
| Montare | DIN Rail |
| Țara de origine | China |

Image 4.1: Dimensional drawing of the TM626 timer switch, showing key measurements.

Image 4.2: The TM626 timer switch, illustrating its robust design for long mechanical and electrical life.
5. Configurare și instalare
Follow these steps for proper installation and initial setup of your TM626 timer switch.
5.1 Montare
- Ensure the main power supply is OFF before mounting.
- Locate a standard 35mm DIN rail within your electrical panel.
- Align the DIN rail clips on the back of the TM626 with the DIN rail.
- Press the timer firmly onto the rail until it clicks into place.
5.2 Cablare
Refer to the wiring diagram on the device and below for correct connections. Incorrect wiring can damage the device or cause electrical hazards.

Imaginea 5.1: Laterală view of the TM626 showing the wiring terminals and a simplified internal diagram. Terminals A1 and A2 are for power input (AC220V). Terminals 15, 16, 18 are for load output (15: Common, 16: Normally Closed, 18: Normally Open).
- Connect the AC220V power supply to terminals A1 şi A2.
- Connect the common wire of your load to terminal 15.
- For normally open operation (load turns ON when timer activates), connect the load's live wire to terminal 18.
- For normally closed operation (load turns OFF when timer activates), connect the load's live wire to terminal 16.
- Asigurați-vă că toate conexiunile sunt sigure și izolate.
5.3 Pornirea inițială
After wiring, restore power. The display should light up. If the display is blank, check power connections. The timer may require an initial charge if it has been stored for a long time; allow it to be powered for a few minutes.
6. Instrucțiuni de utilizare
The TM626 timer switch allows you to set the current time and program multiple on/off cycles.
6.1 Setarea orei și zilei curente
- Apăsați tasta CEAS button (if available, or a similar button for time setting).
- Utilizați D+ (Day), H+ (Hour), and M+ (Minute) buttons to adjust the current day, hour, and minute.
- Presa CEAS din nou pentru a salva și a ieși.
6.2 Programarea ciclurilor de pornire/oprire
The TM626 typically supports multiple ON/OFF programs. The exact number may vary, but common models support 8-16 programs.
- Apăsați tasta PROG button. The display will show "1 ON".
- Utilizare D+ to select the day(s) for this ON event (e.g., Mon-Fri, Sat-Sun, every day, specific days).
- Utilizare H+ şi M+ pentru a seta ora de pornire dorită.
- Presa PROG din nou. Afișajul va afișa „1 OFF”.
- Utilizare D+, H+, și M+ to set the desired OFF time for the first program.
- Repeat steps 1-5 for additional ON/OFF programs (e.g., "2 ON", "2 OFF", etc.).
- După setarea tuturor programelor dorite, apăsați butonul CEAS button to exit programming mode and save settings.
6.3 Anulare manuală
The MANUAL or ON/AUTO/OFF button allows you to manually override the programmed settings.
- Pressing this button cycles through modes: ON (întotdeauna pornit), AUTO (urmărește programele), OFF (întotdeauna oprit).
- Selecta AUTO for the timer to execute its programmed schedules.
6.4 Funcția de resetare
To clear all settings and return the timer to its factory default state, locate the small RESET button (often recessed) and press it using a pointed object (e.g., a pen tip). This will erase all time and program settings.
7. Întreținere
The Fafeicy TM626 timer switch requires minimal maintenance to ensure long-term reliable operation.
- curatenie: Folosiți o lavetă moale și uscată pentru a șterge exteriorul dispozitivului. Nu utilizați substanțe de curățare abrazive sau solvenți.
- Inspecţie: Verificați periodic conexiunile cablurilor pentru strângerea etanșeității și pentru a vedea dacă prezintă semne de uzură sau deteriorare.
- Baterie de rezerva: The device typically includes an internal battery for retaining settings during power outages. This battery is usually non-replaceable by the user and recharges when the device is powered.
8. Depanare
Dacă întâmpinați probleme cu temporizatorul TM626, consultați următoarele probleme și soluții frecvente:
| Problemă | Cauza posibila | Soluţie |
|---|---|---|
| Afișajul este gol. | Fără alimentare; bateria internă descărcată. | Check power connections to A1/A2. Allow device to be powered for several minutes to charge the internal battery. |
| Load does not turn ON/OFF as programmed. | Incorrect programming; timer in manual ON/OFF mode; incorrect wiring; faulty load. | Verify program settings. Ensure the timer is in AUTO mode. Check wiring connections (15, 16, 18). Test the load independently. |
| Timpul este incorect. | Time not set correctly; power interruption (though internal battery should prevent this). | Reset and re-set the current time and day. Ensure the internal battery is charged. |
| Butoanele nu răspund. | Device malfunction; temporary software glitch. | Perform a full reset using the recessed RESET button. If the issue persists, contact support. |
9. Garanție și asistență
For warranty information or technical support, please refer to the documentation provided with your purchase or contact Fafeicy customer service through their official channels. Keep your purchase receipt as proof of purchase.
Pentru întrebări generale, puteți vizita Fafeicy Brand Store.