
1. Introducere
The MASTECH MS8260E is a versatile 2000-count digital multimeter designed for a wide range of electrical and electronic measurements. It features a large LCD display, non-contact voltage (NCV) detection, and capabilities for measuring AC/DC voltage, AC/DC current, resistance, capacitance, and inductance. This manual provides essential information for the safe and effective operation, maintenance, and troubleshooting of your device.
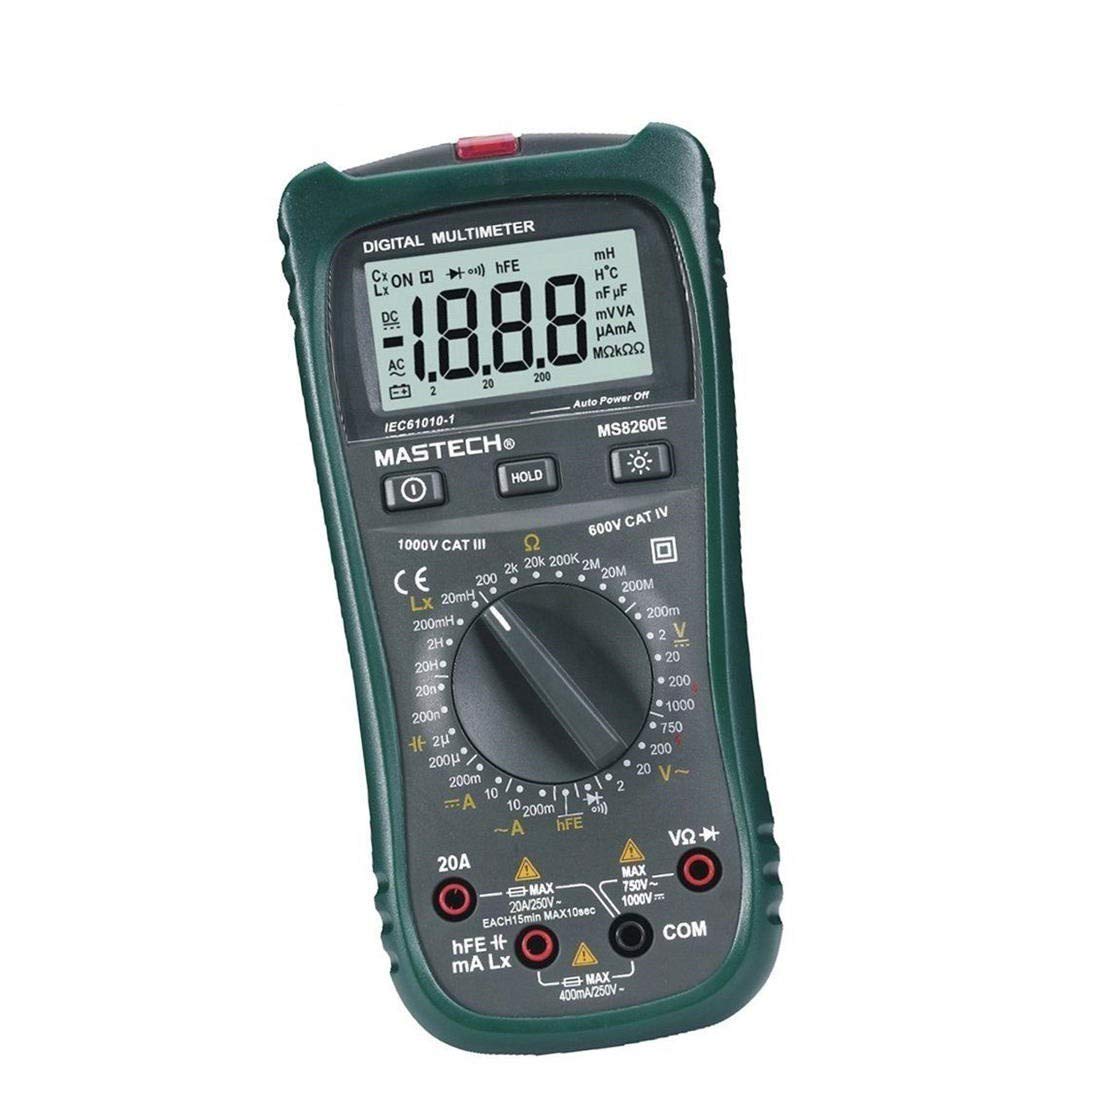
Figura 1: Față view of the MASTECH MS8260E Digital Multimeter, showing the LCD display, function rotary switch, and input jacks.
2. Informații de siguranță
Pentru a asigura funcționarea și întreținerea în siguranță a contorului, urmați aceste instrucțiuni de siguranță:
- Citiți și înțelegeți toate instrucțiunile din acest manual înainte de a utiliza contorul.
- Respectați întotdeauna codurile de siguranță locale și naționale.
- Nu utilizați aparatul de măsură dacă pare deteriorat sau dacă izolația cablurilor de testare este compromisă.
- Observe the input limits for each measurement range to prevent electrical shock or damage to the meter. This meter is rated for CAT.IV 600V.
- Aveți grijă când lucrați cu voltagpeste 30V AC RMS, 42V peak sau 60V DC. Aceste voltajetagreprezintă un pericol de șoc.
- Deconectați întotdeauna alimentarea circuitului și descărcați toate curentul de mare tensiune.tagcondensatoarele înainte de a efectua măsurători de rezistență, continuitate, diode sau capacitate.
- Înlocuiți bateria imediat ce apare indicatorul de baterie descărcată pentru a asigura citiri precise.
- Nu utilizați contorul în medii cu gaze, vapori sau praf exploziv.
3. Produs terminatview
The MS8260E multimeter is equipped with several features to facilitate accurate and convenient measurements:
- Large 2000 Counts LCD Display: Provides clear digital readings.
- Vol. încorporat fără contacttagDetector e (NCV): Detectează AC voltage greater than 110V without physical contact, indicated by a flash warning.
- Funcția de păstrare a datelor: Îngheață citirea afișată pentru o înregistrare ușoară.
- Iluminare de fundal a afișajului: Improves visibility in dimly lit conditions.
- Oprire automată: Conserves battery life by automatically turning off the meter after a period of inactivity.
- Indicație baterie descărcată: Alertează utilizatorul când bateria trebuie înlocuită.
- Indicație de polaritate: Automatically displays negative polarity.
- 30-Range Rotary Switch: Selects various measurement functions including AC/DC voltage, AC/DC current, resistance, capacitance, inductance, diode check, continuity test, and transistor (hFE) check.
4. Configurare
4.1 Instalarea bateriei
The MS8260E requires one 9V battery (NEDA 1604/6F22). To install or replace the battery:
- Ensure the meter is turned off and disconnect all test leads from the input terminals.
- Localizați capacul compartimentului bateriilor pe spatele contorului.
- Deșurubați șurubul (șuruburile) de fixare și scoateți capacul.
- Insert the 9V battery, observing the correct polarity.
- Puneți la loc capacul compartimentului bateriei și fixați-l cu șurubul (șuruburile).
4.2 Conectarea cablurilor de testare
Always connect the black test lead to the "COM" (common) input jack. Connect the red test lead to the appropriate input jack based on the desired measurement:
- Pentru Voltage, Resistance, Capacitance, Inductance, Diode, Continuity, and hFE measurements: Connect the red lead to the "VΩCAPHz" jack.
- For Current measurements up to 200mA: Connect the red lead to the "mA" jack.
- For Current measurements up to 10A: Connect the red lead to the "10A" jack.
Ensure test leads are fully inserted into the jacks before taking measurements.
5. Instrucțiuni de utilizare
Turn the rotary switch to the desired function. The meter will display "OL" (Overload) if no input is present or if the input exceeds the range.
5.1 DC Voltage Măsurare (DCV)
- Set the rotary switch to the desired DCV range (200mV, 2V, 20V, 200V, 1000V).
- Connect the black test lead to the "COM" jack and the red test lead to the "VΩCAPHz" jack.
- Conectați sondele de testare la componenta sau circuitul care urmează să fie măsurat, respectând polaritatea.
- Citiți voltagValoarea de pe ecranul LCD.
5.2 AC Voltage Măsurare (ACV)
- Set the rotary switch to the desired ACV range (2V, 20V, 200V, 750V).
- Connect the black test lead to the "COM" jack and the red test lead to the "VΩCAPHz" jack.
- Conectați sondele de testare la priza de curent alternativtage sursa.
- Citiți voltagValoarea de pe ecranul LCD.
5.3 Măsurarea curentului continuu (DCA)
- Set the rotary switch to the desired DCA range (200mA, 10A).
- For measurements up to 200mA, connect the red lead to the "mA" jack. For measurements up to 10A, connect the red lead to the "10A" jack. The black lead connects to "COM".
- Deschideți circuitul unde urmează să se măsoare curentul și conectați contorul în serie cu sarcina.
- Citiți valoarea curentă pe afișajul LCD.
5.4 Măsurarea curentului alternativ (ACA)
- Set the rotary switch to the desired ACA range (200mA, 10A).
- For measurements up to 200mA, connect the red lead to the "mA" jack. For measurements up to 10A, connect the red lead to the "10A" jack. The black lead connects to "COM".
- Deschideți circuitul unde urmează să se măsoare curentul și conectați contorul în serie cu sarcina.
- Citiți valoarea curentă pe afișajul LCD.
5.5 Măsurarea rezistenței (Ω)
- Set the rotary switch to the desired Ω range (200Ω, 2kΩ, 20kΩ, 200kΩ, 2MΩ, 20MΩ, 200MΩ).
- Connect the black test lead to "COM" and the red test lead to "VΩCAPHz".
- Asigurați-vă că circuitul este dezactivat și că toți condensatorii sunt descărcați.
- Conectați sondele de testare la rezistor sau componentă.
- Citiți valoarea rezistenței pe afișajul LCD.
5.6 Capacitance Measurement (CAP)
- Set the rotary switch to the desired CAP range (20nF, 200nF, 2uF, 200uF).
- Connect the black test lead to "COM" and the red test lead to "VΩCAPHz".
- Asigurați-vă că condensatorul este complet descărcat înainte de a conecta sondele de testare.
- Conectați sondele de testare la condensator.
- Citiți valoarea capacității pe afișajul LCD.
5.7 Inductance Measurement (L)
- Set the rotary switch to the desired Inductance range (20mH, 200mH, 2H, 20H).
- Connect the black test lead to "COM" and the red test lead to "VΩCAPHz".
- Conectați sondele de testare la inductor.
- Read the inductance value on the LCD display.
5.8 Testarea diodei
- Setați comutatorul rotativ pe simbolul diodei.
- Connect the black test lead to "COM" and the red test lead to "VΩCAPHz".
- Conectați firul roșu la anod și firul negru la catodul diodei. O tensiune directătagVa fi afișată o scădere de tensiune (de obicei 0.5V până la 0.8V pentru diodele de siliciu).
- Reverse the leads. The display should show "OL" for a good diode.
5.9 Test de continuitate
- Set the rotary switch to the Continuity symbol.
- Connect the black test lead to "COM" and the red test lead to "VΩCAPHz".
- Conectați sondele de testare la circuit sau la componentă.
- Dacă rezistența este sub aproximativ 30 Ω, va suna un buzer, indicând continuitatea.
5.10 Testul tranzistorului (hFE)
- Setați comutatorul rotativ în poziția hFE.
- Identificați tipul (NPN sau PNP) și pinurile (emitor, bază, colector) tranzistorului.
- Insert the transistor leads into the corresponding sockets in the hFE test socket on the meter.
- Citiți valoarea hFE (amplificarea curentului continuu) pe afișajul LCD.
5.11 fără contact voltage (NCV) Detectie
- Setați comutatorul rotativ în poziția NCV.
- Hold the top front part of the meter near the AC voltage source (e.g., an electrical outlet or insulated wire).
- Dacă AC voltage greater than 110V is detected, the NCV indicator light will flash, and the buzzer may sound.
6. Întreținere
6.1 Curățare
Ștergeți contorul cu reclamăamp o lavetă și un detergent blând. Nu utilizați substanțe abrazive sau solvenți. Asigurați-vă că aparatul de măsură este uscat înainte de utilizare.
6.2 Înlocuirea bateriei
When the "BAT" symbol appears on the display, the battery needs to be replaced. Refer to Section 4.1 for battery installation instructions.
6.3 Înlocuirea siguranței
If the current measurement function fails, the fuse may need replacement. This operation should only be performed by qualified personnel. Refer to the service manual or contact customer support for fuse specifications and replacement procedures.
6.4 Depozitare
If the meter is not to be used for an extended period, remove the battery to prevent leakage and damage to the meter. Store the meter in a cool, dry place away from direct sunlight.
7. Depanare
| Problemă | Cauza posibila | Soluţie |
|---|---|---|
| Niciun afișaj sau afișaj slab | Low battery; Meter off | Replace battery; Turn on meter |
| Se afișează „OL” | Input exceeds range; Open circuit (for resistance/continuity) | Select higher range; Check circuit connection |
| Citiri incorecte | Low battery; Incorrect range selected; Poor test lead contact | Replace battery; Select appropriate range; Ensure good contact |
| Măsurarea curentului nu funcționează | Siguranță arsă | Replace fuse (by qualified personnel) |
8. Specificații
| Funcția de măsurare | Gamă | Precizie |
|---|---|---|
| DC Voltage (DCV) | 200mV, 2V, 20V, 200V, 1000V | ±0.5% (200mV-200V), ±0.8% (1000V) |
| AC Voltage (ACV) | 2V, 20V, 200V, 750V | ±0.8% (2V-200V), ±1.2% (750V) |
| Curent DC (DCA) | 200mA, 10A | ±1.5% (200mA), ±2.0% (10A) |
| Curent AC (ACA) | 200mA, 10A | ±1.8% (200mA), ±3.0% (10A) |
| Rezistență (Ω) | 200Ω, 2kΩ, 20kΩ, 200kΩ, 2MΩ, 20MΩ, 200MΩ | ±0.8% (200Ω-2MΩ), ±1.0% (20MΩ), ±5.0% (200MΩ) |
| Capacitate (CAP) | 20nF, 200nF, 2uF, 200uF | ±4.0% (20nF-2uF), ±5.0% (200uF) |
| Inductanță (L) | 20mH, 200mH, 2H, 20H | ±3.0% |
| Continuitate sonoră | Buzzer sounds at <30Ω | N / A |
| Testul diodei | 1 mA, 2.8 V | N / A |
| Tranzistor (hFE) | 0 - 1,000 | N / A |
Specificatii generale:
- Afişa: LCD 2000 de numărări
- Evaluare de siguranță: CAT.IV 600V
- Putere: 9V battery (NEDA 1604/6F22)
- Greutate: Approximately 1 kg (including battery)
9. Garanție și asistență
For warranty information, technical support, or service inquiries, please refer to the warranty card included with your product or visit the official Mastech website. Do not attempt to repair the meter yourself, as this may void the warranty and pose safety risks.