
LILYTECH ZL-7801A
ZL-7801A Multifunctional Automatic Incubator Controller User Manual
Marca: LILYTECH | Model: ZL-7801A
1. Introducere și Pesteview
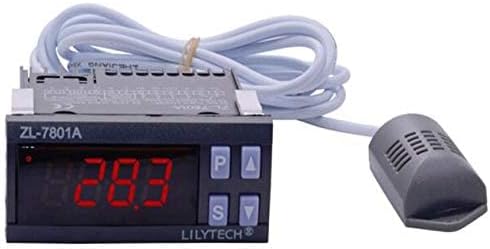
Image 1.1: The LILYTECH ZL-7801A intelligent temperature and humidity controller with its integrated sensor.
The LILYTECH ZL-7801A is an intelligent temperature and humidity controller designed for precise environmental management. Its compact design, IP65 level front panel protection, and user-friendly interface ensure convenient operation and straightforward installation. This controller is ideally suited for a variety of applications, including incubators, climate chambers, warehouses, and other environments requiring accurate temperature and humidity regulation.
This manual provides comprehensive instructions for the installation, operation, maintenance, and troubleshooting of your ZL-7801A controller.
2. Caracteristicile produsului

Image 2.1: The ZL-7801A controller highlighting its temperature and humidity control capabilities.
- Dual High-Capacity Outputs: Features dual 16A outputs (R2 and R3), enabling the control of larger loads such as heaters and humidifiers.
- Timer Outputs: Includes dedicated timer outputs (R4 and R5) for specific functions like egg tray turning in incubators.
- Design compact și durabil: Boasts a compact form factor with IP65 level front panel protection, ensuring durability and ease of integration.
- Aplicație versatilă: Suitable for a wide range of uses, including incubators, climate chambers, and warehouse environmental control.
- Senzor integrat: Comes with a combined humidity and temperature sensor for accurate environmental monitoring.
3. Configurare și instalare
3.1. Instalare fizică
The ZL-7801A controller is designed for panel mounting. Ensure the installation location is dry, well-ventilated, and free from excessive vibrations or corrosive gases.
- Dimensiune gaurire: A rectangular cutout of 71mm x 29mm is required for mounting the controller.
- Nivel de protecție: The front panel offers IP65 protection, making it resistant to dust and low-pressure water jets.
3.2. Instrucțiuni de cablare
Proper wiring is critical for the safe and correct operation of the ZL-7801A controller. Refer to the wiring diagram below and ensure all connections are secure and comply with local electrical codes. Disconnect power before making any connections.

Image 3.1: ZL-7801A Wiring Diagram.
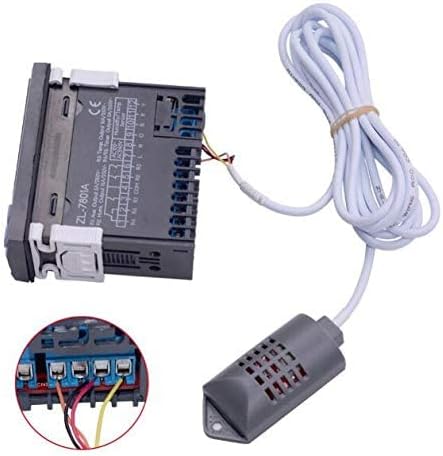
Imaginea 3.2: Spate view of the ZL-7801A showing terminal connections.
Conexiuni terminale:
- Power Supply (100-240Vac 50/60Hz): Connect the Live (L) wire to terminal 7 and the Neutral (N) wire to terminal 8.
- Senzor de temperatură și umiditate: Connect the sensor cable to terminals 9, 10, 11, and 12 according to the color coding (Orange, Black, Red, Yellow). Ensure correct polarity.
- Output R1 (Auxiliary Output 5A/250Vac): Connect your auxiliary device (e.g., alarm bell) to terminal 3.
- Output R2 (Humidifier Output 16A/250Vac): Connect your humidifier to terminal 4.
- Output R3 (Heater Output 16A/250Vac): Connect your heater to terminal 5.
- Output R4 & R5 (Timer Outputs 3A/250Vac): Connect devices requiring timed operation, such as an egg turning motor, to terminals 1 and 2.
Caution: Incorrect wiring can damage the device or connected equipment. Always consult a qualified electrician if unsure.
4. Instrucțiuni de utilizare
The ZL-7801A controller features a clear digital display and intuitive buttons for easy operation. The display shows current temperature and humidity readings.
4.1. Operare de bază
- Pornire/Oprire: The unit powers on automatically when connected to a suitable power source.
- Afişa: The main display shows the current temperature and humidity measured by the sensor.
- Butoane: The control panel typically includes 'P' (Program/Set), 'Up Arrow', 'Down Arrow', and 'S' (Select/Confirm) buttons for navigation and parameter adjustment.
4.2. Setting Parameters (Temperature and Humidity)
To adjust the desired temperature and humidity set points, follow these general steps. Specific button sequences may vary slightly; refer to the detailed programming guide included with your product for precise instructions.
- Apăsați butonul „P” pentru a intra în modul de programare.
- Use the 'Up' or 'Down' arrow buttons to navigate through different parameters (e.g., temperature set point, humidity set point, hysteresis, calibration).
- Press the 'S' button to select a parameter for editing.
- Use the 'Up' or 'Down' arrow buttons to adjust the value.
- Press 'S' again to confirm the new value.
- Press 'P' to exit programming mode and save changes.
Intervalele de setare:
- Umiditate: 5% ~ 95% RH
- Temperatură: -20℃ ~ 60℃
5. Specificații
Detailed technical specifications for the LILYTECH ZL-7801A controller:
| Caracteristică | Caietul de sarcini |
|---|---|
| Alimentare electrică | 100 ~ 240Vac 50/60Hz |
| Semnal de intrare | One humidity and temperature sensor (1.5 meter wire length) |
| Output Load R1 (Aux) | 5A/250Vac (Resistive load) |
| Output Load R2 & R3 (Heater/Humidifier) | 16A/250Vac (Resistive load) |
| Output Load R4 & R5 (Timer) | 3A/250Vac (Resistive load) |
| Interval de setare a umidității | 5 ~ 95% RH |
| Interval de setare a temperaturii | -20℃ ~ 60℃ |
| Precizia senzorului (umiditate) | ±5% RH |
| Sensor Accuracy (Temperature) | ±1℃ |
| Umiditatea de lucru | 10 ~ 90% RH (without dew) |
| Temperatura de lucru | -20 ~ 45℃ |
| Device Size (L x W x H) | 78 x 34.5 x 71 mm (3.07 x 1.36 x 2.8 inchi) |
| Drilling Size | 71 x 29 mm |
| Materiale | PC + ABS, fire proof |
| Nivel de protecție | IP65 (numai panoul frontal) |
| Greutatea articolului | 7 uncii |
| Culoare | Negru |
6. Întreținere
Regular maintenance ensures the longevity and accurate performance of your ZL-7801A controller.
- curatenie: Periodically wipe the front panel with a soft, dry cloth. Avoid using abrasive cleaners or solvents that could damage the display or casing.
- Îngrijirea senzorului: Keep the temperature and humidity sensor clean and free from dust or debris. Do not immerse the sensor in liquids. Ensure the sensor cable is not kinked or damaged.
- Conexiuni: Occasionally check all wiring connections to ensure they remain secure.
- Mediu: Ensure the operating environment remains within the specified working temperature and humidity ranges to prevent damage to the unit.
7. Depanare
This section addresses common issues you might encounter with your ZL-7801A controller. If the problem persists, contact customer support.
| Problemă | Cauza posibila | Soluţie |
|---|---|---|
| Controlerul nu pornește. | Lipsă alimentare cu energie electrică; cablare incorectă; sursă de alimentare defectă. | Check power connections (Terminals 7 & 8). Verify power outlet is functional. Ensure correct voltage (100-240Vac). |
| Citiri incorecte ale temperaturii/umidității. | Sensor dirty or damaged; sensor not properly connected; sensor calibration needed. | Clean the sensor. Check sensor wiring (Terminals 9-12). Refer to the detailed manual for sensor calibration procedures. Replace sensor if damaged. |
| Output (Heater/Humidifier) not activating. | Set point not met; output wiring incorrect; faulty connected device. | Verify set points and hysteresis settings. Check wiring for R2/R3 outputs. Test the connected device independently. |
| Timer output (R4/R5) not working. | Timer settings incorrect; wiring issue; connected device fault. | Review timer program settings. Check wiring for R4/R5 outputs. Ensure the connected device (e.g., egg turning motor) is functional. |
8. Garanție și asistență

Image 8.1: The ZL-7801A controller as packaged with its accessories.
LILYTECH products are manufactured to high quality standards. For specific warranty information, please refer to the warranty card or documentation included with your product packaging. Typically, LILYTECH offers a standard manufacturer's warranty against defects in materials and workmanship.
For technical support, troubleshooting assistance beyond this manual, or warranty claims, please contact LILYTECH customer service through the contact information provided on the product packaging or the official LILYTECH website. When contacting support, please have your product model number (ZL-7801A) and purchase details ready.
We are committed to providing reliable products and excellent customer service.
Ask a question about this manual
Ask about setup, troubleshooting, compatibility, parts, safety, or missing instructions. Manuals+ will review the question and use this page’s manual context to help answer it.