
Introducere
This manual provides detailed instructions for the setup, operation, and maintenance of your Homtime C1 Mini Snooze Alarm Clock. Please read this manual thoroughly before using the product to ensure proper function and longevity.

Image: The Homtime C1 Mini Alarm Clock, light blue in color, is shown on a decorative tray next to a small potted plant. The digital display shows the time 20:08.
Produs terminatview
The Homtime C1 Mini is a compact digital alarm clock designed for convenience and functionality. It features a clear LCD display, dual USB charging ports for mobile devices, and a snooze function. Its design is suitable for various environments including bedrooms, offices, and for travel.
Caracteristici cheie:
- Afișaj digital al orei
- Funcția de amânare
- Dual porturi USB de încărcare
- Dimmable LCD Screen
- Design compact și portabil
Continutul pachetului:
- Homtime C1 Mini Alarm Clock
- Adaptor de alimentare
- Manual de utilizare (acest document)
Înființat
- Conexiune de alimentare: Connect the provided power adapter to the DC input port on the back of the alarm clock. Plug the adapter into a standard wall outlet. The display will illuminate.
- Battery Installation (Optional for backup): Pentru backup-ul setărilor de oră și alarmă în timpul întreruperii alimentăriitages, install 3 AAA batteries (not included) into the battery compartment located on the bottom of the unit. Ensure correct polarity.
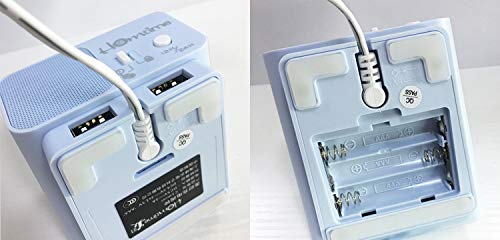
Image: A split image showing the bottom of the Homtime C1 Mini. The left side displays the rear with two USB charging ports and a power input. The right side shows the open battery compartment, designed for AAA batteries.
Instrucțiuni de operare
1. Setarea orei
- Țineți apăsat butonul "Time Set" button (usually located on the top or back) until the hour digits begin to flash.
- Utilizați „+” or „-” buttons to adjust the hour. Pay attention to AM/PM indicators if present.
- Apăsați tasta "Time Set" Apăsați din nou butonul pentru a confirma ora și a trece la reglarea minutelor.
- Utilizați „+” or „-” butoane pentru reglarea minutelor.
- Apăsați tasta "Time Set" button one last time to save the time setting.
2. Setarea alarmei
- Țineți apăsat butonul "Alarm Set" apăsați butonul până când cifrele orei alarmei încep să clipească.
- Utilizați „+” or „-” butoane pentru a regla ora alarmei.
- Apăsați tasta "Alarm Set" button again to confirm the alarm hour and move to alarm minute adjustment.
- Utilizați „+” or „-” butoane pentru a regla minutele alarmei.
- Apăsați tasta "Alarm Set" button one last time to save the alarm setting.
- Pentru a activa/dezactiva alarma, apăsați butonul "Alarm On/Off" button (or a dedicated alarm icon button). An alarm icon will appear on the display when active.
3. Funcția de amânare
When the alarm sounds, press the large button on the top of the clock (often labeled "Pui de somn" or simply the main control button). The alarm will pause for approximately 9 minutes and then sound again. To turn off the alarm completely, press any other button or let it sound for its full duration.
4. Luminozitatea afișajului
The LCD screen has multiple brightness levels. Press the "Dimmer" button (or a dedicated light icon button) repeatedly to cycle through the available brightness settings (e.g., High, Medium, Low, Off).
5. Porturi de încărcare USB
The Homtime C1 Mini features dual USB charging ports on the back of the unit. These ports are designed to charge compatible mobile devices such as smartphones and tablets. Simply connect your device's USB charging cable to one of the ports. Charging will begin automatically.
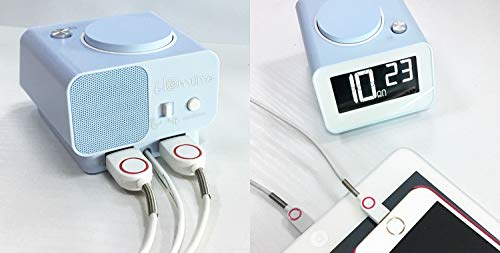
Imagine: Partea din spate view of the Homtime C1 Mini alarm clock, showing two white USB charging cables plugged into its dual USB ports. This illustrates the charging functionality.
Întreţinere
- curatenie: Wipe the unit with a soft, dry cloth. Do not use abrasive cleaners or solvents, as they may damage the surface.
- Putere: Ensure the power adapter is securely connected. Disconnect from power during extended periods of non-use.
- Mediu: Avoid placing the clock in direct sunlight, near heat sources, or in excessively humid environments.
Depanare
| Problemă | Cauza posibila | Soluţie |
|---|---|---|
| Afișajul ceasului este gol. | Fără putere sau puteretage. | Check power adapter connection. If using battery backup, ensure batteries are installed correctly and are not depleted. |
| Alarma nu sună. | Alarma nu este activată sau este setată incorect. | Ensure the alarm is turned ON (alarm icon visible). Verify the alarm time is set correctly. |
| Încărcarea prin USB nu funcționează. | Problemă cu cablul sau incompatibilitate cu dispozitivul. | Try a different USB cable. Ensure the device is compatible with USB charging. Check if the clock is powered on. |
| Afișajul este prea luminos/întunecat. | Setarea luminozității necesită ajustare. | Press the "Dimmer" button to cycle through brightness levels. |
Specificații
- Marca: Hometime
- Model: C1 Mini
- Tip de afișare: LCD digital
- Sursa de alimentare: Electric (Adaptor CA)
- Baterie de rezerva: 3 x baterii AAA (nu sunt incluse)
- Caracteristici speciale: Alarm, Dual USB Charging Ports, Dimmable Screen
- Material cadru: Acrilonitril butadienă stiren, plastic
- Tip de montare: Blat de masă
- Țara de origine: China
Garanție și suport
For warranty information and customer support, please refer to the warranty card included with your product or visit the official Homtime website-ul. Păstrați chitanța de achiziție pentru cererile de garanție.
For further assistance, you may contact Homtime customer service through their official channels. Please have your model number (C1 Mini) and purchase details ready.