
LUX P111
Manual de instrucțiuni pentru termostatul neprogramabil Lux Pro Model P111
Your guide to simple and efficient home climate control.
Produs terminatview
The Lux Pro Model P111 is a non-programmable thermostat designed for straightforward and reliable temperature control in your home. It offers essential features for managing your heating and cooling systems with ease.

Figure 1: Lux Pro P111 Non-Programmable Thermostat. This image displays the front view of the thermostat, showing its LCD screen, fan and system mode switches, and temperature adjustment buttons.
- Instalare ușoară: Designed for simple setup with clear instructions.
- Operațiune neprogramabilă: Provides direct temperature control without complex scheduling.
- Putere dublă: Operates on 2 AA alkaline batteries (included) or 24-volt system power.
- Afișaj iluminat din spate: Dispune de o funcție ușoarăview backlight for clear temperature readings.
- Protecția echipamentului: Includes a selectable 5- or 2-minute time delay to safeguard your HVAC equipment.
- Adjustable Limits: Allows setting of heating and cooling temperature limits.
- Opțiuni de afișare a temperaturii: Switch between Fahrenheit (℉) or Celsius (℃) display.

Figure 2: Key Features of Lux Pro P111 Thermostat. This graphic highlights features such as Keyboard Lockout, Adjustable Heating and Cooling Limits, Back-Lit Display, Dual Power, and a 5-Year Limited Warranty.
Compatibilitatea sistemului
The Lux Pro P111 thermostat is designed for compatibility with various HVAC systems. Please review the following compatibility chart to ensure it meets your system requirements.

Figure 3: System Compatibility Chart. This chart details which heating and cooling systems are compatible (e.g., Gas/Oil/Electric Furnace, Heat Pump without Auxiliary Heat, 2-wire Hydronic, 750 Millivolt, Gas Fireplaces, Single Stage Cooling) and which are not (e.g., Heat Pump Multistage, Radiant Ceiling Heat, Electric Baseboards, 3-wire Hydronic, Multistage systems, Portable space heaters, Plug-in air conditioners).
Configurare și instalare
Proper installation is crucial for the optimal performance of your thermostat. If you are unsure about any steps, it is recommended to consult a qualified HVAC technician.
1. Cerințe de alimentare
The P111 thermostat can be powered by two (2) AA alkaline batteries or by a 24-volt system. Batteries are included for convenience and reliable operation.
2. Diagrame de cablare
Refer to the following diagrams for common wiring configurations. Ensure power to your HVAC system is turned off at the circuit breaker before beginning any wiring.
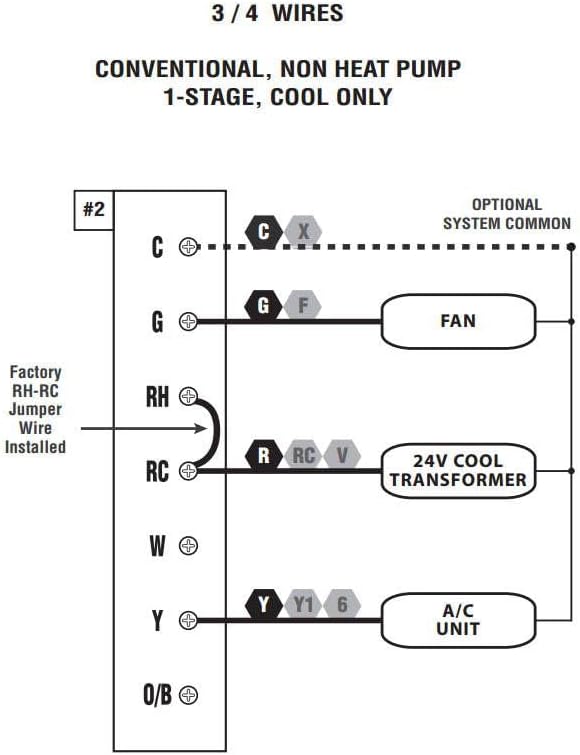
Figure 4: Wiring Diagram for 3/4 Wires. This diagram illustrates the wiring for a conventional, non-heat pump, 1-stage, cool-only system, showing connections for C (optional system common), G (FAN), RH (24V COOL TRANSFORMER), RC (24V COOL TRANSFORMER), and Y (A/C UNIT). A factory RH-RC jumper wire is installed.

Figure 5: Wiring Diagram for 4/5 Wires. This diagram shows the wiring for a conventional, non-heat pump, 1-stage căldură și 1-stage cool system, with connections for C (optional system common), G (FAN), RH (24V TRANSFORMER), RC (24V TRANSFORMER), W (HEATER), and Y (A/C UNIT). A factory RH-RC jumper wire is installed.

Figure 6: Wiring Diagram for 5/6 Wires. This diagram illustrates the wiring for a conventional, non-heat pump, 1-heat / 1-cool system with two transformers, showing connections for C (optional system common), G (FAN), RH (24V HEAT TRANSFORMER), RC (24V COOL TRANSFORMER), W (HEATER), and Y (A/C UNIT). The factory RH-RC jumper wire must be removed for this configuration.
3. Montare
The thermostat is designed for wall mounting. Use the provided screws and wall anchors for secure installation. Ensure the thermostat is level for accurate temperature readings.
Instrucțiuni de operare
The Lux Pro P111 thermostat features an intuitive control panel for easy operation.

Figure 7: Control Panel Diagram. This diagram labels the key components of the thermostat's front panel: Fan Mode Switch (Fan Auto/On), System Mode Switch (Heat/Off/Cool), LCD Display Screen, SET Button, and UP and DOWN Buttons.
1. System Mode Switch
- CĂLDURĂ: Activează sistemul de încălzire.
- OPRIT: Oprește atât sistemul de încălzire, cât și cel de răcire.
- MISTO: Activează sistemul de răcire.
2. Fan Mode Switch
- MAȘINĂ: Ventilatorul funcționează numai atunci când sistemul de încălzire sau răcire este în funcțiune.
- PE: Ventilatorul funcționează continuu, indiferent dacă sistemul de încălzire sau de răcire este activ.
3. Reglarea temperaturii
Utilizați UP (▲) și JOS (▼) buttons to set your desired temperature. The current temperature will be displayed prominently on the LCD screen.
4. Activarea iluminării de fundal
Press any button to activate the backlight for improved visibility in low-light conditions. The backlight will automatically turn off after a short period of inactivity.
5. Temperature Display (Fahrenheit/Celsius)
The thermostat allows you to switch between Fahrenheit (℉) and Celsius (℃) temperature displays. Refer to the full instruction manual for specific steps on how to change this setting, typically found in the advanced settings menu.
6. Equipment Protection Time Delay
The thermostat features a selectable 5- or 2-minute time delay for equipment protection. This delay prevents short cycling of your heating and cooling system, which can extend the lifespan of your equipment. This setting is usually configured during initial setup or in advanced settings.
7. Blocarea tastaturii
To prevent unauthorized adjustments, the thermostat includes a keypad lockout feature. Consult the detailed manual for instructions on how to activate and deactivate this function.
Întreţinere
1. Înlocuirea bateriei
When the battery indicator appears on the display, replace the two (2) AA alkaline batteries. Ensure proper polarity when inserting new batteries. The thermostat retains settings during battery replacement.
2. Curatenie
Curățați exteriorul termostatului cu o lavetă moale șiamp Nu utilizați substanțe de curățare abrazive sau solvenți, deoarece acestea pot deteriora finisajul sau componentele interne.
Depanare
If you encounter issues with your Lux Pro P111 thermostat, consider the following common solutions:
- Fără afișaj sau indicator de baterie descărcată: Replace the batteries with fresh AA alkaline batteries.
- Sistemul nu răspunde (încălzire/răcire):
- Check that the system mode switch is set to HEAT or COOL.
- Ensure the fan mode switch is set to AUTO or ON.
- Verify that the circuit breaker for your HVAC system is not tripped.
- Confirm that the wiring connections are secure and correct according to the installation diagrams.
- Allow for the equipment protection time delay (5 or 2 minutes) to elapse before the system activates.
- Citire incorectă a temperaturii: Asigurați-vă că termostatul nu este expus la lumina directă a soarelui, curenților de aer sau surselor de căldură care ar putea afecta senzorul său.
- Tastatura nu răspunde: Check if the keypad lockout feature is active. Refer to the manual for deactivation steps.
For persistent issues, refer to the complete user manual or contact customer support.
Specificații
| Caracteristică | Detaliu |
|---|---|
| Marca | LUX |
| Numele modelului | P111 |
| Dimensiunile produsului | 4" D x 7" L x 7" H |
| Tip controler | Buton de apăsare |
| Caracteristici speciale | Lighted Display, Temperature Display |
| Culoare | P111-white |
| Utilizări specifice | Aer condiționat, pompă de căldură |
| Tip de control al temperaturii | Manual |
| Componente incluse | Pro P111 Non-Programmable Thermostat; 1 Heat, 1 Cool |
| Sursa de alimentare | Battery Powered (2 AA batteries required), 24V System Powered |
| Greutatea articolului | 1.6 uncii |
| Voltage | 24 volți |
| Material | Plastic |
| Tip de montare | Montare pe perete |
| Stil | Neprogramabil |
| Iluminare de fundal | Da |
| UPC | 021079141111 |
Garanție și suport
Informații despre garanție
The Lux Pro P111 thermostat comes with a Garanție limitată de 5 anAceastă garanție acoperă defectele de materiale și de fabricație în condiții normale de utilizare. Vă rugăm să păstrați dovada achiziției pentru reclamațiile în garanție.
Asistență pentru clienți
For technical assistance, troubleshooting not covered in this manual, or warranty inquiries, please contact Lux customer support. Refer to the product packaging or the official Lux website pentru cele mai recente informații de contact.
You can visit the official LUX Store for more information: Magazinul LUX pe Amazon
Ask a question about this manual
Ask about setup, troubleshooting, compatibility, parts, safety, or missing instructions. Manuals+ will review the question and use this page’s manual context to help answer it.