
1. Introducere
This manual provides essential information for the safe and efficient operation of your InFocus IN112a SVGA DLP Projector. Please read it thoroughly before using the projector and retain it for future reference. The InFocus IN112a is designed to deliver clear and bright projections for various applications, featuring SVGA resolution, HDMI connectivity, and 3D support.
2. Informații de siguranță
Respectați următoarele măsuri de siguranță pentru a preveni deteriorarea proiectorului și a asigura siguranța utilizatorului:
- Do not look directly into the projector lens când lamp este pornit. Lumina intensă poate provoca leziuni oculare.
- Asigurați o ventilație corespunzătoare. Nu blocați orificiile de ventilație.
- Only qualified service personnel should open the projector casing. În interior nu există piese care să poată fi reparate de utilizator.
- Folosiți doar cablul de alimentare furnizat împreună cu proiectorul.
- Țineți proiectorul departe de apă sau de medii umede.
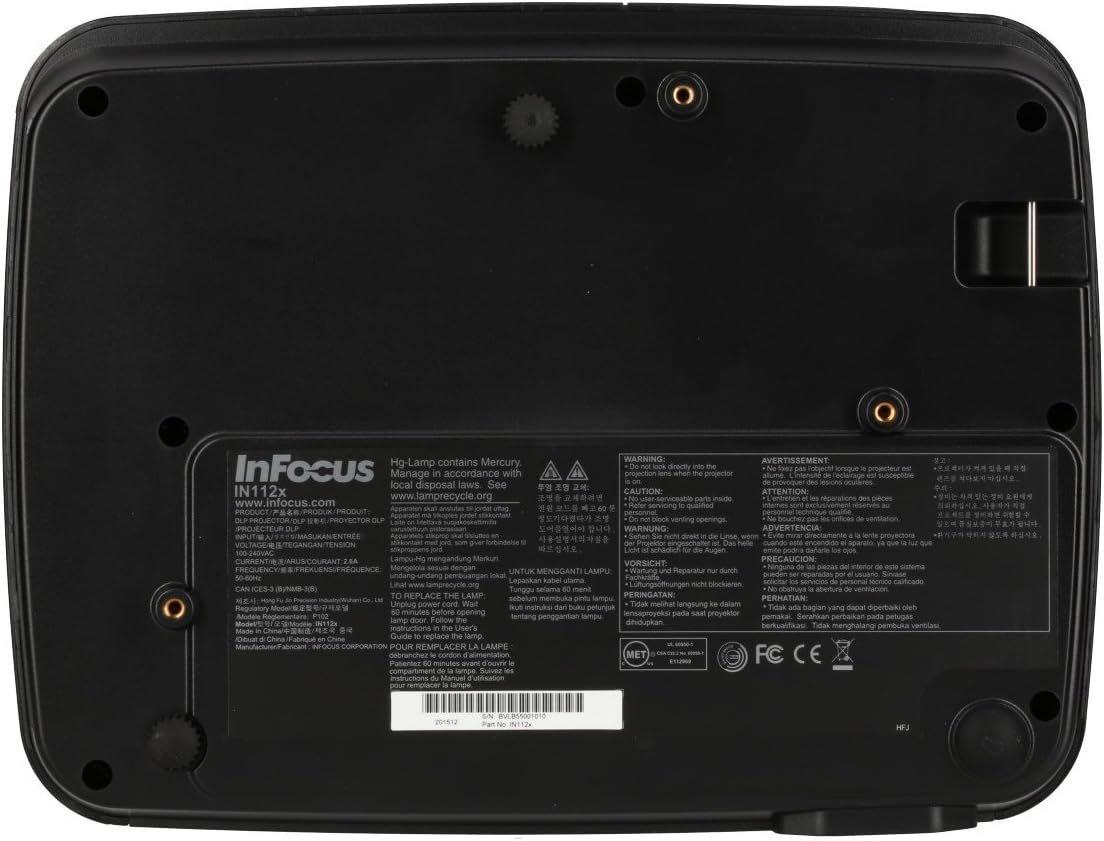
- Proiectorul lamp contains mercury. Dispose of lamps according to local regulations. Visit www.lamprecycle.org pentru mai multe informații.

Imagine: Jos view of the InFocus IN112a projector, displaying various warning labels, regulatory compliance marks (like CE, FCC), and information regarding the mercury content in the lamp and recycling instructions.
3. Produs terminatview
3.1. Dimensiunile proiectorului

Imagine: față view of the InFocus IN112a projector, illustrating its physical dimensions. The projector measures approximately 292 mm in width, 220 mm in depth, and 108 mm in height.
3.2. Comenzile panoului superior
Imagine: Sus view of the InFocus IN112a projector, highlighting the control panel. This panel includes buttons for power, menu access, source selection, and directional navigation for menu adjustments.
The top panel features buttons for power on/off, menu access, input source selection, and navigation arrows for adjusting settings within the on-screen display (OSD) menu. The focus and zoom rings are located near the lens.
3.3. Conexiuni la panoul din spate

Imagine: Spate view of the InFocus IN112a projector, displaying its comprehensive array of connectivity ports. These include HDMI 1.4, two VGA inputs (Computer 1, Computer 2), a VGA monitor output, S-Video, Composite video, two 3.5mm stereo audio inputs, one 3.5mm stereo audio output, an RS232C control port, and a USB-B port.
The rear panel provides a variety of connection options:
- HDMI1.4: Pentru intrare video și audio digitală.
- VGA (Computer 1, Computer 2): Two inputs for analog computer signals.
- VGA Monitor Out: Pentru conectarea unui monitor extern.
- Video compozit: Pentru intrare video la definiție standard.
- S-Video: For enhanced standard definition video input.
- Audio In (3.5mm x 2): Pentru intrare audio stereo.
- Ieșire audio (3.5 mm): For stereo audio output to external speakers.
- RS232C: Pentru controlul proiectorului prin intermediul unui computer sau al unui sistem de control.
- USB-B: Pentru service sau actualizări de firmware.
4. Configurare
4.1. Plasare
Position the projector on a stable, flat surface or mount it securely to a ceiling. Ensure there is adequate space around the projector for ventilation. The distance from the screen will determine the image size. Refer to the specifications section for throw ratio details.
4.2. Conectarea puterii
Connect the supplied power cord to the projector's power inlet and then to a grounded electrical outlet. The power LED will illuminate, indicating standby mode.
4.3. Conectarea surselor video
Connect your video source (e.g., computer, Blu-ray player, cable box) to the appropriate input port on the projector's rear panel using a compatible cable. For best quality, use the HDMI input.
- HDMI: Connect an HDMI cable from your source to the projector's HDMI port.
- VGA: Connect a VGA cable from your computer to either the Computer 1 or Computer 2 port.
- Composite/S-Video: Connect the respective cable for older video sources.
4.4. Conectarea sunetului
If using VGA, Composite, or S-Video inputs, connect an audio cable from your source's audio output to one of the projector's 3.5mm Audio In ports. HDMI carries both video and audio, so a separate audio connection is not typically needed for HDMI sources.
4.5. Adjusting Focus and Zoom
After powering on the projector and displaying an image, rotate the Inel de focalizare around the lens until the image is sharp and clear. Use the Inel de zoom pentru a ajusta dimensiunea imaginii în funcție de ecran.
5. Funcționare
5.1. Pornire/Oprire
- Pentru a porni: Press the Power button on the projector's top panel or the remote control. The power indicator will turn green.
- Pentru a opri: Press the Power button twice. The projector will enter a cooling cycle, and the power indicator will turn red (standby) once complete.
5.2. Selectarea sursei de intrare
Press the "Source" button on the projector or remote control repeatedly to cycle through available input sources (HDMI, VGA1, VGA2, S-Video, Video). The projector will automatically detect an active signal if "Auto Source" is enabled in the menu.
5.3. Navigare prin meniu
Press the "Menu" button to access the On-Screen Display (OSD) menu. Use the directional arrows to navigate through menu options and the "Enter" button to select. Press "Menu" again to exit.
5.4. 3D Content Playback
The IN112a supports 3D content from Blu-ray players, cable boxes, dish services (over HDMI), and PC-based 3D content at 120Hz. To view 3D content, you will need 144 Hz DLP Link 3D glasses (sold separately).
- Ensure your 3D source is connected via HDMI.
- Play 3D content from your source.
- Turn on your 144 Hz DLP Link 3D glasses. The projector should automatically detect the 3D signal.
6. Întreținere
6.1. Cleaning the Projector Lens
Gently wipe the lens with a soft, lint-free cloth specifically designed for optical surfaces. Do not use abrasive cleaners or excessive force, as this can scratch the lens.
6.2. Lamp Înlocuire
Proiectorul lamp are o durată de viață de până la 10,000 de ore. Când lamp viața se apropie de sfârșit, poate apărea un mesaj de avertizare sau poate apăreaamp indicator LED may illuminate. Refer to the full service manual for detailed lamp instrucțiuni de înlocuire. Avertisment: lamp conţine mercur. Aruncați lul uzatamps according to local environmental regulations.
6.3. Cleaning Air Filters
Regularly clean the air filters to ensure proper ventilation and prevent overheating. Dust and debris can accumulate, reducing cooling efficiency. Gently remove the filter cover and clean the filter with a soft brush or vacuum cleaner. Replace the filter cover securely.
7. Depanare
| Problemă | Cauza posibila | Soluţie |
|---|---|---|
| Nu este afișată nicio imagine |
|
|
| Imaginea este neclară |
|
|
| Fără sunet |
|
|
| Proiectorul se supraîncălzește și se oprește |
|
|
8. Specificații
| Caracteristică | Detaliu |
|---|---|
| Numărul de model | IN112X |
| Tehnologia de afișare | DLP |
| Rezoluție nativă | SVGA (800 x 600) |
| Luminozitate | Până la 3200 lumeni |
| Raport de contrast | 15,000:1 |
| Lamp Viaţă | Până la 10,000 ore |
| Conectivitate | HDMI 1.4, VGA x 2, Composite video, S-Video, 3.5 mm stereo in x 2, 3.5mm stereo out, VGA monitor out, RS232C, USB-B |
| Suport 3D | Yes (requires 144 Hz DLP Link 3D glasses) |
| Raportul de aruncare | 1.9 - 2.09 |
| Dimensiunile produsului | 14.25 x 12 x 7.75 inci (aprox. 36.2 x 30.5 x 19.7 cm) |
| Greutatea articolului | 5.4 livre (aprox. 2.45 kg) |
| Utilizare recomandată | Interior/Exterior |
| Caracteristica specială | Difuzoare încorporate |
9. Garanție și asistență
For warranty information and technical support, please refer to the documentation included with your purchase or visit the official InFocus webPăstrați dovada achiziției pentru reclamații în garanție.