
1. Introducere
Thank you for choosing the Technoline WS 6750 Weather Station. This device provides comprehensive weather information and timekeeping features for your home. Please read this manual carefully to ensure proper setup and operation.

Image 1.1: Technoline WS 6750 Main Unit. This image shows the front of the weather station, featuring a clear digital display with various weather data.
Caracteristici cheie:
- DCF-77 Radio-Controlled Clock with optional manual setting.
- Afisare ora 12/24 ore.
- Time zone setting (± 12 hours).
- Date and weekday display in 7 languages.
- Indoor and outdoor temperature display.
- Indoor and outdoor humidity display.
- Temperature and humidity trend indicators.
- MIN/MAX memory for temperature and humidity.
- Comfort indicator.
- Frost alarm.
- Barometric pressure display with 12-hour history.
- Weather forecast icons.
- Sunrise and sunset display.
- Moon phase, moonrise, and moonset display.
- Two alarm settings with snooze function.
- Blue backlight.
- Battery charge indicator for main unit and sensors.
- Supports up to 3 outdoor sensors (one included).
- Table-standing design.
2. Configurare
2.1. Instalarea bateriei
The Technoline WS 6750 requires batteries for operation. Ensure you have the correct battery types as specified below.
Unitate principală:
- Deschideți capacul compartimentului bateriilor din spatele unității principale.
- Insert the required AA Mignon LR06 batteries, observing the correct polarity (+/-).
- Închideți capacul compartimentului bateriei.
Senzor exterior:

Image 2.1: Technoline Outdoor Sensor. This image displays the compact outdoor sensor unit.
- Open the battery compartment cover on the back of the outdoor sensor.
- Insert the required AAA Micro LR03 batteries, observing the correct polarity (+/-).
- Închideți capacul compartimentului bateriei.
- Important: For optimal performance and battery life, use alkaline batteries.
2.2. Initial Power-On and Sensor Pairing
After installing batteries in both the main unit and the outdoor sensor, the main unit will automatically begin searching for the radio-controlled time signal and the outdoor sensor signal.
- Place the outdoor sensor near the main unit during initial setup to facilitate pairing.
- The main unit's display will show a flashing radio tower icon (for DCF signal) and a flashing RF symbol (for sensor signal).
- Once the signals are received, the time will set automatically, and outdoor temperature/humidity will appear on the display. This process may take several minutes.
- If the outdoor sensor does not connect, press the "CHANNEL" button on the main unit to manually search for the sensor. Ensure the sensor is within range and its batteries are correctly installed.
2.3. Placement of Outdoor Sensor
For accurate outdoor readings, proper placement of the sensor is crucial.
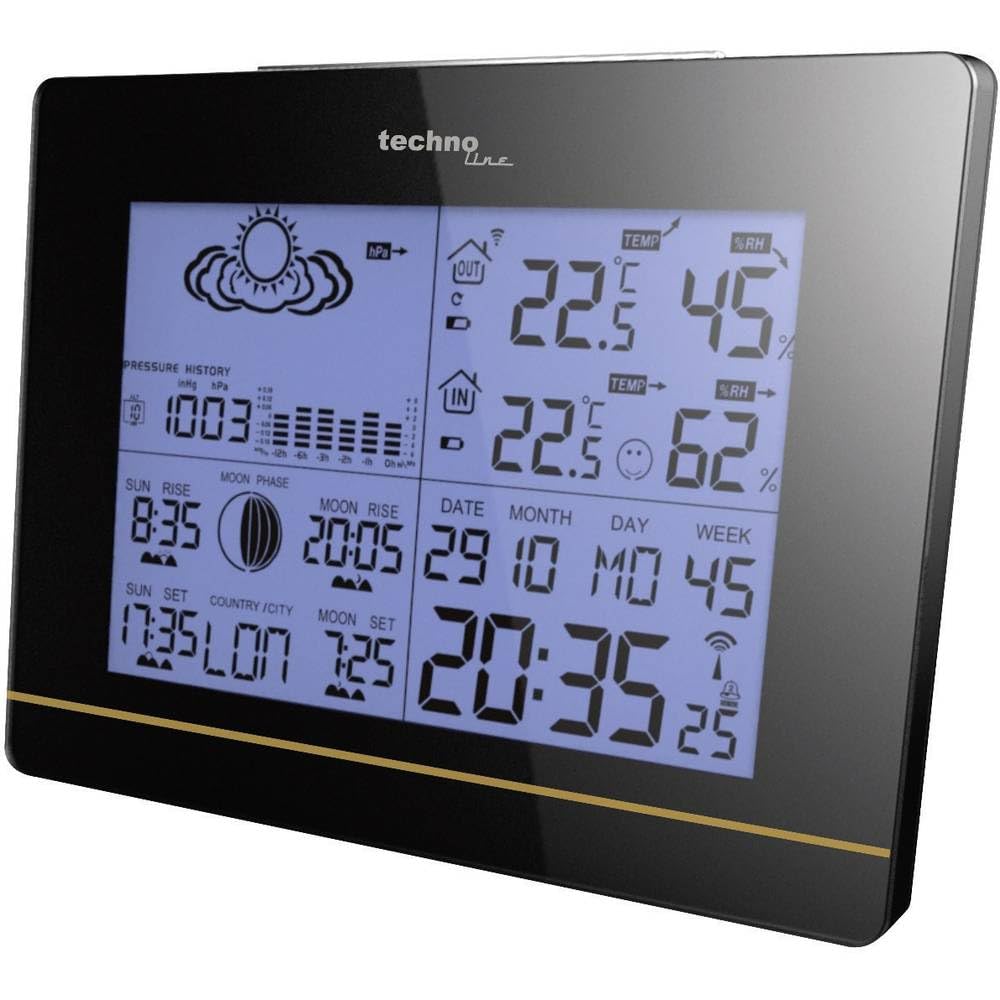
Image 2.2: Outdoor Sensor Placement. The image shows the outdoor sensor mounted on a brick wall, indicating a suitable location away from direct sunlight and rain.
- Choose a shaded location, away from direct sunlight, to prevent inaccurate temperature readings.
- Protect the sensor from direct rain and snow. While the sensor is designed for outdoor use, prolonged exposure to harsh weather can affect its lifespan and accuracy. Consider placing it under an eave or in a protective enclosure.
- Ensure the sensor is within the effective transmission range of the main unit (typically up to 30 meters in open air, less with obstacles).
- Avoid placing the sensor near large metal objects or electrical appliances that could interfere with the radio signal.
2.4. Time Zone and Manual Time Setting
If you are in a region where the DCF-77 signal is not available or if you need to adjust for a different time zone, you can manually set the time and time zone offset.
- Press and hold the "MODE" button to enter time setting mode.
- Use the "UP" or "DOWN" buttons to adjust the flashing value (e.g., time zone offset, hour, minute).
- Press "MODE" again to confirm the setting and move to the next parameter.
- The time zone offset can be set from -12 to +12 hours.
- To manually disable the DCF-77 reception, refer to the detailed instructions in the full manual (not provided here).
3. Funcționare
3.1. Afișare pesteview
The main unit's display provides a wealth of information at a glance. Key areas include:
- Ora și data: Current time (12/24h format), date, and weekday.
- Date interioare: Temperature, humidity, and comfort indicator.
- Date exterioare: Temperature and humidity from the connected sensor(s).
- Prognoza meteo: Icons indicating predicted weather conditions (sunny, cloudy, rainy, etc.).
- Presiune barometrică: Current pressure and 12-hour history graph.
- Astronomical Data: Sunrise/sunset times, moon phase, moonrise/moonset times.
- Alarme: Alarm indicators when set.
- Indicatoare baterie: Low battery warnings for main unit and sensors.
3.2. Funcții butoane
The Technoline WS 6750 features several buttons for navigation and setting adjustments:
- Mod de administrare: Enters setting modes (time, alarm, date) and confirms selections.
- SUS (▲): Increases values during settings, cycles through display modes.
- JOS (▼): Decreases values during settings, cycles through display modes.
- ISTORIE: Displays 12-hour barometric pressure history.
- CANAL: Switches between outdoor sensors (if multiple are connected) or initiates sensor search.
- SNOOZE / LUMINĂ: Activates backlight, snoozes alarm.
- RESETARE: Resets the unit to factory defaults (usually a small button requiring a pin).
3.3. Setarea alarmelor
The weather station has two independent alarms.
- Press the "MODE" button repeatedly until "AL1" or "AL2" appears on the display.
- Press and hold "MODE" to enter alarm setting mode. The hour will flash.
- Use "UP" or "DOWN" to set the desired hour. Press "MODE" to confirm.
- Set the minutes similarly. Press "MODE" to confirm and exit.
- To activate/deactivate an alarm, press "UP" or "DOWN" when "AL1" or "AL2" is displayed. An alarm icon will appear/disappear.
- When an alarm sounds, press "SNOOZE/LIGHT" to activate the snooze function (typically 5 minutes). To stop the alarm, press any other button.
3.4. MIN/MAX Temperature and Humidity
The unit records the minimum and maximum indoor/outdoor temperature and humidity values.
- Press the "UP" button repeatedly to cycle through current, maximum (MAX), and minimum (MIN) readings for temperature and humidity.
- To clear the recorded MIN/MAX values, press and hold the "UP" button while MIN or MAX values are displayed.
4. Întreținere
4.1. Înlocuirea bateriei
When the battery charge indicator appears on the display for either the main unit or a sensor, it's time to replace the batteries.
- Replace all batteries in the respective unit (main unit or sensor) at the same time with new, high-quality alkaline batteries.
- Asigurați polaritatea corectă în timpul instalării.
- After replacing batteries in the outdoor sensor, the main unit may need to re-establish connection. Press the "CHANNEL" button if the outdoor readings do not reappear automatically.
- Aruncați bateriile vechi în mod responsabil, conform reglementărilor locale.
4.2. Curatenie
- Ștergeți unitatea principală și senzorul cu o lavetă moale șiamp pânză.
- Do not use abrasive cleaners or solvents, as these can damage the display or casing.
- Ensure no water enters the battery compartments or other openings.
4.3. Outdoor Sensor Protection
The outdoor sensor is not fully waterproof. To prolong its life and ensure accurate readings, it is recommended to protect it from direct exposure to heavy rain, snow, and extreme temperatures.
- Mount the sensor under an eave, porch, or in a weather-resistant enclosure.
- Ensure adequate ventilation around the sensor for accurate temperature and humidity measurement.
5. Depanare
| Problemă | Cauza posibila | Soluţie |
|---|---|---|
| Nu apare afișaj pe unitatea principală. | Bateriile sunt descărcate sau introduse incorect. | Înlocuiți bateriile, asigurându-vă de polaritatea corectă. |
| Outdoor temperature/humidity not displayed or flashing. | Senzor în afara razei de acțiune, baterie descărcată a senzorului sau interferențe. |
|
| Ora afișată greșit. | DCF-77 signal not received or incorrect time zone setting. |
|
| Display difficult to read. | Viewing angle issue. | Reglați viewing angle of the main unit. The display is optimized for viewing slightly from above or below. |
| Citiri inexacte în exterior. | Sensor exposed to direct sunlight, rain, or heat sources. | Relocate the outdoor sensor to a shaded, protected area with good air circulation. |
If problems persist, try performing a full reset of the unit by pressing the "RESET" button (usually located in a small hole on the back, requiring a thin object like a paperclip).
6. Specificații
| Model: | WS6750 |
| Marca: | Technoline |
| Dimensiuni (unitatea principală): | 17.1 x 5 x 12.3 cm (L x l x înălțime) |
| Greutate (unitatea principală): | 335 de grame |
| Alimentare (Unitate principală): | AA Mignon LR06 batteries (not included) |
| Power (Outdoor Sensor): | AAA Micro LR03 batteries (not included) |
| Material: | Plastic |
| Conectivitate: | Radio Frequency (for sensor communication) |
| Caracteristici speciale: | Alarm, Clock, Backlight |
7. Garanție și asistență
Information regarding the product warranty is not available in the provided data. For detailed warranty terms, technical support, or to purchase additional sensors, please refer to the official Technoline website-ul sau contactați comerciantul dvs.
Always keep your purchase receipt as proof of purchase for any warranty claims.