
Introducere
This manual provides detailed instructions for the setup, operation, and maintenance of your Smartek Sunbeam Mini Portable Sewing Machine. Designed for ease of use, this compact machine is suitable for various sewing projects and quick repairs. Please read this manual thoroughly before operating the machine to ensure proper function and longevity.

Image: The Smartek Sunbeam Mini Portable Sewing Machine, shown with its comprehensive 76-piece sewing kit, foot pedal, and AC power adapter, highlighting its readiness for immediate use.
Componentele produsului
Familiarize yourself with the various parts of your sewing machine:

Image: A detailed diagram illustrating the key components of the sewing machine, including the tension adjuster, expandable spindle, presser foot, easy drop-in bobbin, flexible hand wheel, power switch, dual speed capability, power adapter port, foot pedal, and battery compartment.
- Tension Adjuster: Controls the tightness of the stitch.
- Expandable Spindle: Allows the use of regular spools of thread.
- Picioruș presor: Holds the fabric securely in place during sewing.
- Easy Drop-in Bobbin: Designed for quick and tangle-free bobbin changes.
- Flexible Hand Wheel: Provides precise control for manual stitching.
- Întrerupător: Pornește și oprește mașina.
- Dual Speed Capability: Offers both low and high-speed settings.
- Port adaptor de alimentare: Conectează adaptorul de curent alternativ.
- Pedala de picior: Controls the machine's speed and operation.
- Compartiment baterie: Holds 4 'AA' batteries for portable use (batteries not included).
Înființat
1. Sursa de alimentare
Your sewing machine can be powered in two ways:
- Adaptor CA: Connect the included AC adapter to the power adapter port on the machine and then plug it into a standard electrical outlet.
- Baterii: For portable use, insert 4 'AA' batteries (not included) into the battery compartment located at the base of the machine. Ensure correct polarity.
2. Înfilarea mașinii
The machine comes pre-threaded for immediate use. If re-threading is required:
- Upper Thread: Place a spool of thread onto the expandable spindle. Follow the threading path indicated on the machine, ensuring the thread passes through the tension adjuster and needle eye correctly.
- Bobină: The machine features an easy drop-in bobbin system. Open the bobbin cover, insert a wound bobbin, and guide the thread through the tension spring as shown in the diagram. Close the cover.

Image: A close-up of the horizontal bobbin compartment, illustrating the easy drop-in bobbin feature for quick and convenient thread changes.
3. Foot Pedal Connection
If using the foot pedal for operation, plug the foot pedal cable into the designated port on the side of the sewing machine.

Imagine: Un prim-plan view of the foot pedal, demonstrating its connection to the sewing machine, which allows for hands-free speed control.
Instrucțiuni de operare
1. Controlul puterii și al vitezei
- Pornire/Oprire: Use the power switch to turn the machine on or off.
- Viteză dublă: Select between low (L) and high (H) speed settings using the speed selector switch.
- Foot Pedal vs. Hand Switch: You can operate the machine using either the foot pedal for variable speed control or the push-button hand switch for a consistent speed.
2. Stitching
The machine offers double thread sewing for neat and straight stitches. Place your fabric under the presser foot, lower the presser foot, and begin sewing by activating the machine.
3. Reglarea tensiunii
If stitches appear too loose or too tight, adjust the tension dial located on the machine. Turn clockwise to increase tension and counter-clockwise to decrease tension until the stitches are balanced.
4. Roata de mână
For precise control, especially when starting or ending a seam, use the flexible hand wheel to manually raise or lower the needle.
Întreţinere
To ensure optimal performance and extend the life of your sewing machine, regular maintenance is recommended:
- curatenie: Curățați periodic scamele și praful din zona bobinei și din jurul plăcii acului folosind o perie mică.
- Depozitare: When not in use, store the machine in a dry, clean place.
Depanare
Dacă întâmpinați probleme cu mașina de cusut, consultați următoarele probleme și soluții comune:
| Problemă | Cauza posibila | Soluţie |
|---|---|---|
| Mașina nu pornește | No power, batteries drained, or AC adapter not connected properly. | Verificați conexiunea adaptorului de curent alternativ sau înlocuiți bateriile. |
| Cusături omise | Incorrect threading, needle bent or dull, or incorrect needle size for fabric. | Re-thread the machine, replace the needle, or use an appropriate needle. |
| Ruperea firului | Thread tension too high, poor quality thread, or incorrect threading. | Adjust tension, use good quality thread, or re-thread carefully. |
| Materialul textil nu se alimentează | Presser foot not lowered, or feed dogs obstructed. | Lower the presser foot. Clean any lint from the feed dog area. |
Specificații
Key technical specifications for the Smartek Sunbeam Mini Portable Sewing Machine:
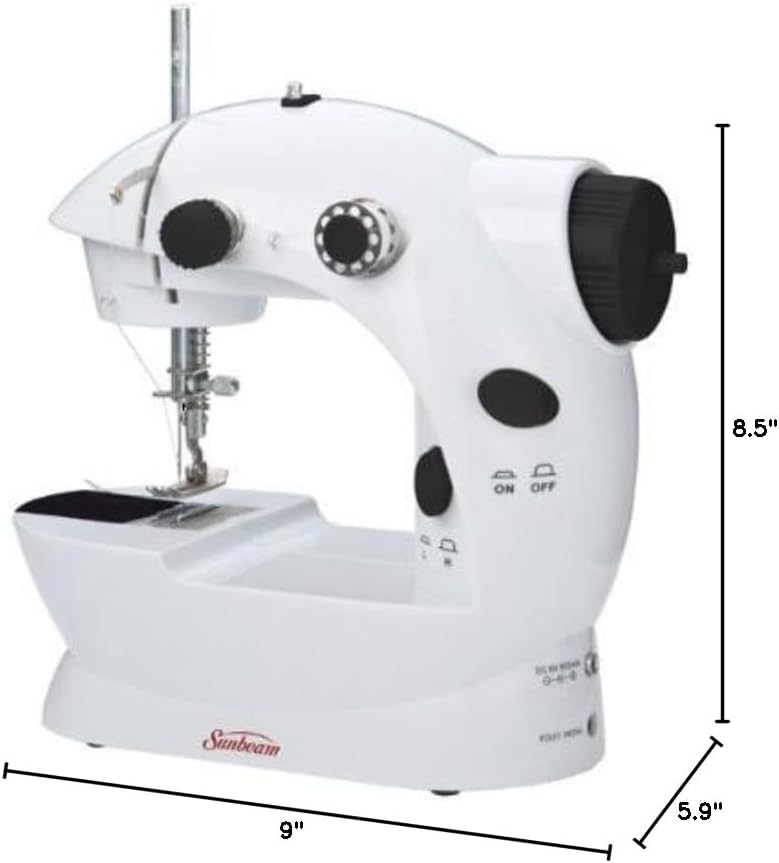
Image: A visual representation of the sewing machine's dimensions, indicating a height of 8.5 inches, width of 9 inches, and depth of 5.9 inches.
- Tip produs: Combination machine; Electronic sewing machine
- Portable/Compact Size: Yes (Built-In Carrying Handle)
- Needle Threading System: Manual
- Thread Tension Adjustment: Manual
- Sursa de alimentare: AC Adapter (included) or 4 'AA' batteries (not included)
- Tip de cusătură: Double thread, straight stitch
- Setări de viteză: Dual speed (Low/High)
- Dimensiuni (total): 8.5'' H x 9'' W x 5.9'' D
- Greutate produs: Aproximativ 3 lb.
- Producător: Smartek
- Număr de model: B00AM7HDWY
- UPC: 892013000289
Informații despre garanție
Producătorul oferă o 6 luni garantie pentru acest produs. Vă rugăm să păstrați dovada achiziției pentru orice reclamații în garanție.
Sprijin
For further assistance or inquiries regarding your Smartek Sunbeam Mini Portable Sewing Machine, please contact Smartek customer support.