
1. Introducere
This manual provides detailed instructions for the installation, operation, and maintenance of your PHONOCAR VM016 DAB+ Bluetooth Car Radio. Please read this manual thoroughly before using the product to ensure correct operation and to prevent damage. Keep this manual for future reference.
2. Informații de siguranță
- Ensure the vehicle's ignition is off and the negative battery terminal is disconnected before installation to prevent electrical shorts.
- Connect the unit only to a 12V or 24V DC power supply with a negative ground.
- Do not disassemble or modify the unit. This may cause electric shock, fire, or other malfunctions.
- Avoid installing the unit in locations where it would obstruct the driver's view sau interferează cu funcționarea vehiculului.
- Protect the unit from direct sunlight, excessive heat, humidity, and dust.
- Always use the correct fuse rating as specified.
3. Produs terminatview
The PHONOCAR VM016 is a versatile car radio designed for 12V and 24V vehicles, offering a range of audio playback options including DAB+ digital radio, FM radio, Bluetooth connectivity, USB, SD card, and AUX-IN. It features a detachable front panel for security and an amplified output of 4x30 Watts.

Figura 3.1: Față view of the PHONOCAR VM016 Car Radio.
Caracteristici cheie:
- Receptor DAB+: Bucurați-vă de emisiuni radio digitale de înaltă calitate.
- Bluetooth A2DP: Wireless audio streaming and hands-free calling.
- USB & SD/MMC Card Slot: Redați MP3 files from external storage (up to 16 GB for SD).
- AUX-IN față: Conectați dispozitive audio externe printr-o mufă de 3.5 mm.
- Detachable Front Panel: Enhanced security feature.
- Encoder Volume Control: Intuitive volume adjustment.
- Automatic Memory Preset: Stores radio stations automatically.
- RDS System: Radio Data System for FM broadcasts.
- 27 FM Preset Stations: Quick access to your favorite FM stations.
- Last Position Memory: Resumes playback from where it left off.
- Amplified Output: 4 x 30 Watt for clear audio.
- 12V-24V Power: Compatible with both standard car and truck electrical systems.
- AmpAntena iluminata: Included for improved reception.
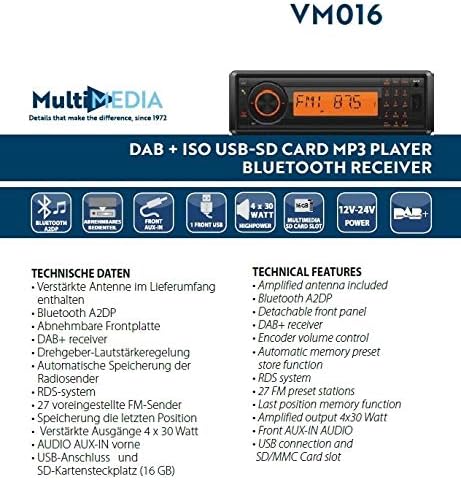
Figure 3.2: Diagram illustrating the technical features and connections of the PHONOCAR VM016.
4. Instalare
4.1 Verificare înainte de instalare
- Verify that your vehicle's electrical system is 12V or 24V DC with a negative ground.
- Ensure you have all necessary tools and accessories for installation.
4.2 Conexiuni de cablare
The unit uses standard ISO connectors for power and speaker connections. Refer to your vehicle's wiring diagram for specific connections if not using standard ISO.
- Conexiune de alimentare: Connect the yellow wire to the constant 12V/24V supply, the red wire to the accessory (switched) 12V/24V supply, and the black wire to a good chassis ground.
- Conexiuni difuzoare: Connect the speaker wires according to their polarity (positive and negative) to the corresponding vehicle speakers. Ensure no speaker wires are shorted to each other or to the vehicle chassis.
- Conexiune antenă: Conectați amplified DAB+/FM antenna (included) to the antenna input on the rear of the unit. Ensure proper placement of the antenna for optimal reception.
4.3 Montare
Insert the unit into the DIN-sized opening in your vehicle's dashboard. Secure it using the provided mounting sleeve and brackets. Ensure the unit is firmly seated to prevent movement during driving.
5. Instrucțiuni de utilizare
5.1 Controale de bază
- Pornire/Oprire: Apăsați tasta PUTERE butonul pentru a porni sau opri unitatea.
- Controlul volumului: Rotiți MÂNECA CODATORULUI (main rotary knob) to adjust the volume level.
- Selectarea modului: Apăsați tasta MOD button to cycle through available sources: DAB+, FM, Bluetooth, USB, SD, AUX-IN.
5.2 Operarea radioului (DAB+ / FM)
- Selecție de trupă: În modul radio, apăsați tasta BANDĂ button to switch between DAB+ and FM bands.
- Scanare automată: Țineți apăsat butonul SCANĂ button to automatically search for and store available stations.
- Reglare manuală: Utilizați TUNE +/- butoane pentru reglarea manuală a frecvenței.
- Posturi presetate: Use the numeric buttons (1-6) to select stored preset stations. To store a station, tune to the desired frequency, then press and hold a numeric button until you hear a confirmation beep.
- RDS System (FM): When available, the Radio Data System will display station information such as program type and station name.
5.3 Funcționare Bluetooth
- Asociere: Select Bluetooth mode. On your mobile device, search for Bluetooth devices and select "PHONOCAR VM016". Enter "0000" if a PIN is required. Once paired, the Bluetooth icon will illuminate.
- Transmisie audio (A2DP): Play audio from your paired device. Use the unit's controls or your device to manage playback (play/pause, skip tracks).
- Apeluri fără mâini: Când primește un apel, unitatea va afișa ID-ul apelantului. Apăsați butonul APEL button to answer, and press it again to end the call.
5.4 Media Playback (USB, SD Card, AUX-IN)
- Card USB/SD: Insert a USB drive or SD card into the respective slot. The unit will automatically switch to USB/SD mode and begin playing compatible MP3 files. Folosește SARE butoane pentru a naviga pe trasee.
- AUX-IN: Connect an external audio device (e.g., MP3 player, smartphone) to the front AUX-IN jack using a 3.5mm audio cable. Select AUX-IN mode to listen to audio from the connected device.
5.5 Detachable Front Panel
To remove the front panel, press the ELIBERARE button. Gently pull the panel away from the main unit. To reattach, align the panel with the main unit and push until it clicks into place.
6. Întreținere
- curatenie: Folosiți o cârpă moale și uscată pentru a curăța suprafața unității. Pentru murdăria persistentă,ampen the cloth with a small amount of mild detergent. Do not use abrasive cleaners or solvents.
- Front Panel Care: Handle the detachable front panel with care. Avoid touching the contacts on the back of the panel. Store it in the provided case when removed.
- Înlocuirea siguranței: If the unit does not power on, check the fuse. Replace it with a fuse of the same rating only.
7. Depanare
- Fără putere: Check the power connections (yellow, red, black wires) and the fuse. Ensure the vehicle's ignition is on if connected to a switched power source.
- Fără sunet: Check speaker connections. Ensure the volume is not at minimum and the MUTE function is not active. Verify the correct audio source is selected.
- Recepție radio slabă: Check the antenna connection. Ensure the amplified antenna is properly installed and positioned. Try performing an automatic scan again.
- Probleme de conexiune Bluetooth: Ensure Bluetooth is enabled on your mobile device and the unit is in Bluetooth mode. Delete previous pairings and try pairing again.
- Erori de redare USB/SD: Ensure the USB drive or SD card is formatted correctly (FAT32) and contains compatible MP3 files. Check for file corruption. The maximum supported SD card size is 16 GB.
8. Specificații
| Caracteristică | Caietul de sarcini |
|---|---|
| Numărul de model | VM016 |
| Alimentare electrică | 12V - 24V DC (Negative Ground) |
| Putere de ieșire audio | 4 x 30 wați |
| Conectivitate | Bluetooth (A2DP), USB, SD/MMC Card, Front AUX-IN |
| Tuner radio | DAB+, FM (cu RDS) |
| Presetări FM | 27 statii |
| Media acceptate | MP3 (prin USB/SD) |
| Capacitate card SD | Până la 16 GB |
| Caracteristici speciale | Detachable Front Panel, Last Position Memory, Amplified Antenna Included |
| Culoare | Negru |
9. Garanție și asistență
For warranty information and technical support, please refer to the documentation provided with your purchase or contact your authorized PHONOCAR dealer. Keep your proof of purchase for warranty claims.


