
1. Introducere și Pesteview
The Sper Scientific 840020 Light Meter is designed for accurate and stable measurement of visible light levels. It provides fast response and displays results on an extra-large LCD with a bar graph. This meter is capable of reading LED light sources and features a color and cosine corrected sensor that meets C.I.E. photopic spectrum standards.
Key features include RS232 computer output, Min/Max recording, auto power-off, external zero adjustment, and a hold function. The unit comes with a detachable sensor for convenience and includes a soft padded case with a shoulder strap.

Figure 1: Sper Scientific 840020 Light Meter with its detachable sensor unit.
2. Configurare
2.1 Instalarea bateriei
- Localizați capacul compartimentului bateriilor pe spatele contorului.
- Glisați sau desfaceți capacul pentru a-l deschide.
- Introduceți o baterie de 9V, asigurându-vă că polaritatea este corectă (+/-).
- Puneți bine capacul compartimentului bateriei.
2.2 Conexiune senzor
The light meter utilizes a detachable sensor for flexible positioning and measurement. The sensor connects to the main unit via a 44-inch cord.
- Locate the 'PROBE INPUT' port on the top end of the meter.
- Align the connector of the detachable sensor cord with the input port.
- Gently push the connector into the port until it is firmly seated.
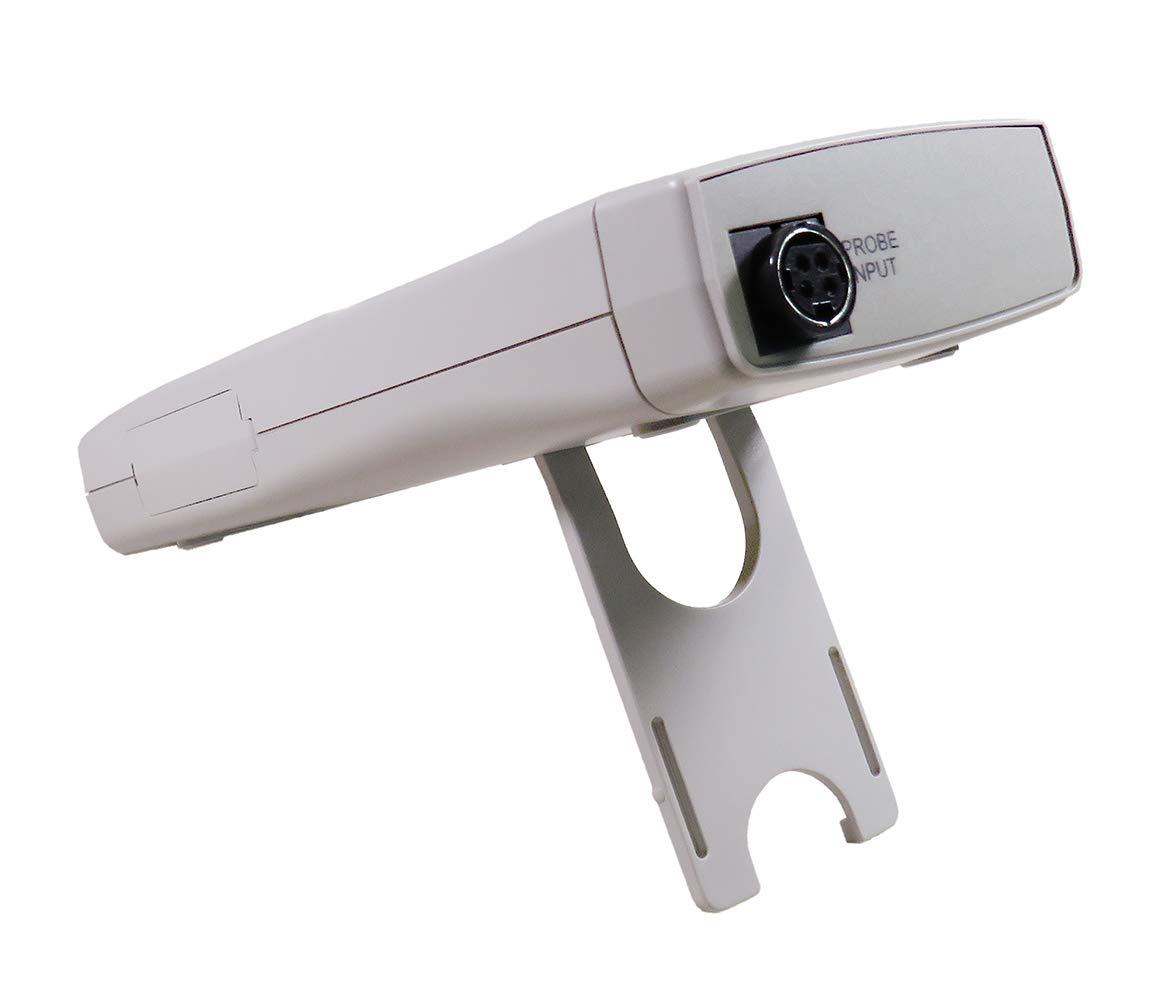
Figura 2: Spate view of the meter, highlighting the probe input connection.
2.3 Pornirea inițială
After battery and sensor installation, press the PUTERE button to turn on the device. The LCD will illuminate and display the current light reading.
3. Instrucțiuni de utilizare
3.1 Pornire/Oprire
- Apăsați tasta PUTERE pentru a porni contorul.
- Apăsați tasta PUTERE button again to turn the meter off. The meter also features an auto power-off function to conserve battery life.
3.2 Lux / Foot-Candle Selection
- Apăsați tasta LUX/FC button to toggle between Lux and Foot-Candle measurement units. The selected unit will be indicated on the LCD.
3.3 Selectarea intervalului
- Apăsați tasta GAMA button to cycle through available measurement ranges. Select a range appropriate for the light intensity being measured to ensure accuracy.
3.4 Funcția Hold
- Apăsați tasta ȚINE button to freeze the current reading on the display.
- Presa ȚINE again to release the reading and resume live measurement.
3.5 Min/Max Recording
- Apăsați tasta REC/MAX/MIN button once to enter recording mode. The 'REC' indicator will appear.
- Presa REC/MAX/MIN again to display the maximum recorded value ('MAX').
- Presa REC/MAX/MIN a third time to display the minimum recorded value ('MIN').
- Apăsați și mențineți apăsat REC/MAX/MIN to exit recording mode.
3.6 External Zero Adjustment
- To perform an external zero adjustment, ensure the sensor is covered or placed in complete darkness.
- Apăsați tasta ZERO button. The display should read zero. This calibrates the meter for accurate low-light measurements.
3.7 RS232 Computer Output
The meter is equipped with an RS232 output port for connecting to a computer for data logging and analysis. A compatible RS232 cable and software (not included) are required.
- Locate the RS232 output port on the side of the meter, typically covered by a protective flap.
- Open the flap and connect the RS232 cable.
- Refer to the software's instructions for data transfer and configuration.

Figura 3: Prim-plan view of the RS232 output port with its protective cover open.
3.8 Montarea trepiedului
The meter includes a tripod back for stable, hands-free operation. Attach the meter to a standard photographic tripod using the integrated mounting point.
4. Întreținere
4.1 Curățare
- Wipe the meter and sensor with a soft, dry cloth.
- Nu utilizați agenți de curățare abrazivi sau solvenți, deoarece aceștia pot deteriora casing or sensor.
4.2 Înlocuirea bateriei
- When the low battery indicator appears on the LCD, replace the 9V battery as described in Section 2.1.
- Remove the battery if the meter will not be used for an extended period to prevent leakage.
4.3 Îngrijirea senzorului
- Keep the sensor clean and free from dust or debris, as this can affect measurement accuracy.
- Use the provided sensor cover when the meter is not in use to protect the sensor element.
4.4 Depozitare
- Store the meter in its soft padded case to protect it from physical damage.
- Store in a cool, dry environment, away from direct sunlight and extreme temperatures.
5. Depanare
- Nu se afișează / Aparatul de măsură nu pornește:
Check battery installation and ensure the 9V battery has sufficient charge. Replace if necessary. - Citiri inexacte:
Ensure the sensor is clean and unobstructed. Perform an external zero adjustment (Section 3.6). Verify the correct measurement unit (Lux/FC) and range are selected. - "OVER RANGE" Indication:
The light intensity exceeds the current measurement range. Press the GAMA button to select a higher range. - "LOW BATTERY" Indication:
The 9V battery needs to be replaced. Refer to Section 4.2 for battery replacement instructions. - RS232 Communication Issues:
Ensure the RS232 cable is securely connected to both the meter and the computer. Verify that the correct software and driver are installed and configured properly on the computer.
6. Specificații
The following table outlines the technical specifications for the Sper Scientific 840020 Light Meter:

Figure 4: Detailed specifications for Lux and Foot-Candle measurements.
| Caracteristică | Caietul de sarcini |
|---|---|
| Numărul de model | 840020 |
| Unități de măsură | Lux, Foot-Candle (FC) |
| Range (Lux) | Up to 400,000 Lux |
| Range (Foot-Candle) | Up to 40,000 FC |
| Rezoluție (Lux) | 0.01 / 1 Lux (depending on range) |
| Resolution (FC) | 0.001 / 1 FC (depending on range) |
| Precizie | ±(3% + 0.5% FS) |
| Tip senzor | Color and Cosine Corrected, meets C.I.E. photopic spectrum |
| Afişa | Extra large LCD (1½" high, 38.1 mm) with bar graph |
| Ieșire | RS232 computer output |
| Sursa de alimentare | baterie de 9V |
| Dimensiuni | 7¾" × 2¾" × 1¼" (197 × 70 × 32 mm) |
| Greutate | 10 oz (283 g) |
| Accesorii incluse | 9V battery, instructions, soft padded case with shoulder strap, detachable sensor with 44" cord and cover |
7. Garanție și asistență
7.1 Calibration Certificate
A N.I.S.T. traceable certificate of calibration is available for the Sper Scientific 840020 Light Meter, ensuring its accuracy and compliance with national standards.
7.2 Suport tehnic
For technical assistance, troubleshooting beyond this manual, or inquiries regarding warranty service, please contact Sper Scientific customer support. Refer to the product packaging or the official Sper Scientific website pentru informații de contact actuale.